Cloud printing simplifies the printing of receipts, dockets and tickets to specific printers over a network connection through the web browser, eliminating the need for printer drivers or other installs. Additionally, it offers real-time monitoring for easy printer management. This guide outlines the three key steps for configuring your printers for cloud printing:
Set unique, static IP addresses for each printer.
Enable ePOS settings for each printer.
Generate a SSL certificate from each printer, export it, then import it on each POS device you want a printer to connect with.
The ROLLER support team does not provide help with printer settings and hardware connectivity. Reach out to your IT support staff for help with troubleshooting these issues.
Preparation
Cloud printing is available on all plans for customers using ROLLER Payments.
Make sure you have the following prepared to configure your printers.
1. Printers and connectivity
Cloud printing supports the following Epson ePOS receipt printer models:
EPSON TM-m30II (Ethernet): Built for easy connectivity with tablets.
EPSON TM-M30III (Ethernet): Built to support both retail and hospitality environments. Due to the compact design it’s a good choice for businesses with limited counter space.
EPSON TM-T88VII (Ethernet): Built to support both retail and hospitality environments.
EPSON TM-T82III (Ethernet): Built to support venues with a low volume of POS transactions.
EPSON TM-U220IIB (Ethernet): Built to withstand high-temperature environments (eg kitchens).
These ePOS printers must be connected to the local area network via Ethernet or WiFi. You cannot connect your printers via USB, only Ethernet or WiFi connections will work.
We recommend that you buy more than one printer if you're printing production dockets. Two or more printers are better able to handle the printing load.
Additional items to purchase separately:
If connecting via Ethernet, make sure you have an Ethernet cable for each printer.
If connecting via WiFi, make sure you have a WiFi dongle for your receipt printer model from Epson.
Printer receipt paper (80 MM).
You can also purchase a printer mount for the wall if you don't want your printers to sit on a bench in your food and beverage areas.
You should also check that your venue has enough Ethernet ports to support the number of printers you would like to connect. If not, you may also have to purchase an ethernet port power outlet.
Cloud printing does not currently support the printing of sticker tickets or wristbands. If your venue uses sticker printers or wristband printers, you can use ROLLER Connect alongside cloud printing.
2. EpsonNet Config utility installed on POS device
Install the EpsonNet Config utility on your POS device/s. This is a tool to help you configure your printers correctly for cloud printing over the local network.
You can install the utility on one of your POS devices and use it to configure all printers in your venue.
Download the EpsonNet Config (for Windows OS) zip file to a physical POS device/s connected to the same network as your Epson printer/s.
Locate and extract the zip file (usually in your Downloads folder). Double-click the .exe file.
Follow the instructions to install the software.
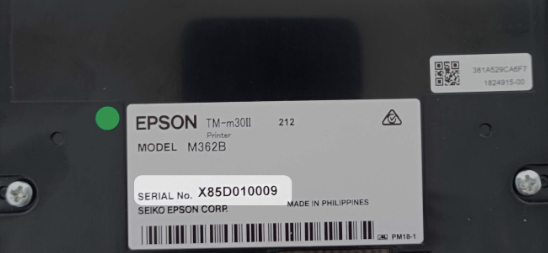
3. Take note of the printer serial numbers to use as a password
Take the back cover off the printer and note down the serial number for each of your printers. You'll need this when asked for a user name and password when configuring each printer's settings.
The user name is epson.
The password is the printer's serial number (unless it's been changed from the default). It's found on a white sticker under the back cover of the printer.
The setup process
Connect the printers for cloud printing to the local area network.
Set unique, static IP addresses for each printer.
Enable ePOS settings for each printer.
Generate a SSL certificate from each printer, export it, then import it on each POS device you want a printer to connect with.
Perform test prints from the associated print stations created in Venue Manager.
Read on for the detailed instructions. While the web page for configuring each printer model varies from model to model, the process remains the same. The instructions and videos in this section relate to the EPSON TM-m30II and are using a Chrome browser.
Connect your printers to the network
To connect your printers to the local area network, you have two options: Ethernet or WiFi (USB is not supported).
The printers must be connected to the same network as your physical POS device.
While WiFi is available, it's recommended to connect via Ethernet as this provides a more stable connection.
If you choose to connect via WiFi, make sure that the printer is placed in an area with a strong signal. You'll also need to purchase a WiFi dongle for the printer model.
For detailed instructions on setting up your printer and making sure it's connected to the network, consult the user manual that came with your specific printer model.
If you need further help with network connectivity, reach out to your IT support staff. The ROLLER support team does not provide help with troubleshooting hardware connectivity issues.
Step 1: Set static printer IP addresses
Set the printer's IP address to be static (fixed).
To do this, you'll require the EpsonNet Config utility installed on a physical POS device computer (see Requirements section above).
Turn your printer on. When you turn your printer on, it may automatically print a production docket (if there's paper in the printer). This production docket may contain the printer's IP address, which you can use if you have to manually input your printers IP address.
Connect the printer to the same network as your physical POS devices using an Ethernet cable or WiFi.
Launch the EpsonNet Config utility from a POS device computer. You can usually find it in the Windows Start menu or by searching for EpsonNet Config.
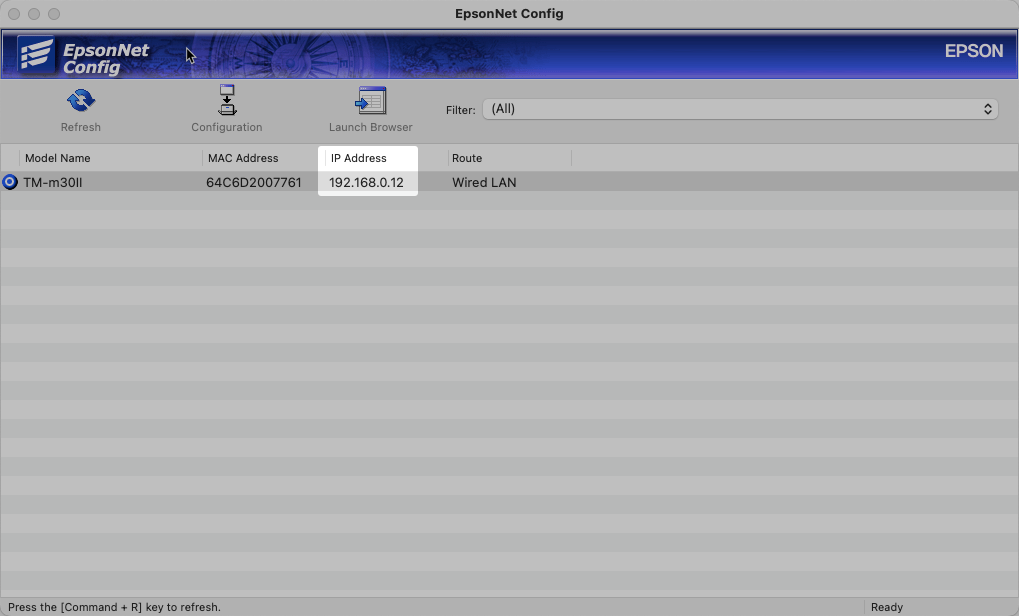
In the utility, select Refresh to discover the printer on the network.
After a few moments, the utility lists any Epson printers connected to the same network as your POS device.
If nothing appears, make sure your printer is turned on and connected to the network.
If you're unable to discover your printers, contact your IT/Network specialist for further troubleshooting.
An IP address is automatically assigned by the router and you’ll see it identified in the list.
To make the IP address static, change the method for specifying an IP address from Automatic to Manual:
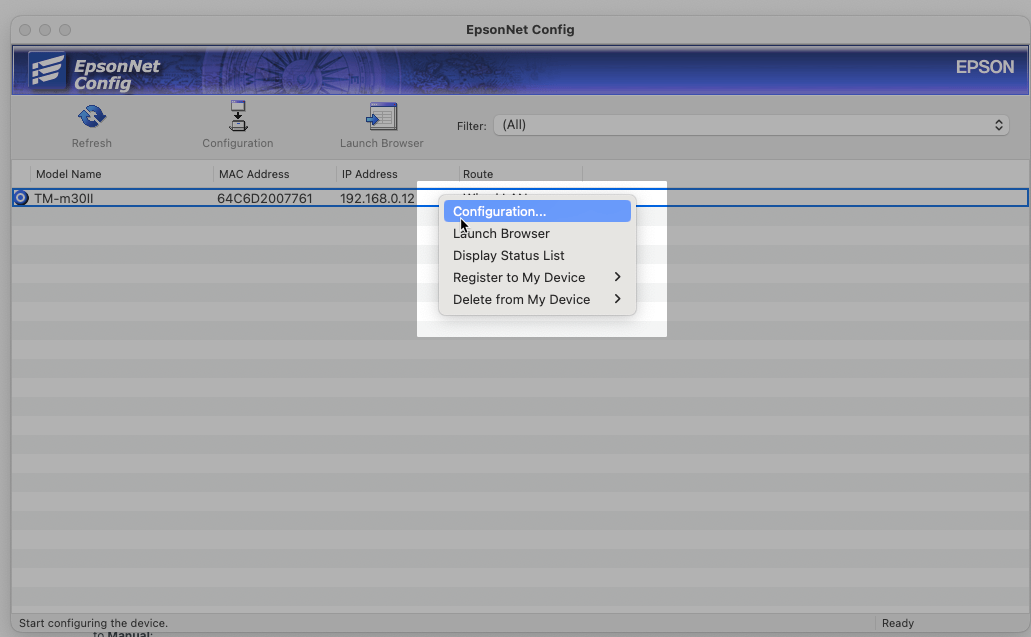
Right-click the target printer and select Configuration.
In the configuration window, from the left-side menu, go to TCP/IP > Basic.
By default Automatic is selected as the method for specifying the printer IP address. Select Manual to make the printer IP address static.
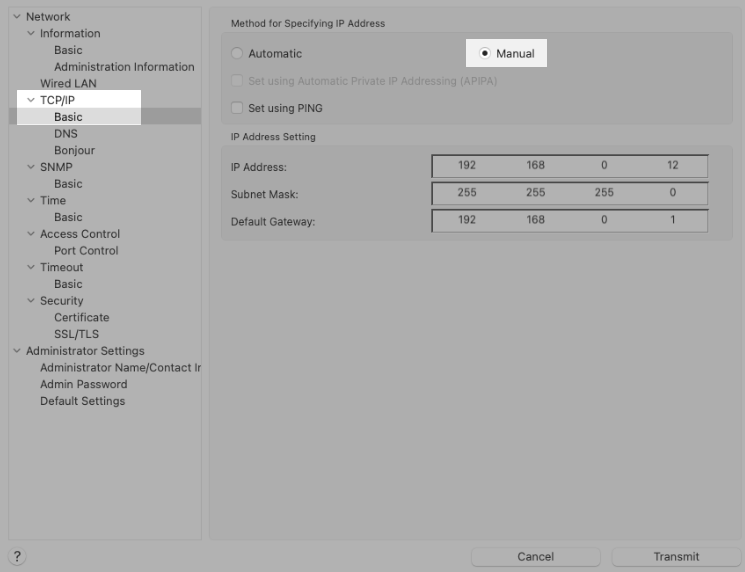
Select Transmit at the bottom right to update the printer's settings. Once the process is complete, you’ll return to the printer list.
Select Refresh again to populate the list.
Record the static IP address to use when generating a SSL certificate (see section below) and to enter it into its print station in Venue Manager.
Watch the video to see how.
What if no IP address is automatically assigned by the router?
In the EpsonConfig utility printer list, right-click the target printer and select Configuration.
Select Transmit to assign a printer IP address. Once the process is complete, you’ll return to the printer list.
Select Refresh to update the printer list. An IP address should appear in the list.
Then continue with the steps above to change the method of specifying the address from Automatic to Manual.
In some cases, you might have to manually input the printer's IP address. Consult with your IT staff to make sure you have accurate details for the IP address.
Step 2: Enable ePOS for each printer
Make sure that ePOS is enabled for each printer by configuring it through the printer's web configuration page. If you don't complete this step, the printer won't connect.
Keep in mind that the interface and buttons for the printer’s web configuration page varies from printer model to model. While the instructions and videos in this section relate to the EPSON TM-m30II, the process is the same.
In the Epson Config utility, select Refresh to see all printers connected to the network.
Right-click your target printer and select Launch browser. Select OK in the pop-up message.
The printer’s web configuration page opens in a new browser tab.
The first time you do this in Google Chrome, you'll get the message: Your connection is not private.
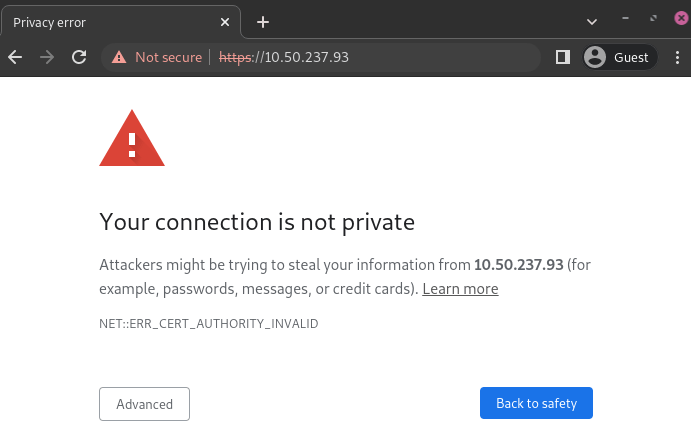 This is because a SSL certificate hasn't been set up yet (you'll do this in the next section). Ignore this message for now, and complete the steps below.
 Select the Advanced button on the page.
Select the link to the printer’s IP address to go to the printer’s web configuration page.
If asked to sign in, use epson as the username and your printer’s serial number as the password (found on a white sticker under the back cover of each printer).
From the printer's web page menu, go to ePOS-Print.
For the ePOS-Print setting, make sure Enable is selected.
Select Send to update the setting for the printer. Your printer will restart.
From the navigation menu, select ePOS-Device.
For the ePOS-Device setting, make sure Enable is selected.
Select Send to update the setting for the printer. Your printer will restart.
Watch the video to see how.
To enable ePOS printing on a TM-T88VII printer model, you do not need to launch the browser. You can enable ePOS printing from within the EpsonNet Config utility. From the left-hand menu, select ePOS-Device and then select the checkbox for Enable ePOS-Device.
Step 3: Generate, export and import SSL certificates
Epson ePOS printers require SSL certificates to establish secure connections with each POS device through the web browser.
An SSL certificate is a digital certificate that allows your devices (printers and POS, in this case) to communicate securely over the network. Without the certificate, the connection between your POS devices and printers is not secure and for security reasons they won't communicate until the certificate is in place.
You'll need to generate a SSL certificate from a printer's web configuration page, export it, then import it to the correct certificate folder on each POS device you want a printer to connect with. Each printer needs its own generated SSL certificate.
To do this, you'll need Windows administrator privileges for the POS computer. This ensures you can install the SSL certificates in the correct folder.
Keep in mind that the appearance and buttons on the printer's web configuration page may vary depending on the printer model. However, the process remains the same. The detailed instructions & videos shown here relate to the EPSON TM-m30II.
Generate the SSL certificate
Generate an SSL certificate for each printer. Ensure it includes the printer's static IP address.
In the Epson Config utility window, select Refresh.
Right-click your target printer and select Launch browser. Select OK in the pop-up warning message.
If asked to sign in again, use "epson" as the username and your printer’s serial number as the password (found under the back cover of the printer).
From the printer’s web configuration home page, go to Network > Security > SSL.
For a Self-signed certificate, select Create.
In the Common name field, enter the static IP address you've fixed for the printer in the section above. It must be the exact same static printer IP address.
For Certificate Validity, select a long expiry (10 years).
Select Next > OK.
Wait for the SSL certificate to generate on the page.
Sometimes the web configuration page may timeout while the SSL certificate generates from the printer. In this case, refresh the browser and the SSL certificate will still have generated. You may also have to clear your cache and restart your browser.
Watch the video to see how.
Generate the SSL certificate for a TM-T88VII Epson printer model
Watch the video below to see how to generate an SSL certificate for the TM-T88VII Epson printer model.
Export the SSL certificate
Complete the following steps to export the SSL certificate generated from each printer. The steps outlined here use the Chrome browser. Other browsers can have different labelling.
From the printer’s web configuration page, select Not secure in the address bar.
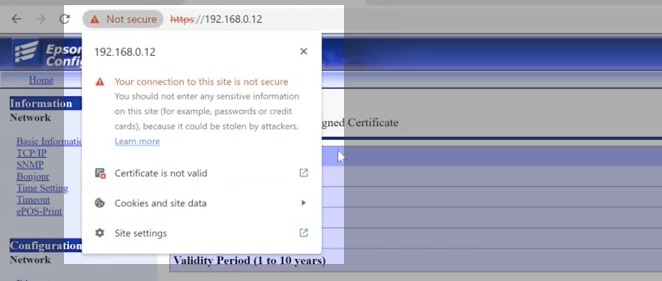
Select Certificate is not valid from the drop-down menu.
The Certificate viewer window opens.
Select the Details tab.
Select Export.
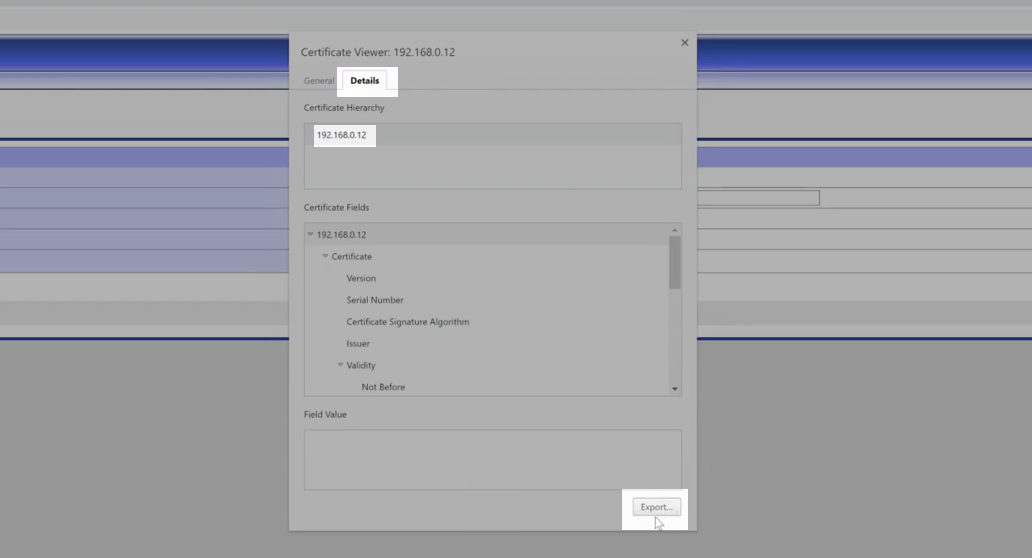
Save to your POS device computer in a place you can easily find it again (eg desktop).
Watch the video to see how.
Import the SSL certificate on each POS device
Import the SSL certificate on each POS device that needs to connect to the printer.
You'll need Windows administrator privileges to the POS computer for this step.
Make sure the "Local Machine" root certificate is selected during installation.
Follow these steps:
From the Windows taskbar for a POS device, search for Manage computer certificates.
The Certificates - Local Computer folder opens for your computer.
Go to Trusted Root Certification Authorities > Certificates.
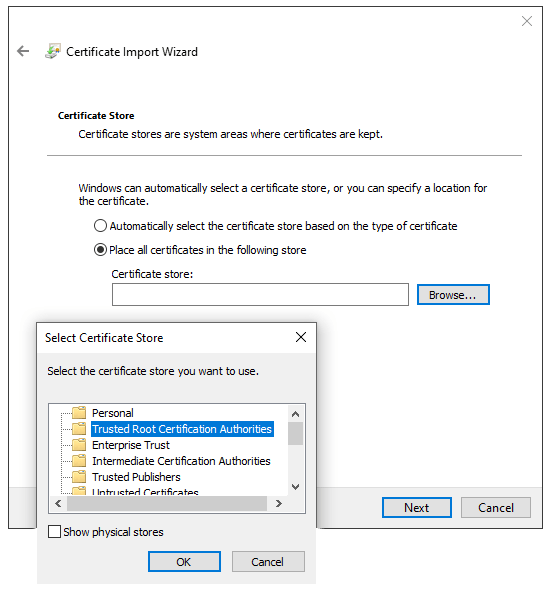
Right click Certificates folder and select Import.
The Certificate Import Wizard opens.
You must make sure Local Machine is selected for the root certificate store. Select Next.
Browse for and select the certificate file saved to your desktop. Select Next.
Select Next to import into the Trusted Root Certificates Authorities store.
Select Finish. The certificate imports to your computer and is successfully installed.
Clear your cache, then close and reopen your browser. If you don't complete this step, Chrome caching issues may cause the certificate to be invalid.
Watch the video to see how.
To check the connection is trusted and the certificate is valid:
Close and reopen the web browser.
From the EpsonNet Config utility, select the printer, then select Launch browser. The Chrome secure icon in the printer's web page address bar indicates the connection is trusted.

Alternatively type in the printer's static IP address after https:// in the address bar to check the secure icon appears.
If the secure icon isn't showing after closing and reopening your browser, restart your POS system computer. This should fix the problem.
Complete a test print
Once a printer is configured, enter its static IP address into its print station in Venue Manager, then complete a test print. Follow these steps:
From Venue Manager, go to Settings > Devices.
Create a new print station for the printer or select one you’ve already created.
Enter the static IP address in the IP field.
Select Test print.
Connected: Printer is ready to use. A test sheet also prints from the connected printer.
Not connected: Cannot connect to printer. Check IP address. This means that the setup is not correct.
Not connected: Incorrect IP address format. Please review. This means your IP address doesn’t follow the expected format.
Read on for troubleshooting steps if your printer’s static IP address does not connect.
Once the static printer IP address is entered in its print station in Venue Manager, make sure it remains unchanged. The printer’s IP address must remain the same in all three places: the printer, the print station and the SSL certificate.
If the printer's IP address changes, you can manually update both the printer's IP address and the IP address in its print station to match the SSL certificate settings to avoid the need for a new SSL certificate generation and import.
Troubleshoot test print error messages
If you encounter issues:
Ensure the printer is on and connected to the network.
Clear the browser cache on the POS device, quit the browser window, then restart.
Verify that you've completed all the steps in this guide correctly.
Double-check the IP address consistency between the printer, print station, and SSL certificate.
Make sure you've imported the latest version of the SSL certificate to the POS device.
For detailed troubleshooting, refer to the guide Troubleshoot an unsuccessful test print from a print station.
Review before enabling cloud printing
After configuring printers, creating print stations and successfully testing prints in Venue Manager, remember to review the following before activating cloud printing at POS.
Enable cloud printing at POS
Once you’ve successfully completed the requirements listed above, you’re ready to enable printing at POS. Follow the steps below.
From Venue Manager, go to Settings > Devices.
Above your list of printers, there’ll be a banner prompting you to enable your print stations at POS. Select Switch to print stations.
A checklist will appear, asking you to confirm you’ve completed the required steps to print at POS. Select each checkbox and then select Switch to print stations.
To check that your print stations have successfully linked to your POS devices, follow the steps below.
From POS, go to More > Settings > Print stations.
You should see a list of all connected print stations with their print status.
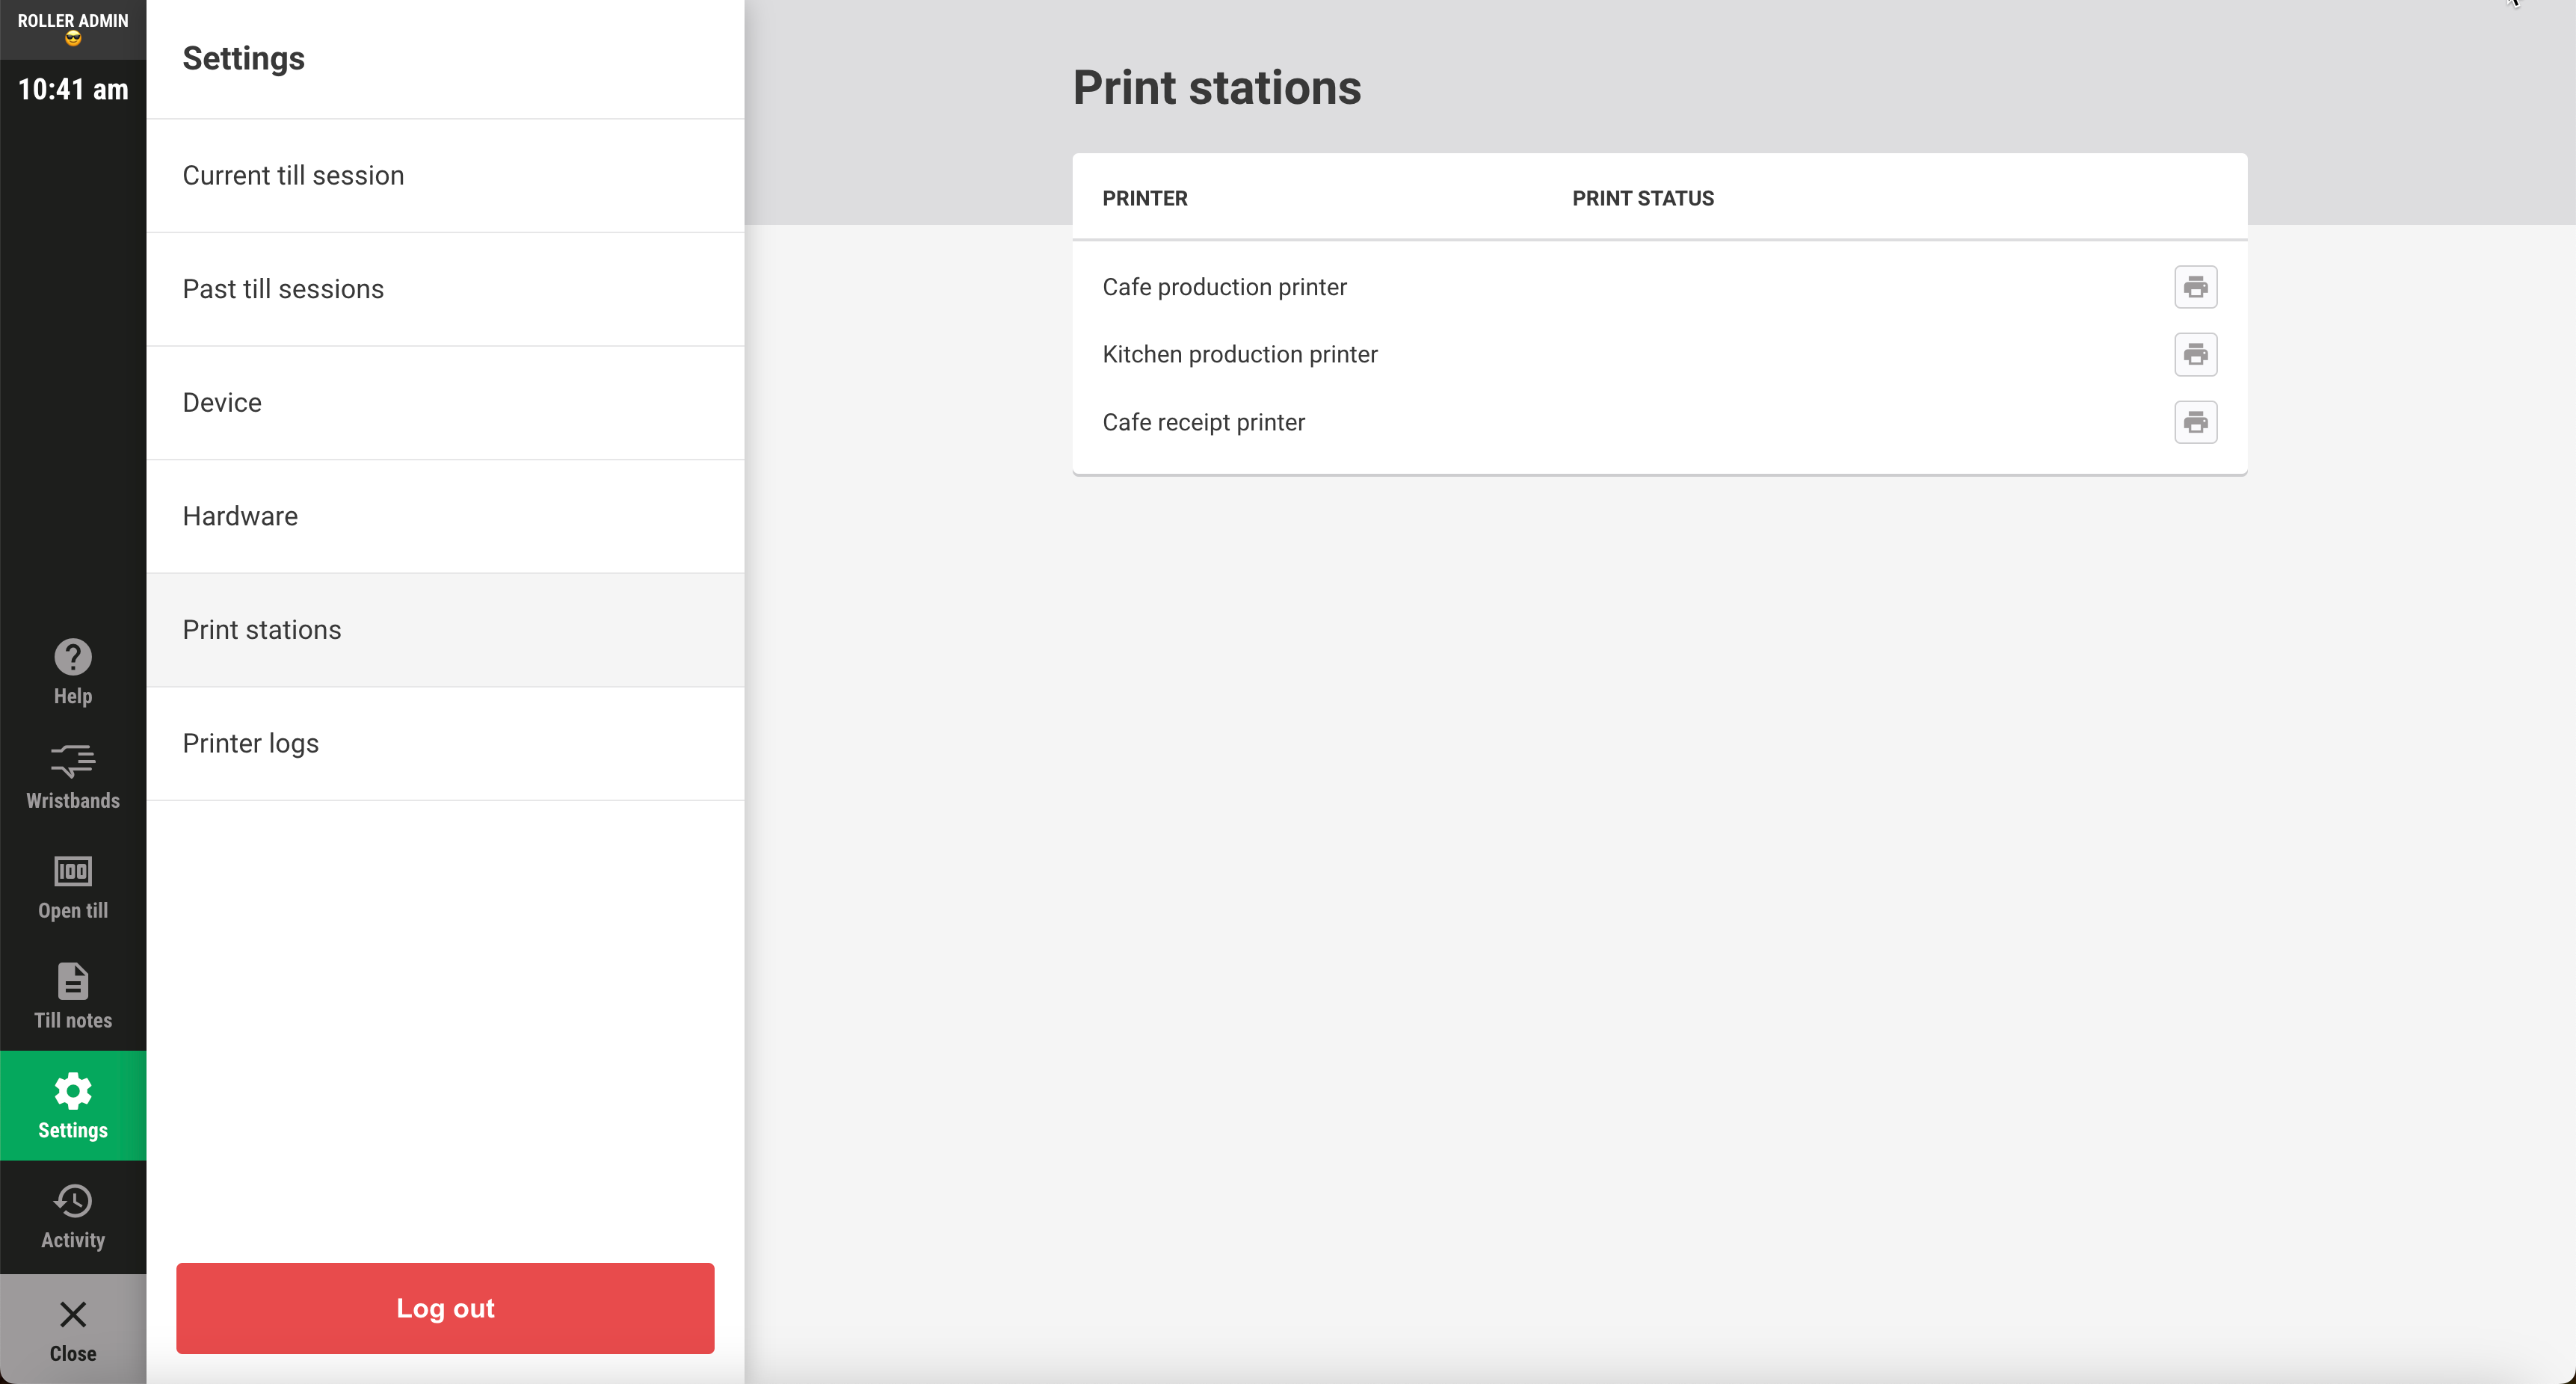
If you don’t see any print stations, refresh the page and they should appear.
Once this is done, we recommend that you run a few test prints from POS to ensure that printing is working as expected.