This article walks you through setting up your race track in ROLLER Karting. You'll register each timing loop at your track, connect the decoder hardware that reads the transponders, and create one or more courses that combine the loops into a complete track layout. With all three in place, your race track is ready to host races.
About this setup
There are three connected pieces, and you'll build them in this order:
Loops are placeholders for the physical timing loops embedded in your track. The most basic course needs one (the start-finish line). More advanced courses might add a pit-exit loop for auto-assignments and one or more sector loops for sector timing or safety.
Timing sources are the decoder hardware that physically reads transponders as karts cross the loops. Each timing source is connected to ROLLER Karting over your network and is mapped to a loop (or to multiple loops, depending on the decoder).
Courses are the saved layout of your track. A course pulls together a set of loops, tags each loop with the role it plays in a race (start-finish, assignment, and so on), and adds details like track length and minimum lap time. Run templates select a course, which is how a race knows which loops to listen to. This is covered in Create a run template in ROLLER Karting.
Most venues only need one course. Some venues have two or three (for example, a main track and a junior track), and a handful of tracks support far more configurations.
Before you begin
ROLLER Karting is installed and you can sign in as an admin. See Install ROLLER Karting if you haven't completed the install yet.
Your timing hardware is physically installed at the track. Loops in the ground, decoder mounted, network cable run. Hardware install is the venue's responsibility (see the install guide for the support boundary).
Your IT contact has the decoder's IP address and the port it listens on (default is 5100). Most decoders connect over the local network.
You know your track layout: how many loops you have, where each one sits (start-finish, pit exit, sector), and whether you want auto-assignment of karts at the pit exit.
Step 1: Create your loops
Add a placeholder for every physical timing loop on your track. This is done in ROLLER Karting. Follow the steps below:
From the left menu, go to Settings.
Under the Course Setup & Timing header, select Loops.
Select New Loop.
Give the loop a clear name that describes its location on the track (for example, Start Finish, Pit Exit, Sector 1).
Select Save.
Repeat for every loop you have on the track.
Example: A track with auto-assignment and one sector loop would have three loops set up here: Start Finish, Pit Exit, and Sector 1.
.png)
Each loop has a safety lights icon (a small yellow triangle) in the Actions column. It opens a display view designed for an external monitor at that point on the track, showing the live flag and sector condition for that loop. It's an inexpensive way to add safety light boards, and works with any device that can display a web URL (smart TV, Fire Stick, low-cost Android box).
Step 2: Add your timing source
Connect the decoder hardware to ROLLER Karting and tell it which loop the hardware reads. This is done in ROLLER Karting. Follow the steps below:
From the left menu, go to Settings.
Under the Course Setup & Timing header, select Timing Sources.
Select NEW TIMING SOURCE.
Enter a Timing Source Name that describes the decoder (for example, Main Track Decoder).
From the Device Type/Protocol dropdown, select your decoder model. Common options include AMB TranX-2/Enhanced TCP/IP, AMB20 TCP/IP, AMB TranX, Amusement Products, Arrowy, and CDX Timing (the dropdown has more). If you're not sure which to pick, check the hardware label or ask your decoder vendor.
Enter the decoder's IP address or hostname. Your IT contact will provide this. It's set on the hardware itself when it's installed, not in ROLLER Karting.
Enter the Port. The default is 5100. Only change it if your IT contact tells you to.
Leave Auto-connect at start selected. This keeps the timing source online whenever ROLLER Karting is running, so you don't have to reconnect it manually after a restart.
Map the timing source to a loop:
In Timing Source Loop ID, enter the loop ID from the decoder. The default is an asterisk (*), which matches all loop IDs from this decoder. Use the asterisk if your decoder delivers one loop per timing source (for example, an Ambitronics Live Decoder).
From ROLLER Karting Loop Name, select the loop this decoder reads (Start Finish, Pit Exit, or another loop you created in Step 1).
If your decoder delivers multiple loops, select ADD LOOP MAPPING and repeat for each loop ID.
Select SAVE.
ROLLER Karting opens a connection to the decoder. When it's healthy, the timing source shows as Connected with a green wifi icon.
.png)
Most decoders connect over the network. USB or serial connections (COM port) are also supported on some models (for example, CDX). Nine times out of ten, network is preferable. Check with your decoder vendor if you're unsure which method your hardware supports.
Step 3: Create your course
Tie your loops together into a saved track layout. This is done in ROLLER Karting. Follow the steps below:
From the left menu, go to Settings.
Under the Course Setup & Timing header, select Courses.
Select NEW COURSE (or select the pencil icon next to an existing course to edit it).
Give the course a clear Name (for example, Main Track, Junior Track).
Enter the Length of the track as a number. This is used to calculate speed (lap time + length = speed) and appears in the race results.
Leave Status set to Active. Set it to Inactive only if you want to keep the course in the system but hide it from run templates and the schedule.
From Length Units, select the unit your venue prefers (km or miles).
(Optional) Enter a Minimum laptime in seconds. If a lap registers faster than this value during a race, ROLLER Karting flags it as invalid. Use this when the fastest realistic lap on your track is well-known (for example, if a 20-second lap is your floor, set this to 17 or 18 to catch spin-and-cross-twice events). You can also set this at the run template level instead, which overrides the course value.
Under Loops, select ADD LOOP for each loop that belongs to this course. For each loop:
From the Loop dropdown, select the loop you created in Step 1 (Start Finish, Pit Exit, or another).
Tick Start/Finish? for the start-finish loop. Every crossing increments the lap counter for the kart that crossed. Every course needs at least one loop tagged as Start/Finish.
Tick Assignment? for any loop where you want auto-assignment. When a kart crosses this loop, if it isn't already assigned to a racer, ROLLER Karting automatically matches it to the next unassigned participant in the session. Typically ticked on the pit exit loop. You can tick more than one loop as Assignment.
Tick Pit Lane? for loops that mark the pit lane. Used by some race rules.
(Optional) Under Sections, select ADD SECTION to define named segments between two loops with a length value. For a simple sector-timing course, you might define Sector 1 from Start Finish to Sector Loop, and Sector 2 from Sector Loop to Start Finish.
Select SAVE.
.png)
Troubleshoot with the log
The Timing Sources page has a live log on the right that shows every signal coming from your connected decoders. It's the main troubleshooting tool when something looks wrong on race day. Follow the steps below:
Go to Settings > Course Setup & Timing > Timing Sources.
Confirm the timing source you want to check shows as Connected with a green wifi icon in the list. If it's disconnected, the log won't populate for it.
Watch the log panel on the right of the page. Entries are tagged with a coloured pill by type (for example, heartbeat or crossing) and show the timing source name, the loop crossed, and the exact time.
Most decoders send a heartbeat message every 5 to 10 seconds. Steady heartbeats mean the connection is healthy. Crossing entries appear each time a kart passes a loop.
To find a specific kart's activity, type its transponder number into Filter logs by these term(s) at the top of the log. If passings appear, the hardware sees the kart and something else (mapping, run template, course config) is dropping them. If nothing appears, the transponder isn't being read by the hardware. Check the physical setup or the kart's transponder.
If the log is empty and you expect events, check that at least one timing source is connected and that no one has recently cleared the logs. Reconnect the source or trigger a passing to repopulate it.
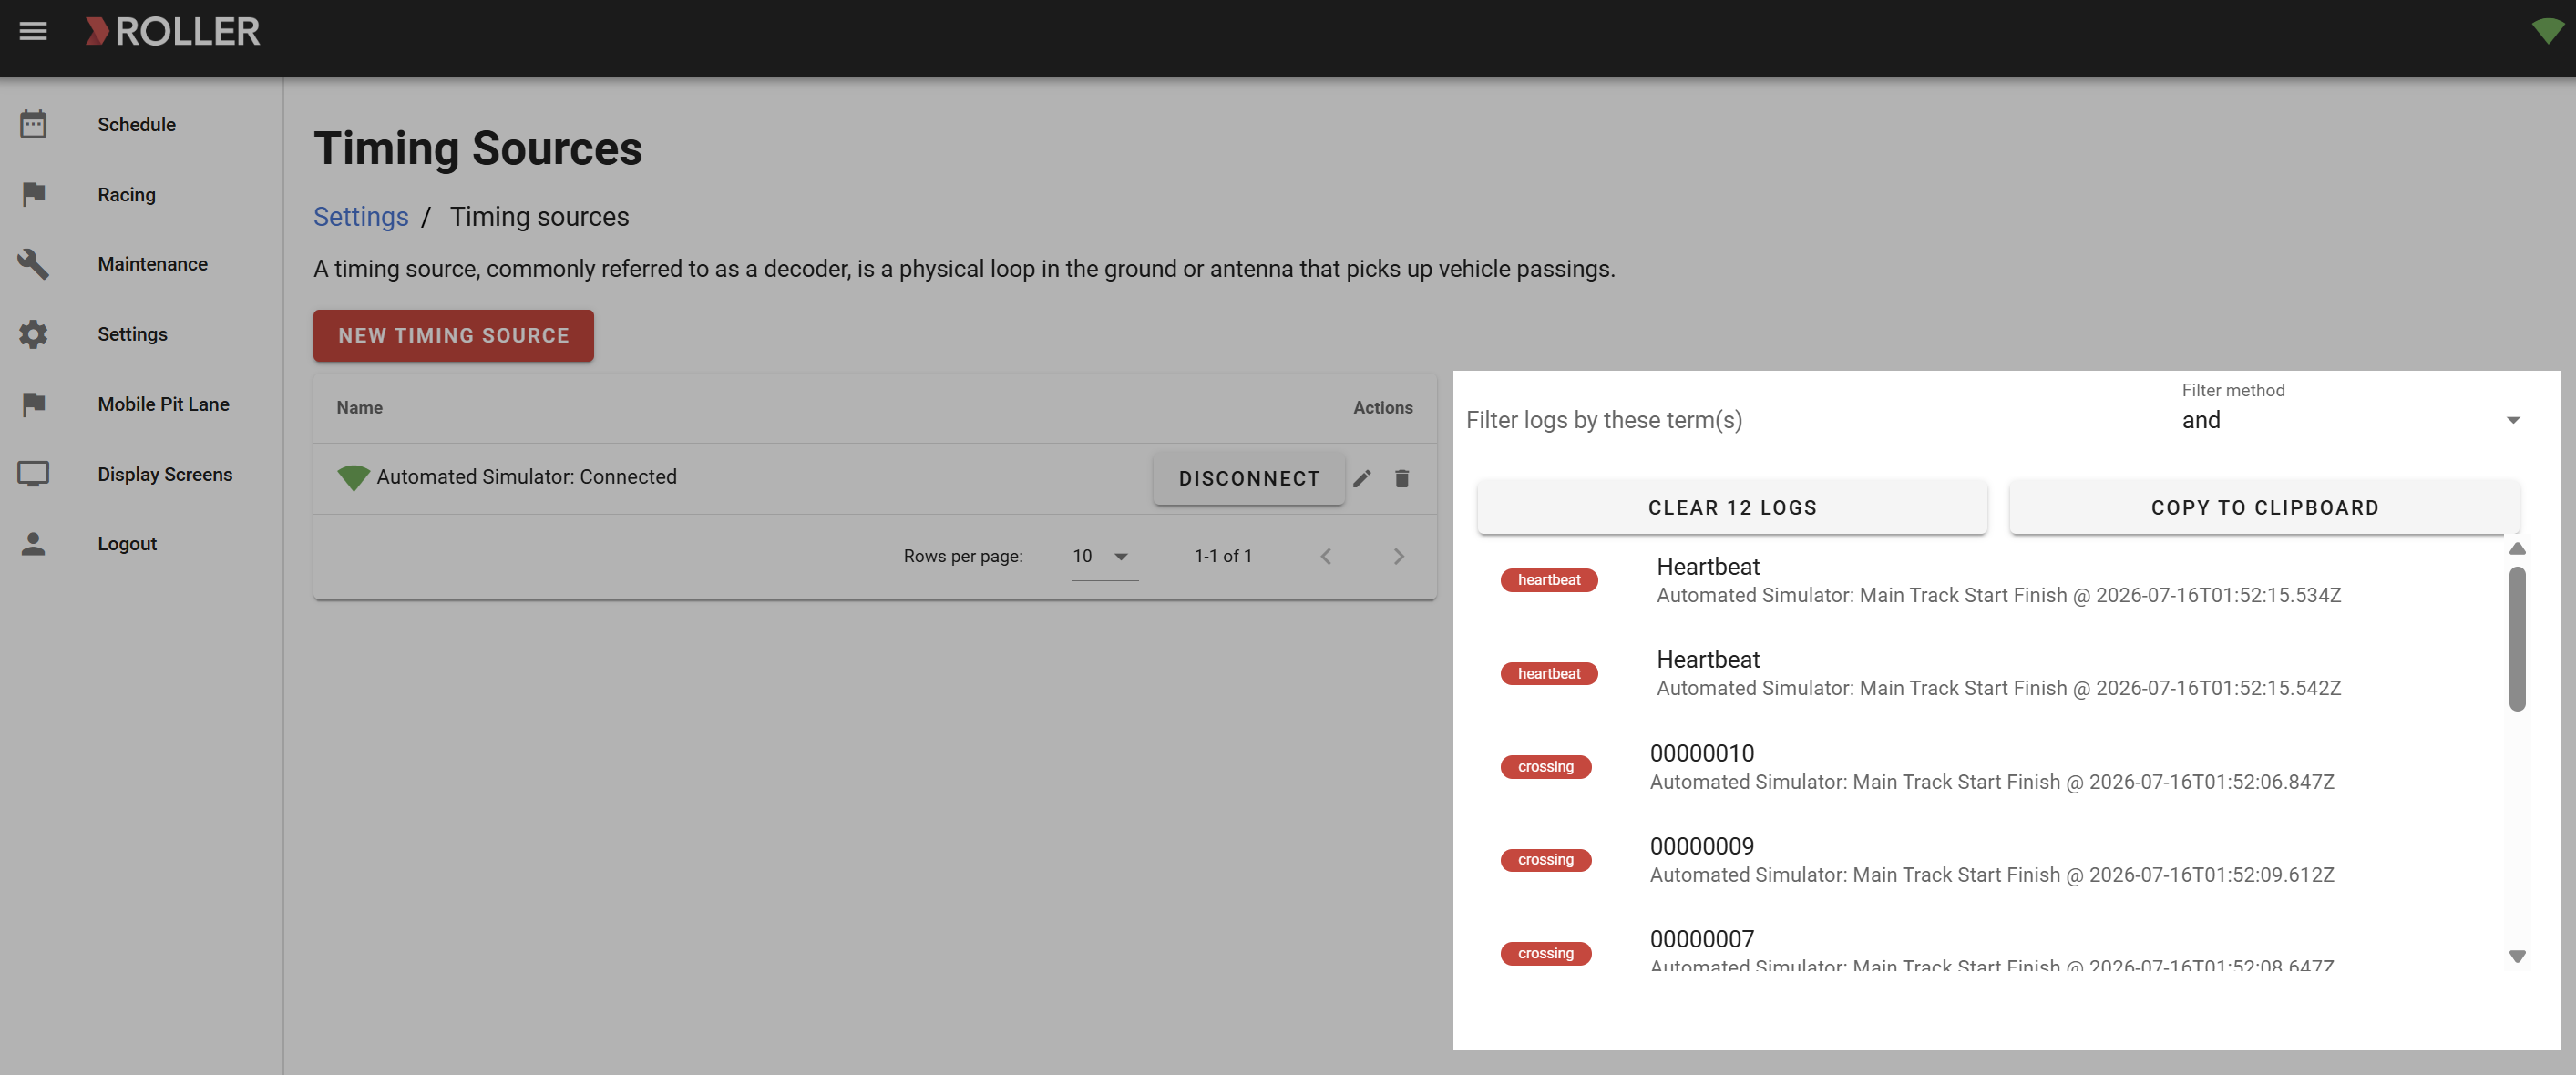
The live log is the first place to look if races are missing laps or karts aren't being picked up. It shows exactly what the decoder is sending, so it tells you whether the issue is on the hardware side or somewhere in ROLLER Karting.
Frequently asked questions
My decoder doesn't appear in the Type dropdown. What do I do?
ROLLER Karting supports a range of decoder vendors out of the box, including AMB / MyLaps, DeHaardt, RaceResult and CDX. If your decoder isn't listed, check the install guide and contact your decoder vendor or ROLLER support to discuss adding it. Some less common vendors (for example, Amusement Products) are available as custom integrations.
Should I set Minimum Lap Time on the course or on the run template?
Both fields do the same thing: flag suspiciously fast laps as invalid. Set it on the course if every race style on that course uses the same threshold. Use the run template field (Discard laps faster than) when you want to override the threshold for a specific race style. Run template values win over course values.
What are sectors used for?
Sectors split your track into named segments between loops. They're useful for sector timing (showing how fast a driver was through each portion of the track) and for safety light control (a flag condition on one sector doesn't have to affect others). You can skip sectors entirely on a basic course with just a start-finish loop.
What's the safety lights icon next to each loop?
It opens a view designed for an external display (an LCD TV mounted near that loop) showing the current flag and sector condition for that loop. It's an inexpensive way to put visual safety information out around the track. We'll cover safety lights setup in a separate article.
How do I know if my course is set up correctly before a real race?
Use the simulated timing loop option that ROLLER Karting set up during install. It generates fake passings on your course so you can confirm laps are counting, assignments work, and run templates pick up the right course. If you skipped or disabled the simulator, you can also drive a kart slowly around the track and watch the Timing Sources heartbeat log to verify each loop fires.
What's next
With your loops, timing source, and course set up, your physical track is fully configured in ROLLER Karting. You're now ready to create the run templates that define the races run on it.
See Create a run template in ROLLER Karting.