Run your group event sales pipeline from Salesforce without switching to ROLLER to check availability or confirm bookings. ROLLER Connect – Groups & Events embeds live resource availability from ROLLER into Salesforce Opportunities, so you can manage quotes, holds, and closures in one place.
To manage group event sales in Salesforce, you need the ROLLER Connect – Groups & Events module, available on request. To learn more, contact your customer success manager or the support team.
How ROLLER Connect – Groups & Events works
Each group event is managed as an Opportunity in Salesforce. From the Opportunity, you can view resource availability on the Reservations Calendar, place provisional holds, add products, generate a quote PDF, and collect payment.
When an Opportunity reaches Closed Won, ROLLER automatically confirms the booking, generates a Banquet Event Order (BEO), and builds an inventory order list from your recipes.
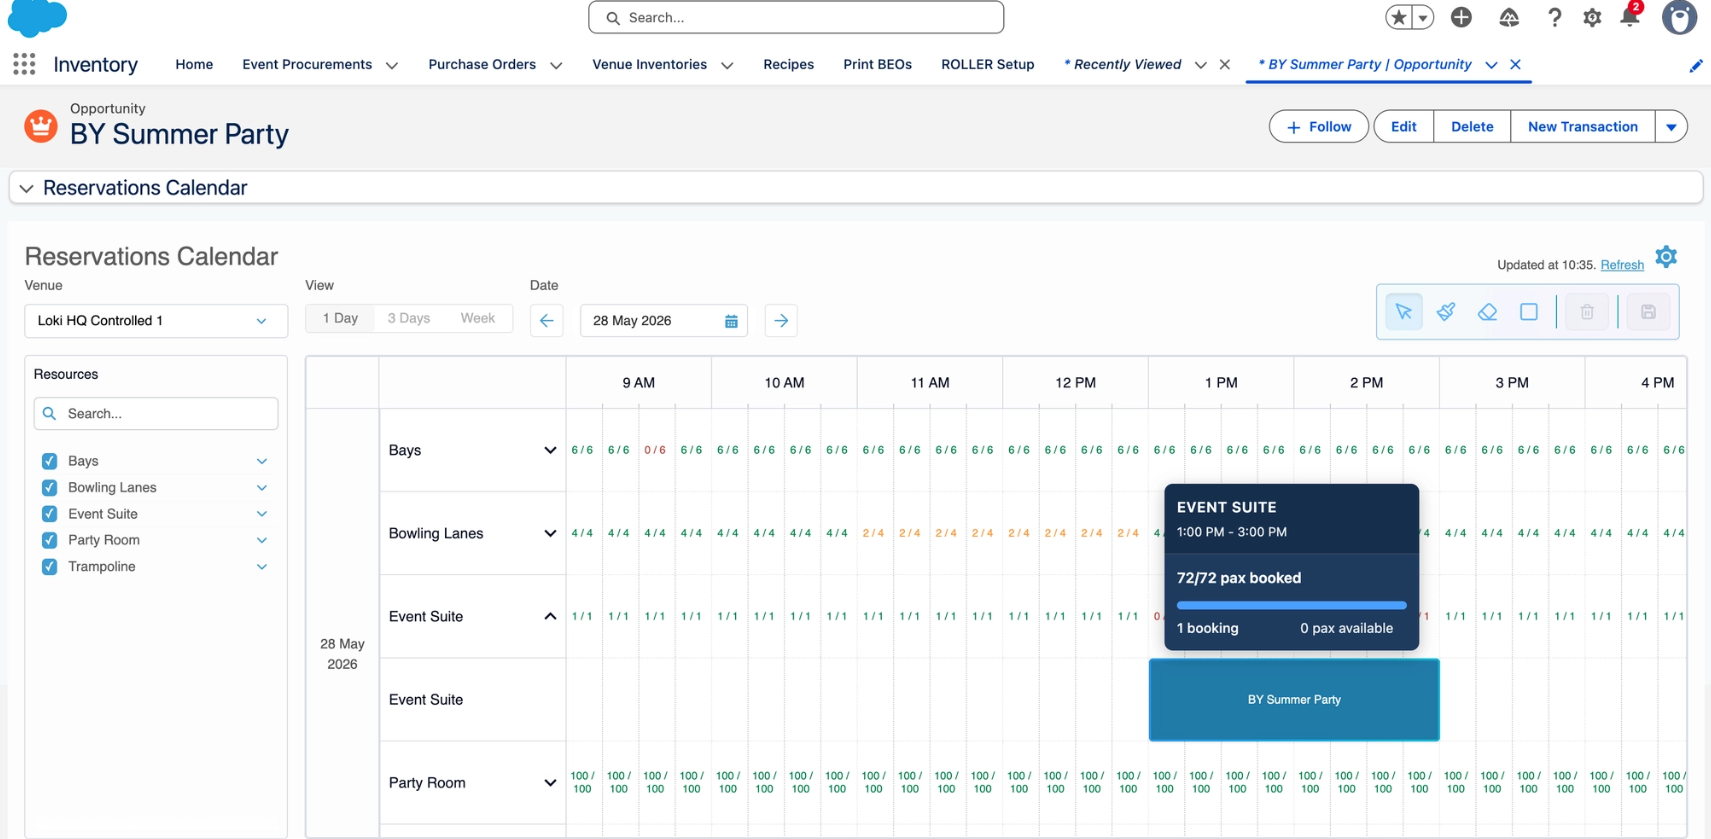
On the Reservations Calendar:
Orange blocks are provisional holds
Blue blocks are confirmed bookings
Before you begin
Before you start, make sure you have:
ROLLER Connect – Groups & Events enabled for your organization
Your venue connected and configured by the ROLLER Training & Implementations team
Keep in mind
Once you save the first resource block on an Opportunity, the ROLLER Venue is locked and cannot be changed on that Opportunity. If you need a different venue, create a new Opportunity.
The following fields on the Opportunity auto-populate — do not fill them in manually: Amount, ROLLER Discount Amount, ROLLER Tax Amount, ROLLER Total (inc. Tax).
After adding or editing resource blocks, refresh the page to see the updated calendar.
Create a booking
Creating a booking is a multi-step process:
Create the Opportunity.
Use the Reservations Calendar on that Opportunity to block resources.
Add products as Opportunity Line Items or by creating a Quote.
Mark the Opportunity as Closed Won to generate the BEO and inventory order list.
Collect payment.
Create a group event opportunity
You can create an Opportunity in two ways:
Convert a Lead — using the standard Salesforce Lead conversion flow.
Create a new Opportunity directly — from the Opportunities tab, or from a related list on an Account or Contact.
To create a new Opportunity directly:
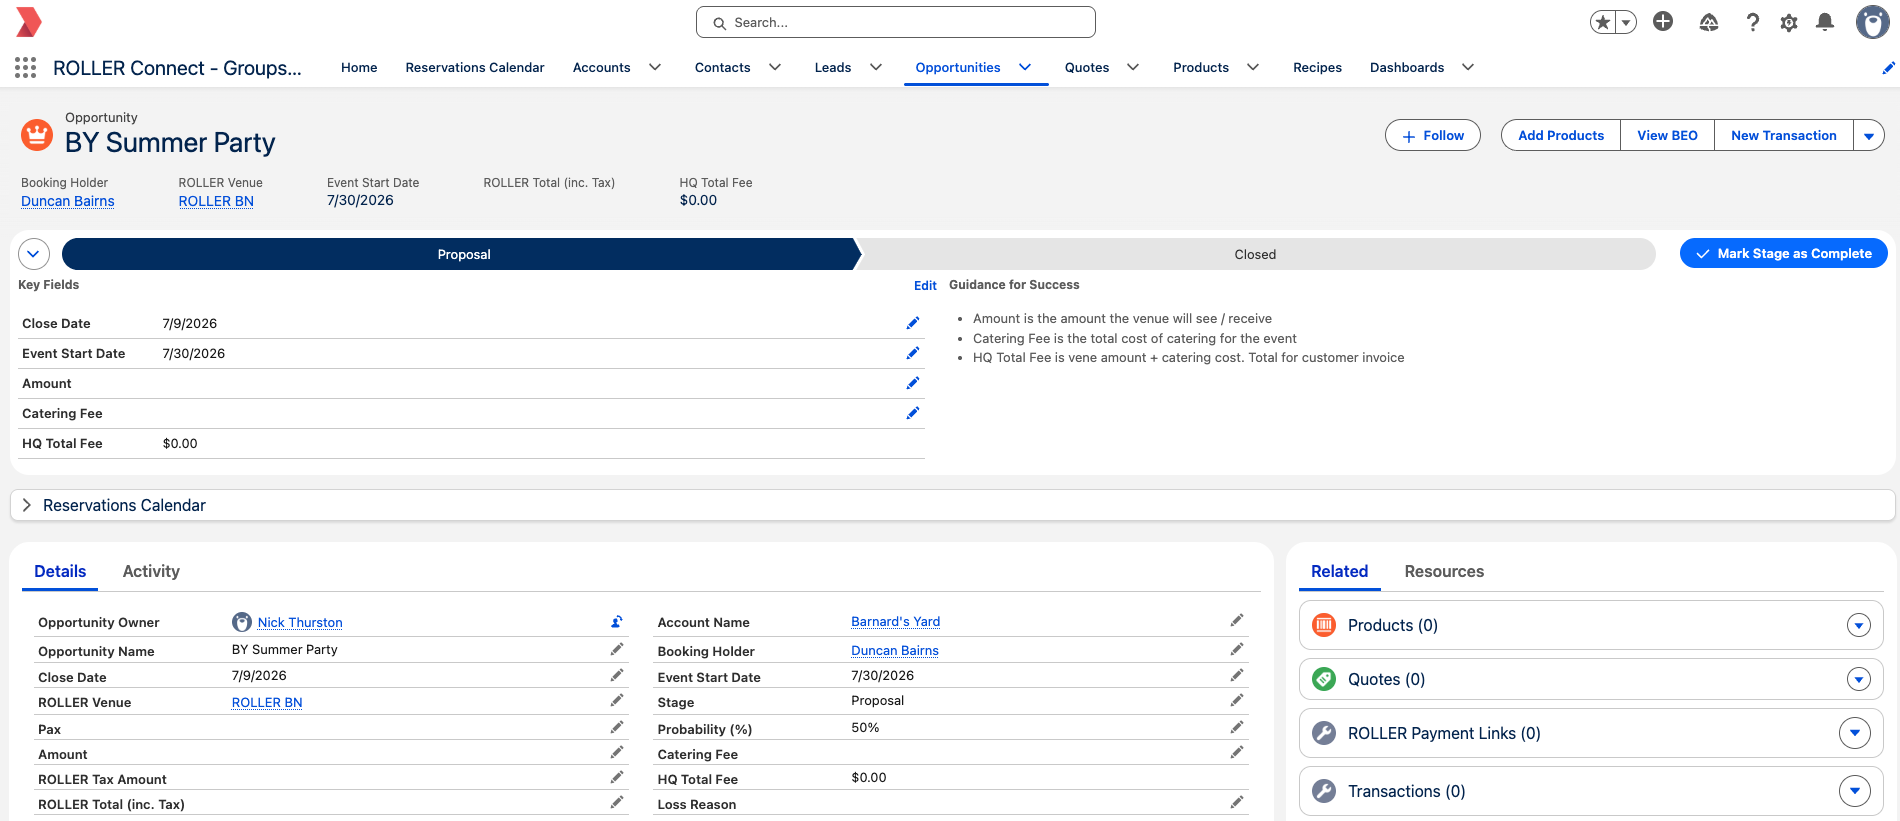
Go to Opportunities and select New.
Fill in the following required fields: Opportunity Name, Account, Booking Holder, and Stage.
Fill in Close Date, Event Start Date, and ROLLER Venue.
Enter the number of attendees in the Pax field — this tells ROLLER the booking quantity.
Save the Opportunity.
Block resources on the Reservations Calendar
The Reservations Calendar shows live resource availability pulled from ROLLER. You can place and manage resource blocks directly from within an Opportunity.
Three tools are available for blocking resources:
Pointer — select a specific asset to open the Event Details modal and set the date, time, and hold duration.
Paint — click and drag across time slots to select a range on a single resource.
Rectangle — click and drag across multiple time slots and assets simultaneously to block several resources at once.
Before placing your first block, confirm the venue is correct. Once saved, the ROLLER Venue field is locked and cannot be changed on this Opportunity. If the venue is manually changed through the Venue field on the Opportunity, the booking will break. If the venue needs to change, create a new Opportunity.
To block resources on the Reservations Calendar:
Open the Opportunity and scroll to the Reservations Calendar section.
Right-click on a Resource Group to expand or collapse the group, add an event on the first available resource, or book multiple resources. Or select individual assets using the Pointer, Paint, or Rectangle tool.
In the Event Details modal, set the date and time for the block.
For multi-booking resources, a Participants field appears — enter the number of participants before applying.
When using the Paint or Rectangle tool, the modal shows a grouped Resource Usage summary listing all selected resources and their time slots. Set the hold duration in days or hours before applying.
If you select All day, only the hours visible on the calendar are reserved. If your venue takes bookings outside normal operating hours, make sure the calendar is configured to show those hours first.
Select Apply to save the block.
Refresh the page to see the updated calendar.
After the first block is saved:
Event Start Date and Event End Date are populated automatically with the date you selected.
An Opportunity Line Item (Event Participants) is generated automatically as a placeholder to represent the booking.
If you change a resource block's dates after saving, the Event Start Date and Event End Date fields update accordingly — but the date on the Opportunity Line Item does not update.
If a block fails to save (for example, ROLLER rejects the request because a resource is no longer available), the calendar automatically releases the reservation it created. Check the error message at the top of the calendar for details, then try again with different resources or a different time slot.
A hold automatically releases when it expires or when the Opportunity reaches Closed Lost. When the Opportunity reaches Closed Won, all holds convert to confirmed bookings.
Review the booking in ROLLER
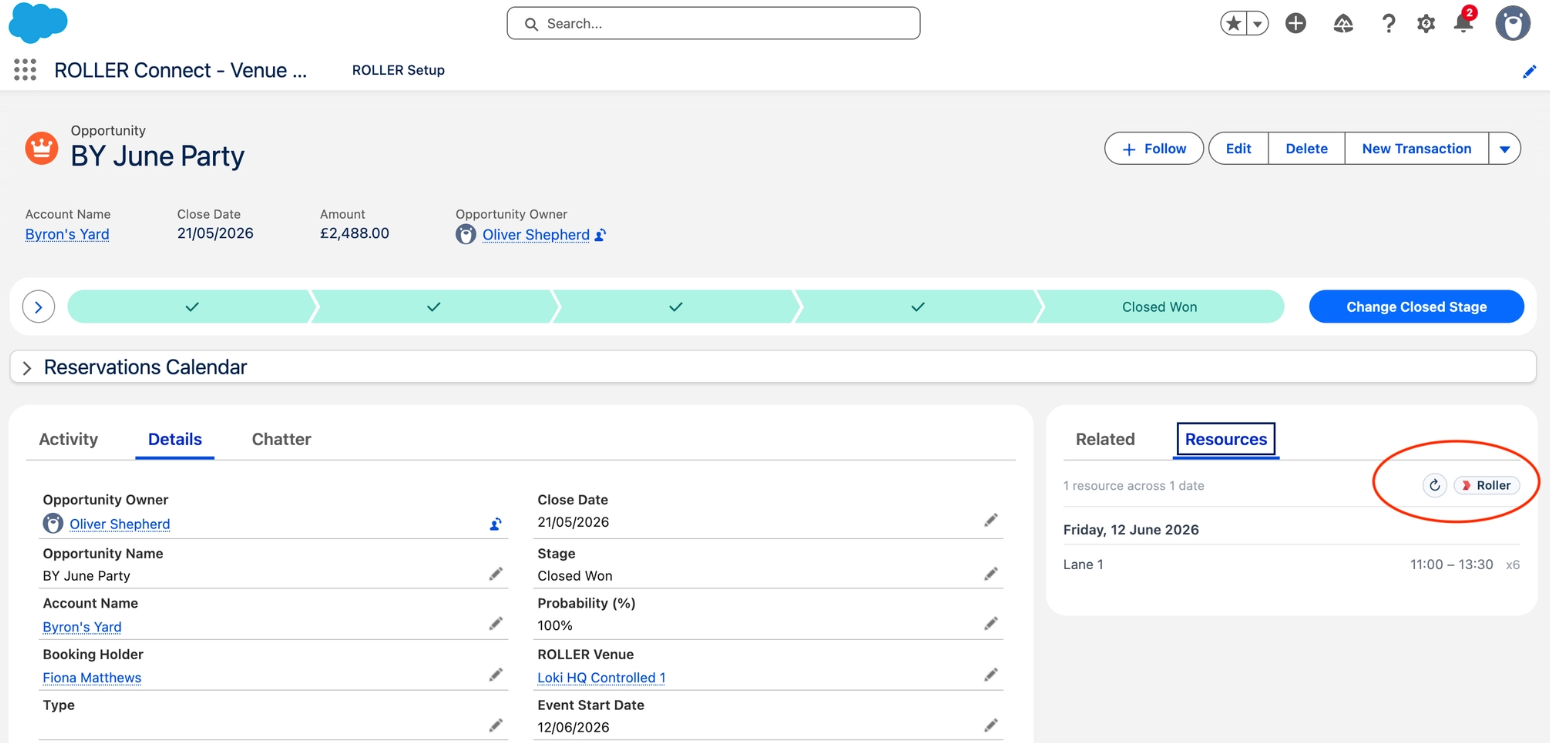
From the moment the first resource block is saved, the booking can be reviewed in ROLLER. A ROLLER button appears on both the booking modal (when you double-click a block on the calendar) and on the Resources tab on the Opportunity. Select it to open the booking directly in ROLLER.
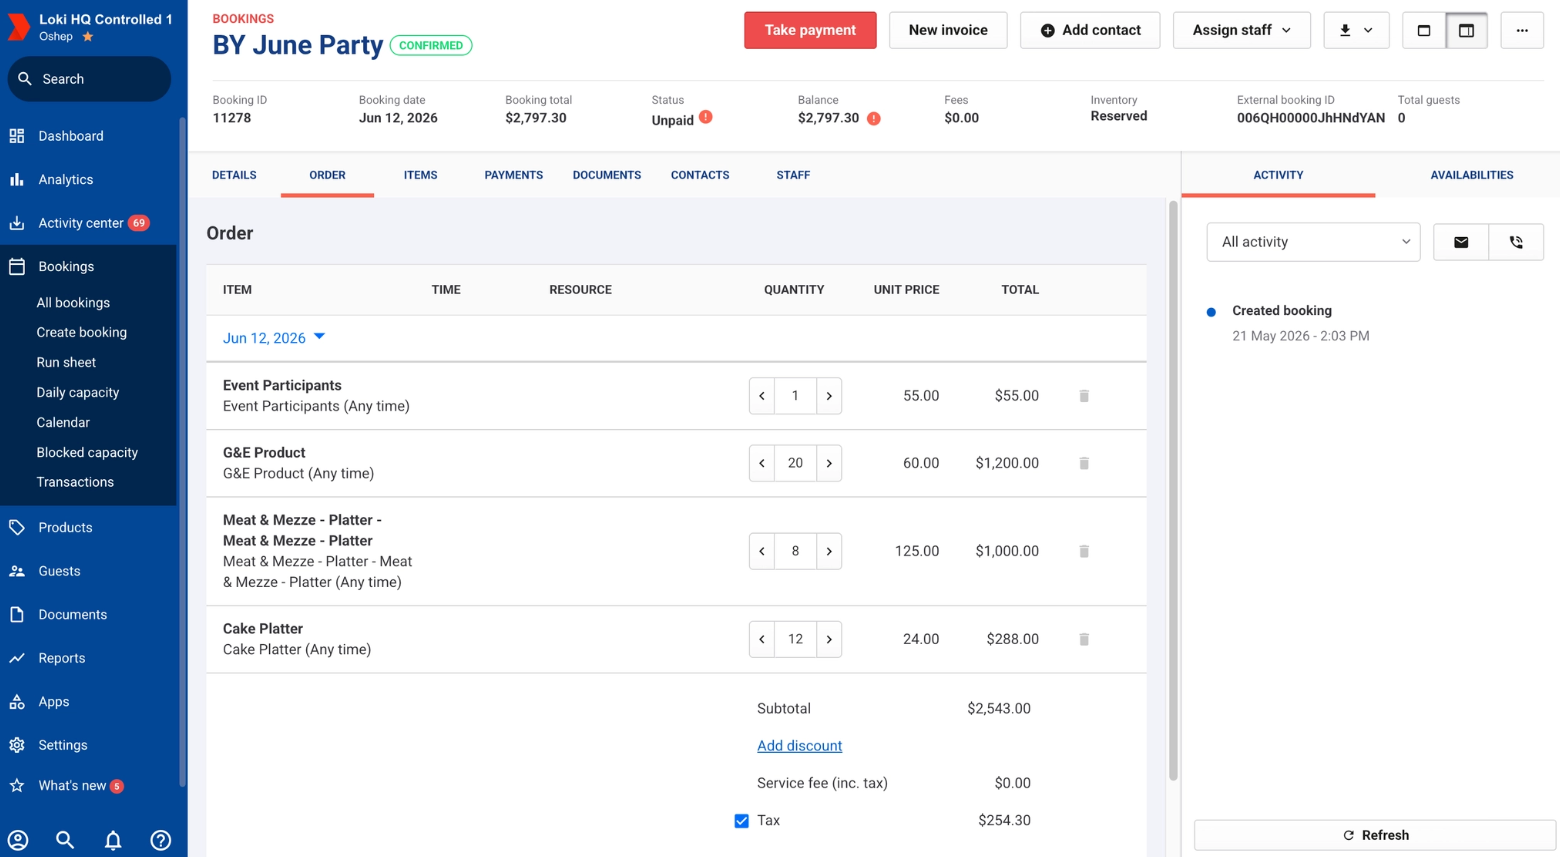
From ROLLER, you can change the quantity of existing items and add new items. You cannot change the booking date from ROLLER.
Add products to the event
After blocking resources, add the products the customer is buying. The Event Participants line item generated in the previous step is a placeholder only — it is not a product the customer is purchasing.
You have two options:
Add Opportunity Line Items directly — use the Add Products button in the Quick Actions bar at the top of the Opportunity to add line items one by one. This is the quickest path for simple bookings.
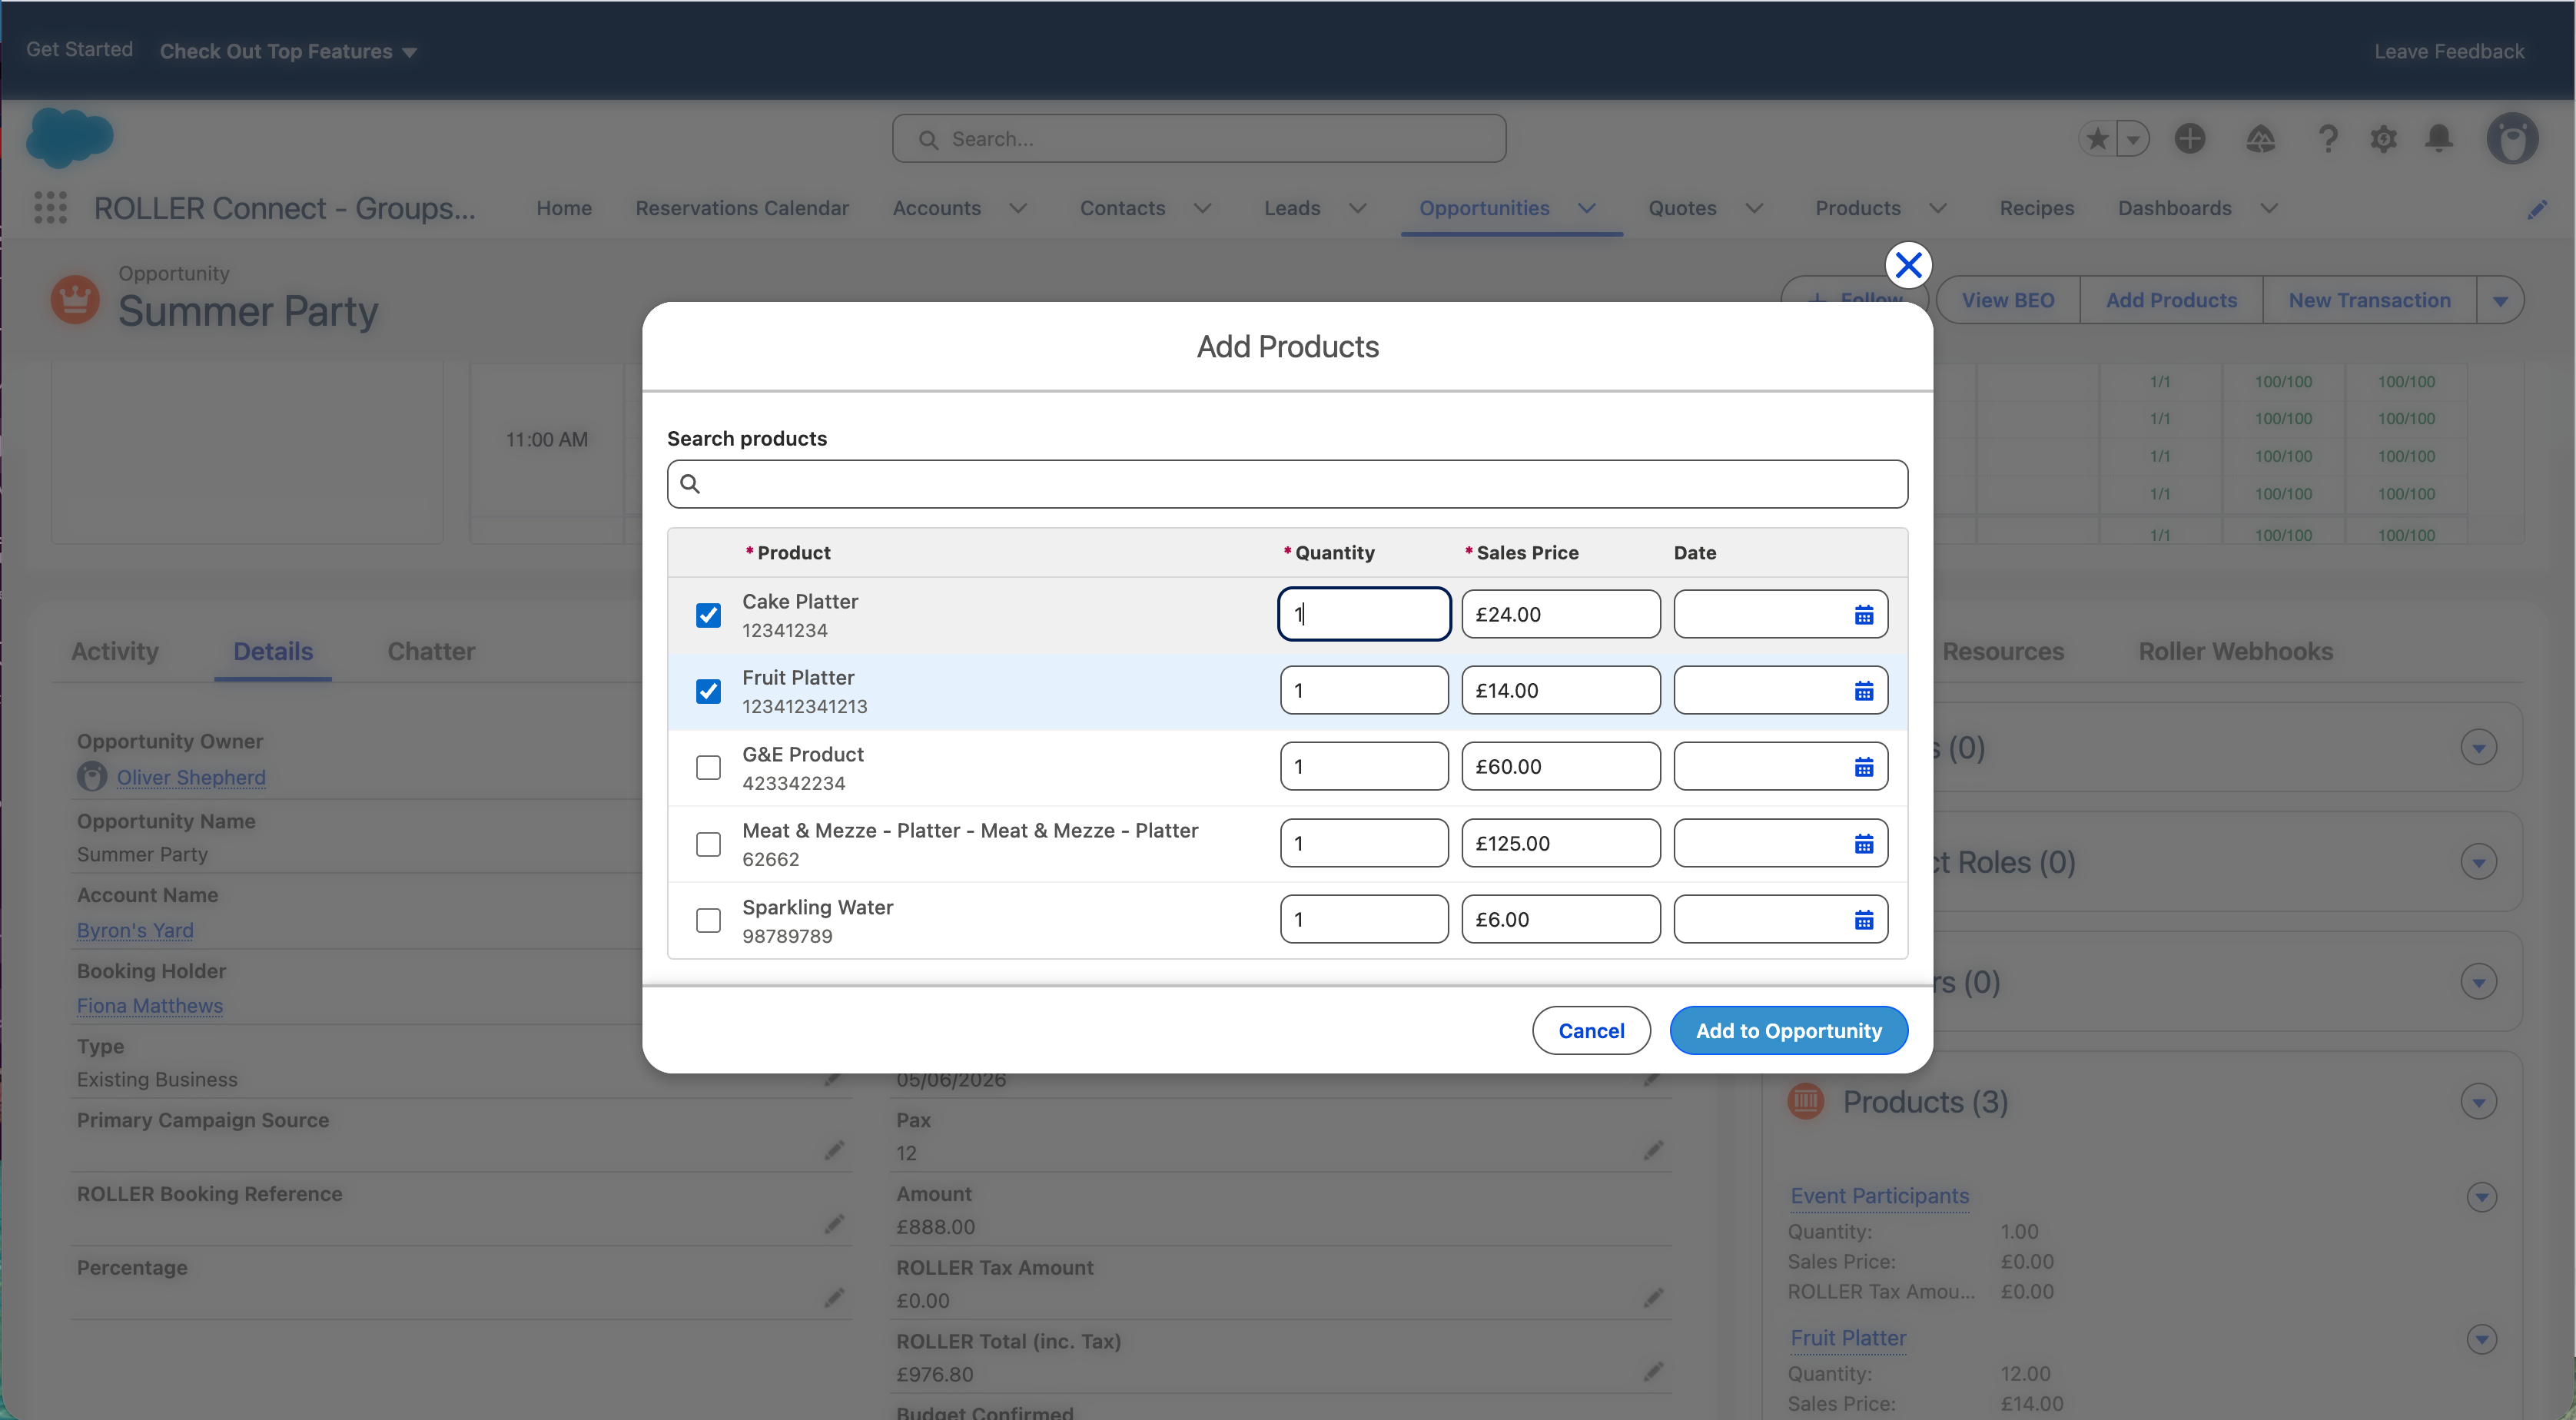
Create a Quote — use Salesforce Quotes to build a formal quote document, send it to the customer, and convert it into Opportunity Line Items. Use this when the customer needs a quote before committing.
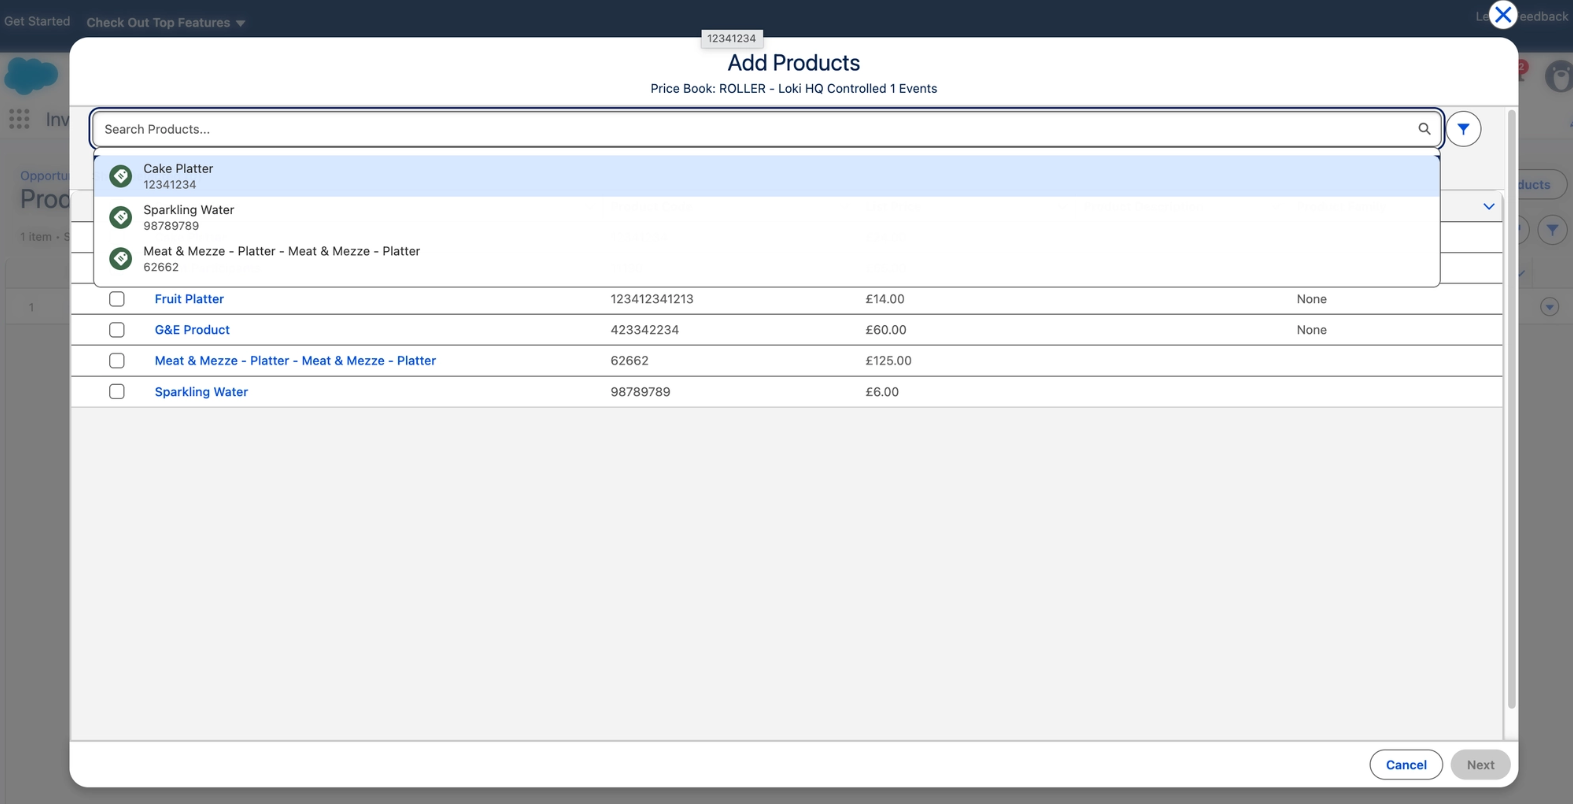
As you add or update Opportunity Line Items, the changes sync to the linked ROLLER booking.
Three product types are used in group events:
Event Participants — blocks the event space. No monetary value. Auto-generated when the first resource block is saved.
Venue hire and activity products — revenue-attributed products that make up the event value.
Food and beverage (F&B) products — items linked to recipes, used to generate inventory order lists.
The ROLLER Product Category field on each product determines which section of the BEO it appears in. Resource blocks and G&E products go to the Event Details section. All other categories go to their respective sections.
Generate a quote PDF
To generate a quote PDF for the customer:
From the Opportunity, create or open a Quote.
Select a quote template.
Generate and download the PDF.
The PDF can be sent to the customer directly from Salesforce.
Collect payment
You can collect payment directly from the Opportunity. Payments can be full or partial. The payment status syncs back to ROLLER automatically.
To record a payment:
From the Opportunity, select New Transaction.
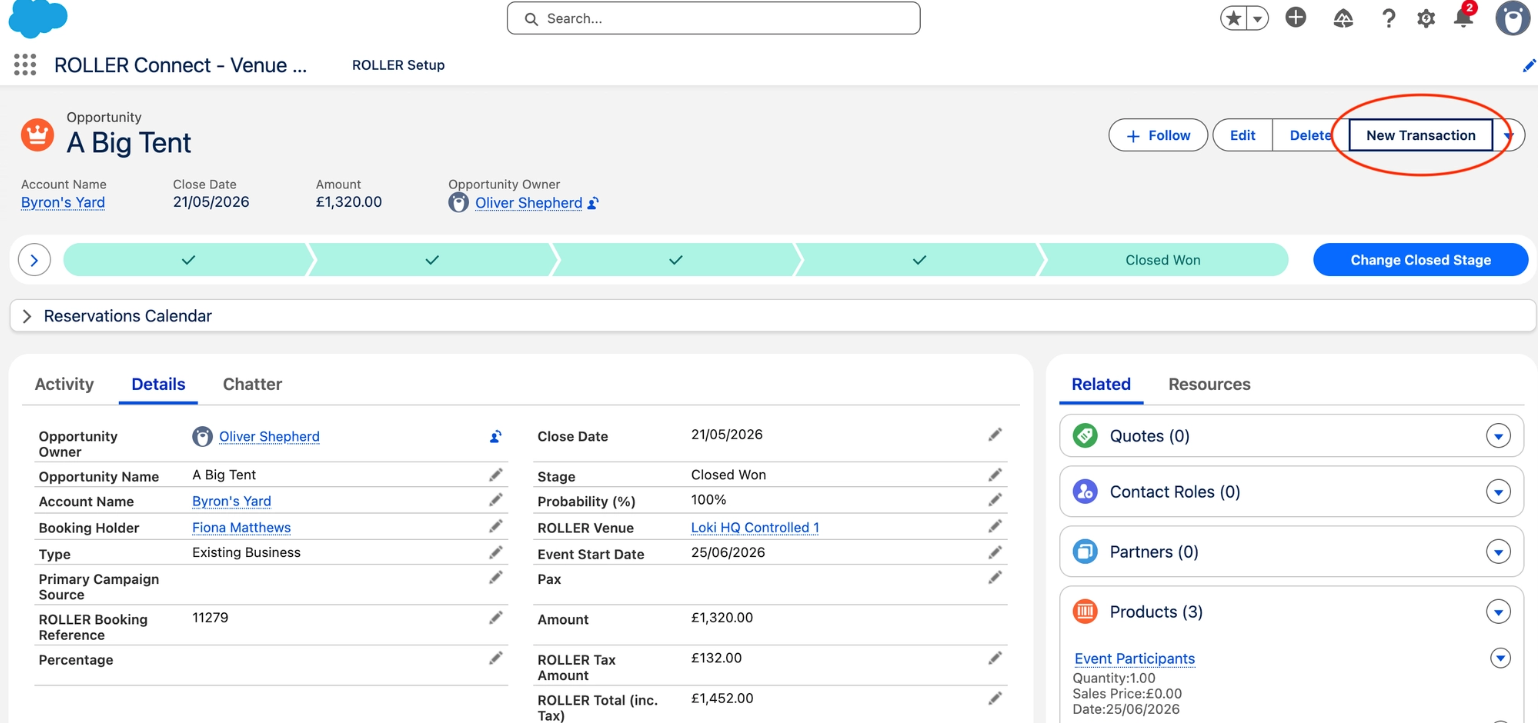
Select a payment method from the dropdown.
Toggle between Full and Partial as needed and enter the amount.
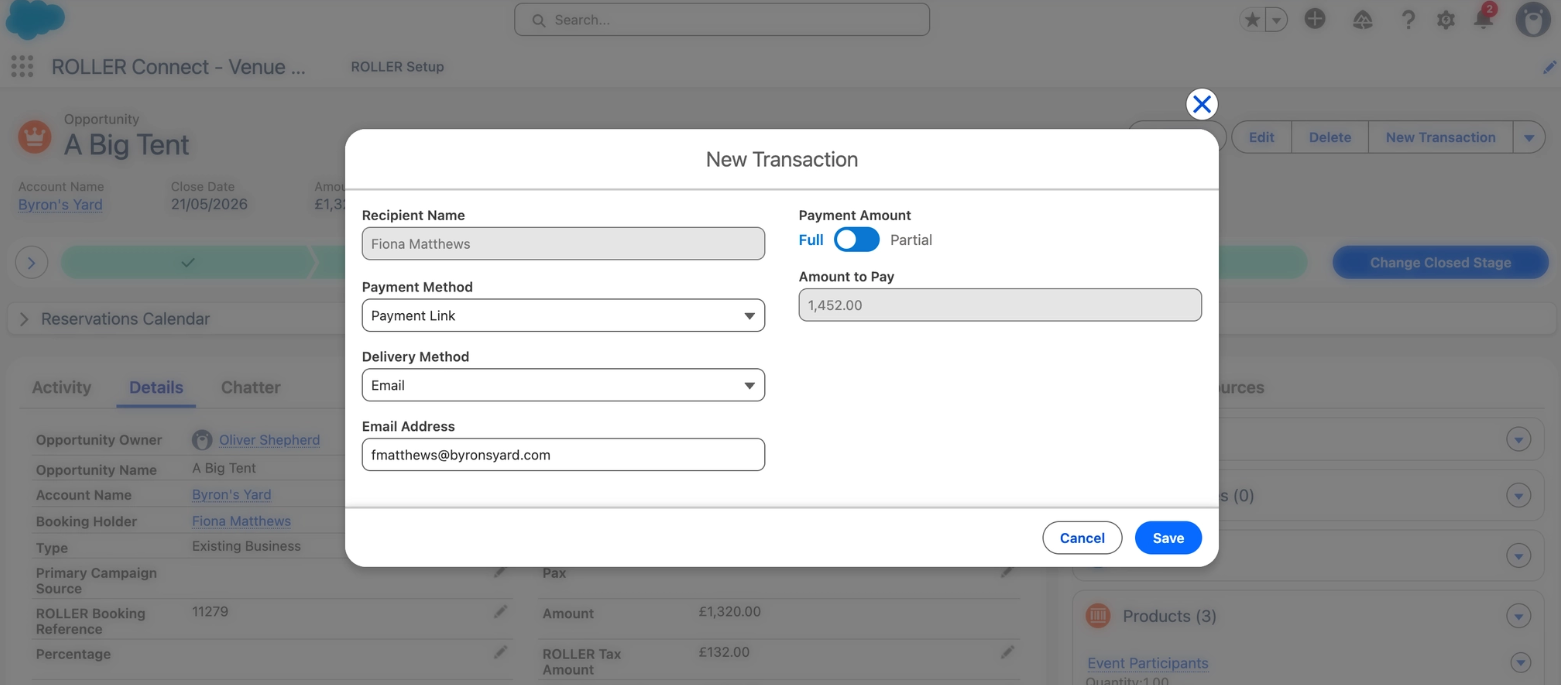
Save.
When Payment Link is selected, you can choose to send it by email or phone and update the contact details from the Booking Holder's record if needed.
The amount shown is before any card fees. Once paid, fees are added to the Fees field and ROLLER Total (inc. Tax) updates accordingly.
The accepted payment methods are: Credit Card, Cash, Cheque, Bank Transfer, Other.
Close the deal
When your event is confirmed and ready to book, move the Opportunity to Closed Won.
When an Opportunity reaches Closed Won:
The booking is confirmed in ROLLER.
A Salesforce Order is created and linked to the Opportunity. Orders are read-only — to make changes after closing, edit the Opportunity, not the Order.
A Banquet Event Order (BEO) is generated and distributed to the relevant teams.
An inventory order list is generated from your recipes, giving your team a complete view of the stock needed for the event.
If the event does not proceed, move the Opportunity to Closed Lost. All resource holds are released in ROLLER automatically.
Manage Banquet Event Orders (BEOs)
A BEO is a running order for your event, covering all products and F&B requirements. It's generated automatically when an Opportunity closes.
To view a BEO, select View BEO on the Opportunity.
.png)
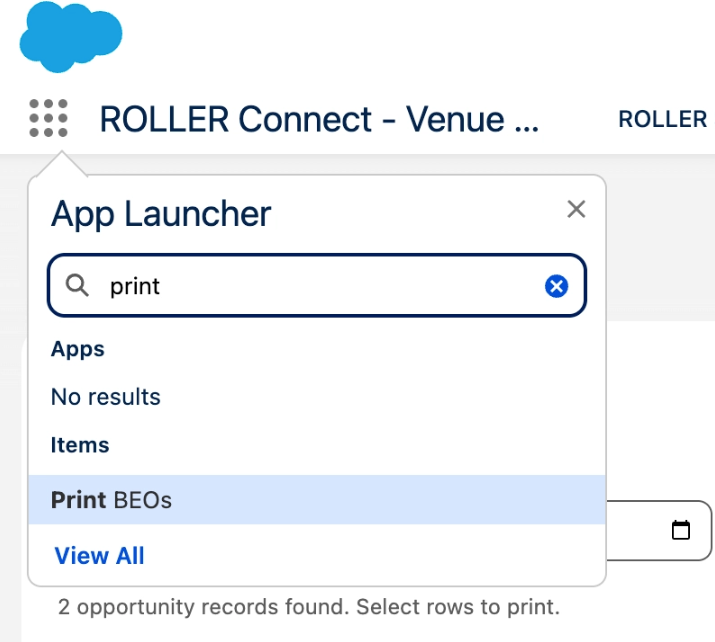
To print multiple BEOs at once, open the App Launcher, search for Print BEOs, and select it. Select the date range and venue, select the rows you want to print, then select Print BEOs.
The default BEO template includes four sections: Event Setup, Standard Requirements, Miscellaneous (Entertainment & Decor), and Special Requirements. If the fields on the BEO need to be changed, they can be updated on the BEO Field Configuration panel on the Venue page.
Calendar settings
The Reservations Calendar is available in two places in Salesforce:
On an Opportunity — scoped to that Opportunity's venue and event date. This is where you create and edit bookings.
Standalone tab — a view-only reference for browsing resource availability across venues. You can switch between venues, browse dates, and see existing bookings, but you cannot create or edit bookings from this view.
Configure calendar settings
Each venue can have its own calendar layout. To configure settings for a venue:
Open the Reservations Calendar for the venue you want to configure.
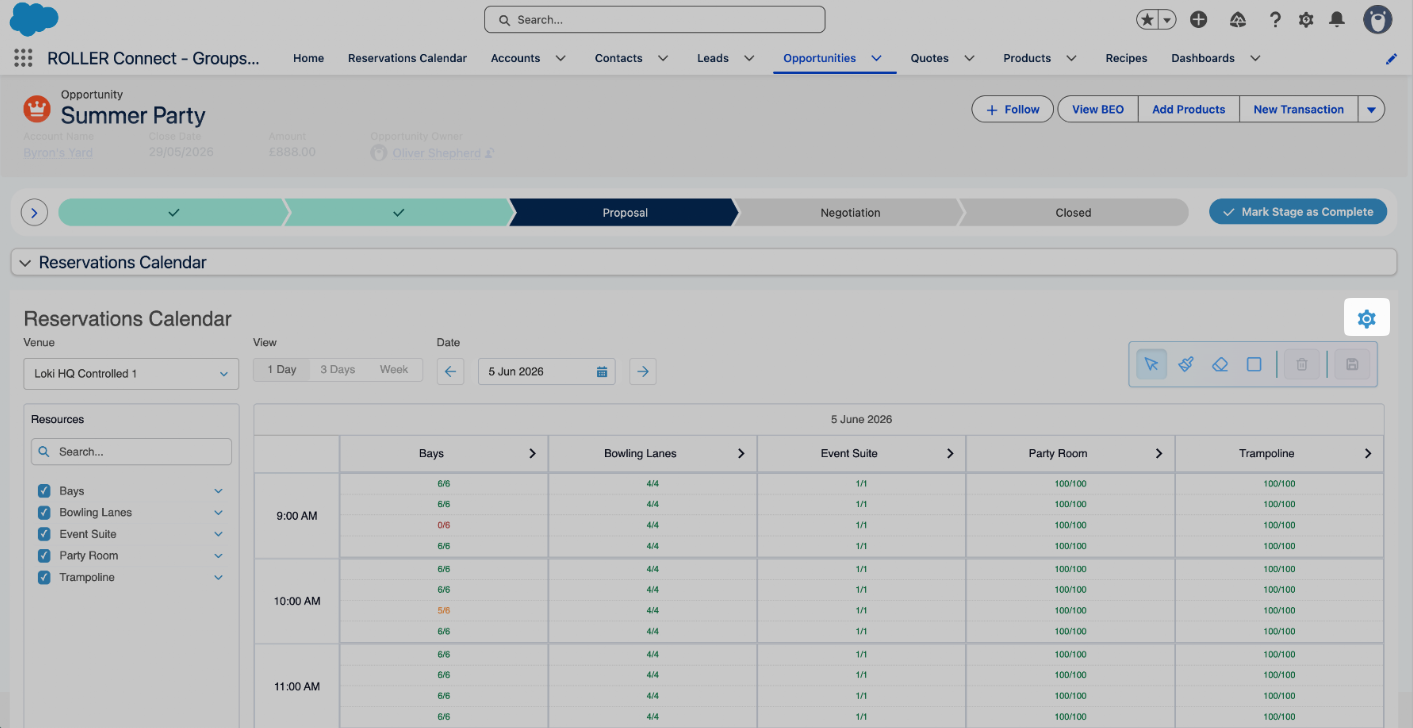
Select the Settings icon (gear) in the calendar header.
Adjust any of the following:
Time Slots — choose how hours are divided: 15, 30, or 60 minutes.
Calendar Start and End Time — define the visible hours.
Manage Asset Classes — reorder or hide resource groups. Click and hold the three lines next to an asset class and drag to reorder. Click the eye icon to hide.
Schedule Layout — set time to run horizontally or vertically.
Make Default View for Site — saves the current configuration (days in view, selected asset classes, expanded asset classes) as the default. Settings reset when the panel is closed if this is not saved.
Select Apply to save, or Cancel to discard.
FAQs
Should I add products to the Opportunity or create a quote?
Add Products is fastest for simple bookings. Use a quote where the customer needs a formal quote document before committing.
To learn more, see Add products to the event.
When do holds release?
On expiry, or when the Opportunity moves to Closed Lost. At Closed Won, all holds convert to confirmed bookings.
To learn more, see Block resources on the Reservations Calendar.
Can I see the booking in ROLLER before it's confirmed?
Yes, from the first saved block. Use the ROLLER button on the booking modal or the Resources tab. You can change quantities and add items in ROLLER, but you can't change the booking date there.
To learn more, see Review the booking in ROLLER.
What do the calendar colors mean?
Orange is a provisional hold. Blue is a confirmed booking.
To learn more, see How ROLLER Connect – Groups & Events works.
Which fields shouldn't I fill in manually?
Amount, ROLLER Discount Amount, ROLLER Tax Amount and ROLLER Total (inc. Tax). All four auto-populate.
To learn more, see Keep in mind.