If you're transitioning to ROLLER from other software, you can import signed waivers. While there may be cases where this is a necessary requirement, we normally recommend having your guests re-sign waivers in ROLLER during their next ticket purchase. This also ensures their signature is stored in ROLLER.
Always consult your training & implementation (T&I) manager to see if importing signed waivers is required and, if so, how best to prepare the CSV file for importing.
This guide takes you through how to prepare a CSV file for importing signed waiver data into ROLLER.
Importing data takes approximately 5-7 business days. If edits are needed, we'll return the file for approval. Incorrect formatting can cause delays.
Steps
Create a test CSV file of 20 records by following the instructions outlined here.
Validate the test data in ROLLER to make sure the data is correctly formatted and compatible with ROLLER's requirements. Validating is a preliminary check; it doesn't actually import or commit the data to ROLLER.
Once validation is successful, email the test CSV file to your T&I manager who will import it into ROLLER playground.
Check the waiver data from the test import is accurate in ROLLER Playground.
If all is okay with the test import, prepare all waiver records in the required CSV format.
Validate all waiver records, troubleshoot any errors, then email the files to your T&I manager for data import.
Confirm that all waiver data has been correctly imported.
Important to know before getting started
CSV files for import are capped at 5 MB. If your data surpasses this file limit, split it into separate files for individual uploads. You must split up the waiver data in a way that doesn't split parents/guardians into different files as that will throw errors due to the children not having a parent linked. See FAQs below to learn more.
Once data is in, you can't delete imported records. Make sure you test in Playground before the CSV file gets imported into the Live environment. Note that you can, however, deactivate individual waivers.
Signatures aren't included in waivers imported to ROLLER.
You don't need to include waiver data with expiry dates in the past.
Formatting problems in CSV files might lead to hold-ups.
If you do change expiry dates in the CSV file, and want ROLLER to send the expiry email reminder two weeks in advance, make sure under 4,000 waivers have the same expiry date. This is due to a 5,000 daily email cap per venue, which is set to help prevent emails being seen as spam. To manage this, stagger the expiry dates, grouping less than 4,000 on the same date.
Given the above, we recommend that guests re-sign waivers when next buying tickets for your venue rather than importing waivers from a previous system. Learn more about how you can get guests to complete waivers with ROLLER
Prepare a test file of 20 records
Extract the waiver data from your former software into a spreadsheet program such as Microsoft Excel. ROLLER imports the CSV format.
Make a copy of your exported file for backup. This safeguards against mistakes and aids in data verification.
In the spreadsheet, adjust the column headers to align with the signed waiver data fields outlined below. You must include all column headings for the data import to be successful–even if the column is not required and blank. If you don’t include a column heading, the import will fail.
Examine and correct any data or formatting issues as outlined below.
You can also download a spreadsheet template from ROLLER.
From Venue Manager, go to Settings > Data Import.
From the Import type drop-down at the top of the page, select Signed Waivers. If you don't select the correct import type, you'll download the incorrect template.
Select Sample to download a sample CSV template for signed waivers.
Signed waiver data fields and requirements
Download the following example of a correctly formatted CSV file to use as a guide:
Here is a screenshot of the example columns and data prepared correctly. Select the image to view in a larger size.
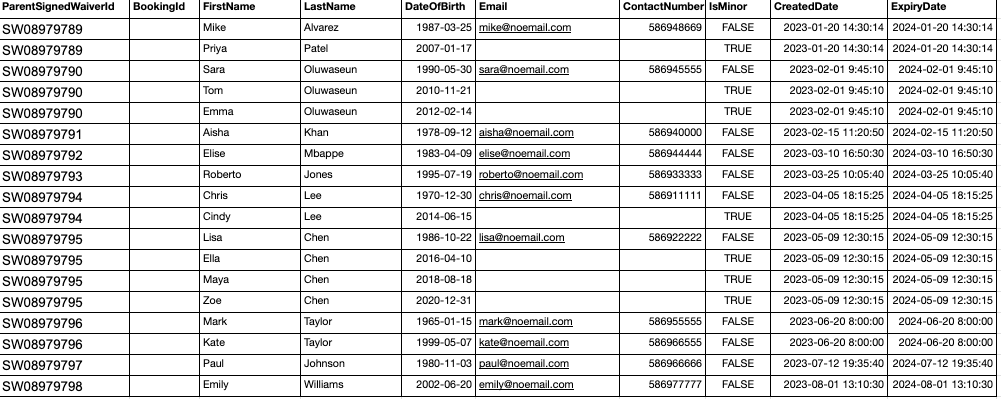
Review the list of requirements for each column.
Column heading | Required | Example | Description | Requirements |
|---|---|---|---|---|
ParentSignedWaiverId | Yes | SW08979789 | This is for grouping the parent/guardian signee with any minors. | To connect a parent/guardian waiver with child waivers, use the same number. For an adult-only waiver, assign a unique number. No returns, line breaks, and special characters. Note that the ID doesn't get imported as the Waiver ID in ROLLER. Waiver ID in ROLLER is determined by the waiver version. |
BookingID | No | You can use this column to associate the signed waiver with a booking. But, we recommend not pre-linking waivers to bookings. Instead, link the waiver when guests redeem their tickets on the day. | Include the column, but leave the field blank—no letters, numbers or special characters. If you try to validate with booking IDs, and they don’t exist in ROLLER, a BookingID error will show when validating the import. | |
FirstName | Yes | Sam | First name of the signee or the minor they are signing for | Text up to 40 characters. No returns, line breaks or special characters. If the first name is longer than 40 characters, an error will display when validating the import. |
LastName | Yes | Petrie | Last name of the signee or the minor they are signing for | Text up to 40 characters. No returns, line breaks or special characters. If the first name is longer than 40 characters, an error will display when validating the import. |
DateOfBirth | Yes | 1987-03-25 | The date-of-birth of the signee or the minor they are signing for | Default date format is yyyy-mm-dd. No returns, line breaks or special characters. |
No | sam@noemail.com | Email of the parent/guardian signee. Leave blank for minors linked to a parent/guardian signee. | Leave blank for minors grouped with parent/guardian signees. No returns, line breaks or special characters. | |
ContactNumber | No | 586948669 | Phone/mobile number of the signee or the minor they are signing for | Numeric or blank. No returns, line breaks or special characters. |
IsMinor | Yes | FALSE | Indicates if the waiver is for a minor (eg under 18 years old) | Enter TRUE for a minor and FALSE otherwise. No returns, line breaks or special characters. |
CreatedDate | Yes | 2021-01-20 14:30:14 | The date-time when the waiver was signed | Default date format is yyyy-mm-dd. No returns, line breaks or special characters. |
ExpiryDate | Yes | 2021-01-20 14:30:14 | The date-time when the waiver expires | Default date format is yyyy-mm-dd. No returns, line breaks or special characters. |
After creating your file, check for data mistakes that might delay the import. Remove any special characters (eg !@#$%^&*()_-+=[]{}|;:'",.<>?/).
Remove any returns or line breaks.
Clear cells marked "N/A" to leave them completely empty.
Validate your test data
From Venue Manager, go to Settings > Data import.
Select Signed waivers from the Import type in the drop-down. If you don't select the correct import type, you will receive errors when validating.
If you’re not using the default date format (yyyy-mm-dd), select Advanced options, then select the correct date setting. If you don't select the correct date format, you will receive errors when validating.
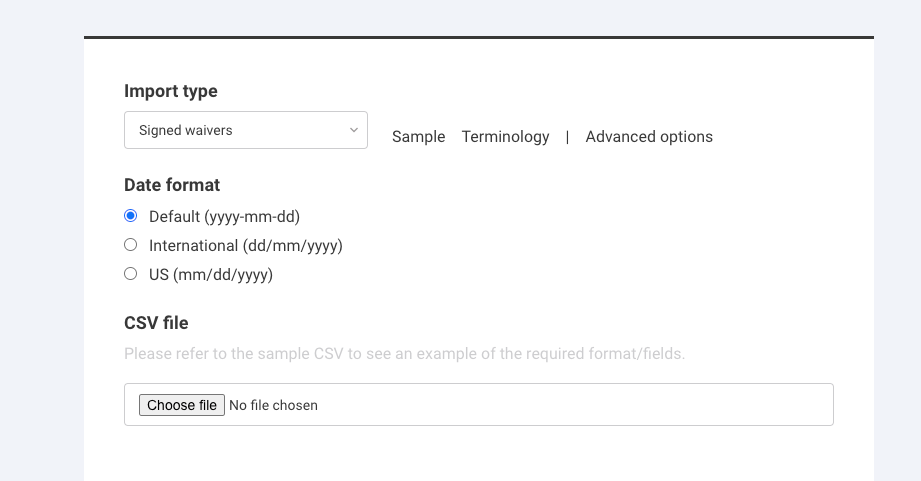
Select Choose file to upload your CSV file.
Select Validate.
When the validation process has completed, you'll get a message showing success or failure. If it fails, errors are highlighted in red.
The Import button is disabled in your ROLLER Playground and Live environment. Your T&I manager will perform final checks and import the data for you.
If validation fails
Check the red error messages and data requirements to correct the issue or if unsure, consult your T&I manager.
When you're ready to validate the data again, you must refresh the browser first, then repeat the steps above to try again.
If validation is successful
Check the data in the successful validation section for accuracy. If the data is correct, send the test CSV file to your T&I manager to import into ROLLER Playground for testing.
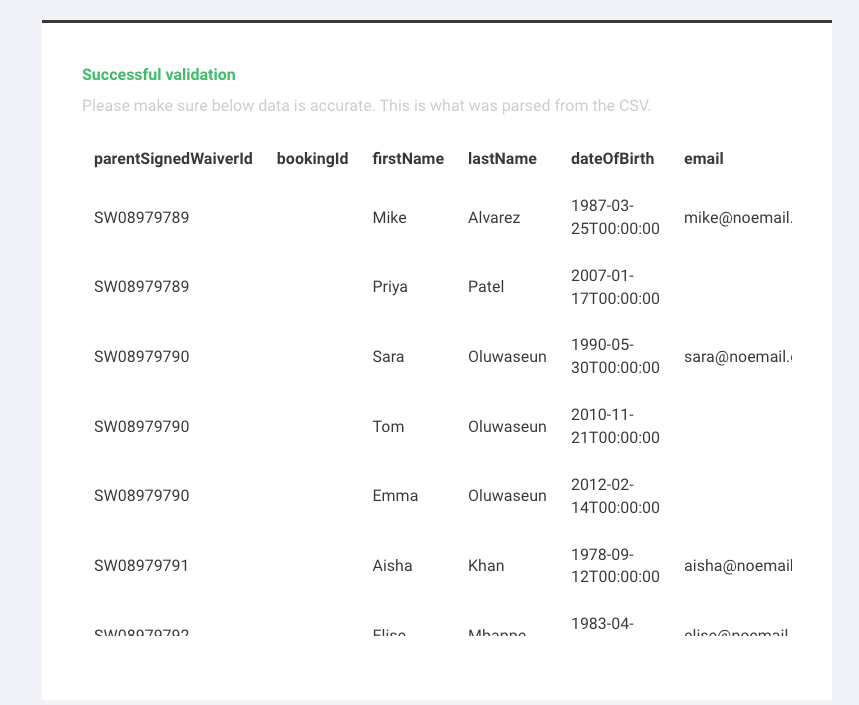
Check the test data has been imported correctly
Once your T&I manager has imported the test data, check the waiver data in your ROLLER Playground to make sure the data has transferred correctly.
Refer to the guide Test your imported data in Playground for instructions on what waiver items to check in ROLLER.
Prepare a CSV file of all your records
If the data has been imported correctly, prepare a CSV file for all your records as outlined above.
Use the same process above to validate the data in all your files.
Send the validate CSV file/s for all waiver records to your T&I manager to import.
Frequently asked questions
Are there file size limits on CSV imports?
Yes, CSV imports are limited to 5 MB.
You must split up the waiver data in a way that doesn't split parents/guardians into different files as that will throw errors due to the children not having a parent linked. This can be done by sorting and saving the file by ParentSignedWaiverId to make sure you don't split out parents and children.
Do I need to include waivers with expiry dates in the past?
No. It's not necessary to import signed waivers that have expired. It's best to delete any waivers with an expiration date in the past from the spreadsheet.