A product won't display online when something in its settings stops it reaching the checkout. By far the most common cause is the product's schedule, or its date and time availability. Other common causes are that the product hasn't been added to the checkout the guest is using, a variation is hidden from online sales, the product is archived and more.
This guide walks through the most common reasons a product is missing from a progressive checkout, ordered from most to least likely, so you can get it selling again fast.
It helps to open your checkout and the product side by side so you can compare their settings as you go. To open your checkout, from Venue Manager, go to Apps > Progressive checkouts > All checkouts, then select your checkout.
Check the product's schedule and availability
This is the leading cause for session passes, party packages and recurring passes not showing in online checkouts.
From Venue Manager, go to Products > Schedules.
Select the product and open the relevant schedule.
Confirm any relevant variations are included in the Tickets section.
Check the schedule dates, times and operating hours cover the booking window.
Select Save.
Confirm the product is added to the checkout
The Products tab controls what guests see after they choose a date. Home page widgets on the Basics tab control what they see when the checkout first opens.
From Venue Manager, go to Apps > Progressive checkouts > All checkouts.
Select the checkout the guest is using.
Select the Products tab.
Check that the product is listed.
Select the Basics tab.
Under Home page widgets, check the product is in a widget if you want guests to see it as soon as the checkout opens.
Select View checkout to preview what guests see.
Check when sales start and stop
A session pass or party package with a current schedule still won't show online before its sales start, or once online sales have closed for a session.
From Venue Manager, go to Products > All products.
Select the session pass or party package.
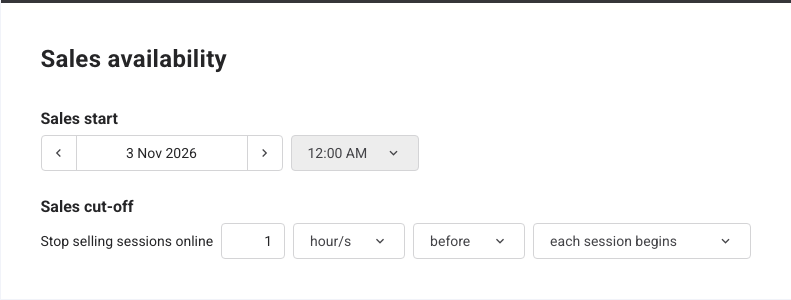
Under Sales availability, check Sales start has passed.
Check Sales cut-off. It sets when online sales stop for each session (eg 2 hours before each session begins), and sessions inside that window show as unavailable.
Select Save.
Check the variation isn't hidden from online sales
From Venue Manager, go to Products > All products.
Select the product and variation.
Select Advanced.
Make sure Hide from online sales is turned off. If only some variations are missing, this setting is usually why.
Check the product isn't archived
From Venue Manager, go to Products > All products.
Set the Status filter to Active.
Confirm the product and variation aren't archived.
Archived products are removed from online checkouts and POS but still appear in reporting, so a product can look live in a report while being hidden online.
Check capacity and resources
From Venue Manager, go to Bookings > Daily capacity.
Select the date in question.
Find the resource and time slot for the session. The page shows how many spaces are left for each slot (eg 17/20 booked, with three spaces left). If the slot is full, the session is sold out.
Check whether the capacity has been blocked. Blocked slots are highlighted yellow. Staff can block capacity, which makes a session unavailable even when the schedule is correct.
A session can also show as unavailable when a ticket has no resource, or its resource holds fewer guests than you expect.
From Venue Manager, go to Products > All products.
Select the product.
Check the resource is selected under Resource, and in each ticket variation that should use it.
Select Save.
Go to Settings > Resources.
Select the resource and check its capacity covers the number of guests you want to allow.
Check the product doesn't book out the whole resource
If one booking makes a session show as sold out, the product may be booking out the whole resource.
From Venue Manager, go to Products > All products.
Select the product.
Under Resource, check whether Book out multi-booking resources is turned on. When it's on, each booking takes the entire resource, and no one else can book it for that session.
If guests should share the resource, turn it off.
Select Save.
Turning it off applies to new bookings. Bookings made while it was on still take the whole resource until you edit their resources and save the booking.
To learn how, see the guide Edit resources for existing bookings in Venue Manager.
Check categories and tags
If your checkout groups products by category or tag, a product only shows in the groups it belongs to.
From Venue Manager, go to Products > Categories.
Check the product is in the category your checkout uses.
If your checkout uses tags, go to Products > All products and select the product.
Check it has the tag your checkout uses, then select Save.
Check it's fixed
After each change, select View checkout, choose the date in question and check the product now shows.
If the product still isn't showing, contact your customer success manager or the support team with the product name, the checkout and the date.