A session pass lets guests book time-based activities that run on a schedule. Each session links to one or more resources (eg trampoline zone, lane, escape room, or VR arena), so ROLLER automatically manages capacity for you and prevents overbooking.
Use a session pass for activities that run multiple times a day, such as jump sessions, mini golf, karting, escape rooms, VR, laser tag, playgroups or timed experiences.
Before you start: Create your resources in Settings > Resources. Each session pass must link to at least one resource.
Step 1: Create a new session pass
From Venue Manager, go to Products > Create product.
Select the Session pass product type.
The session pass settings page opens.
Step 2: Add content
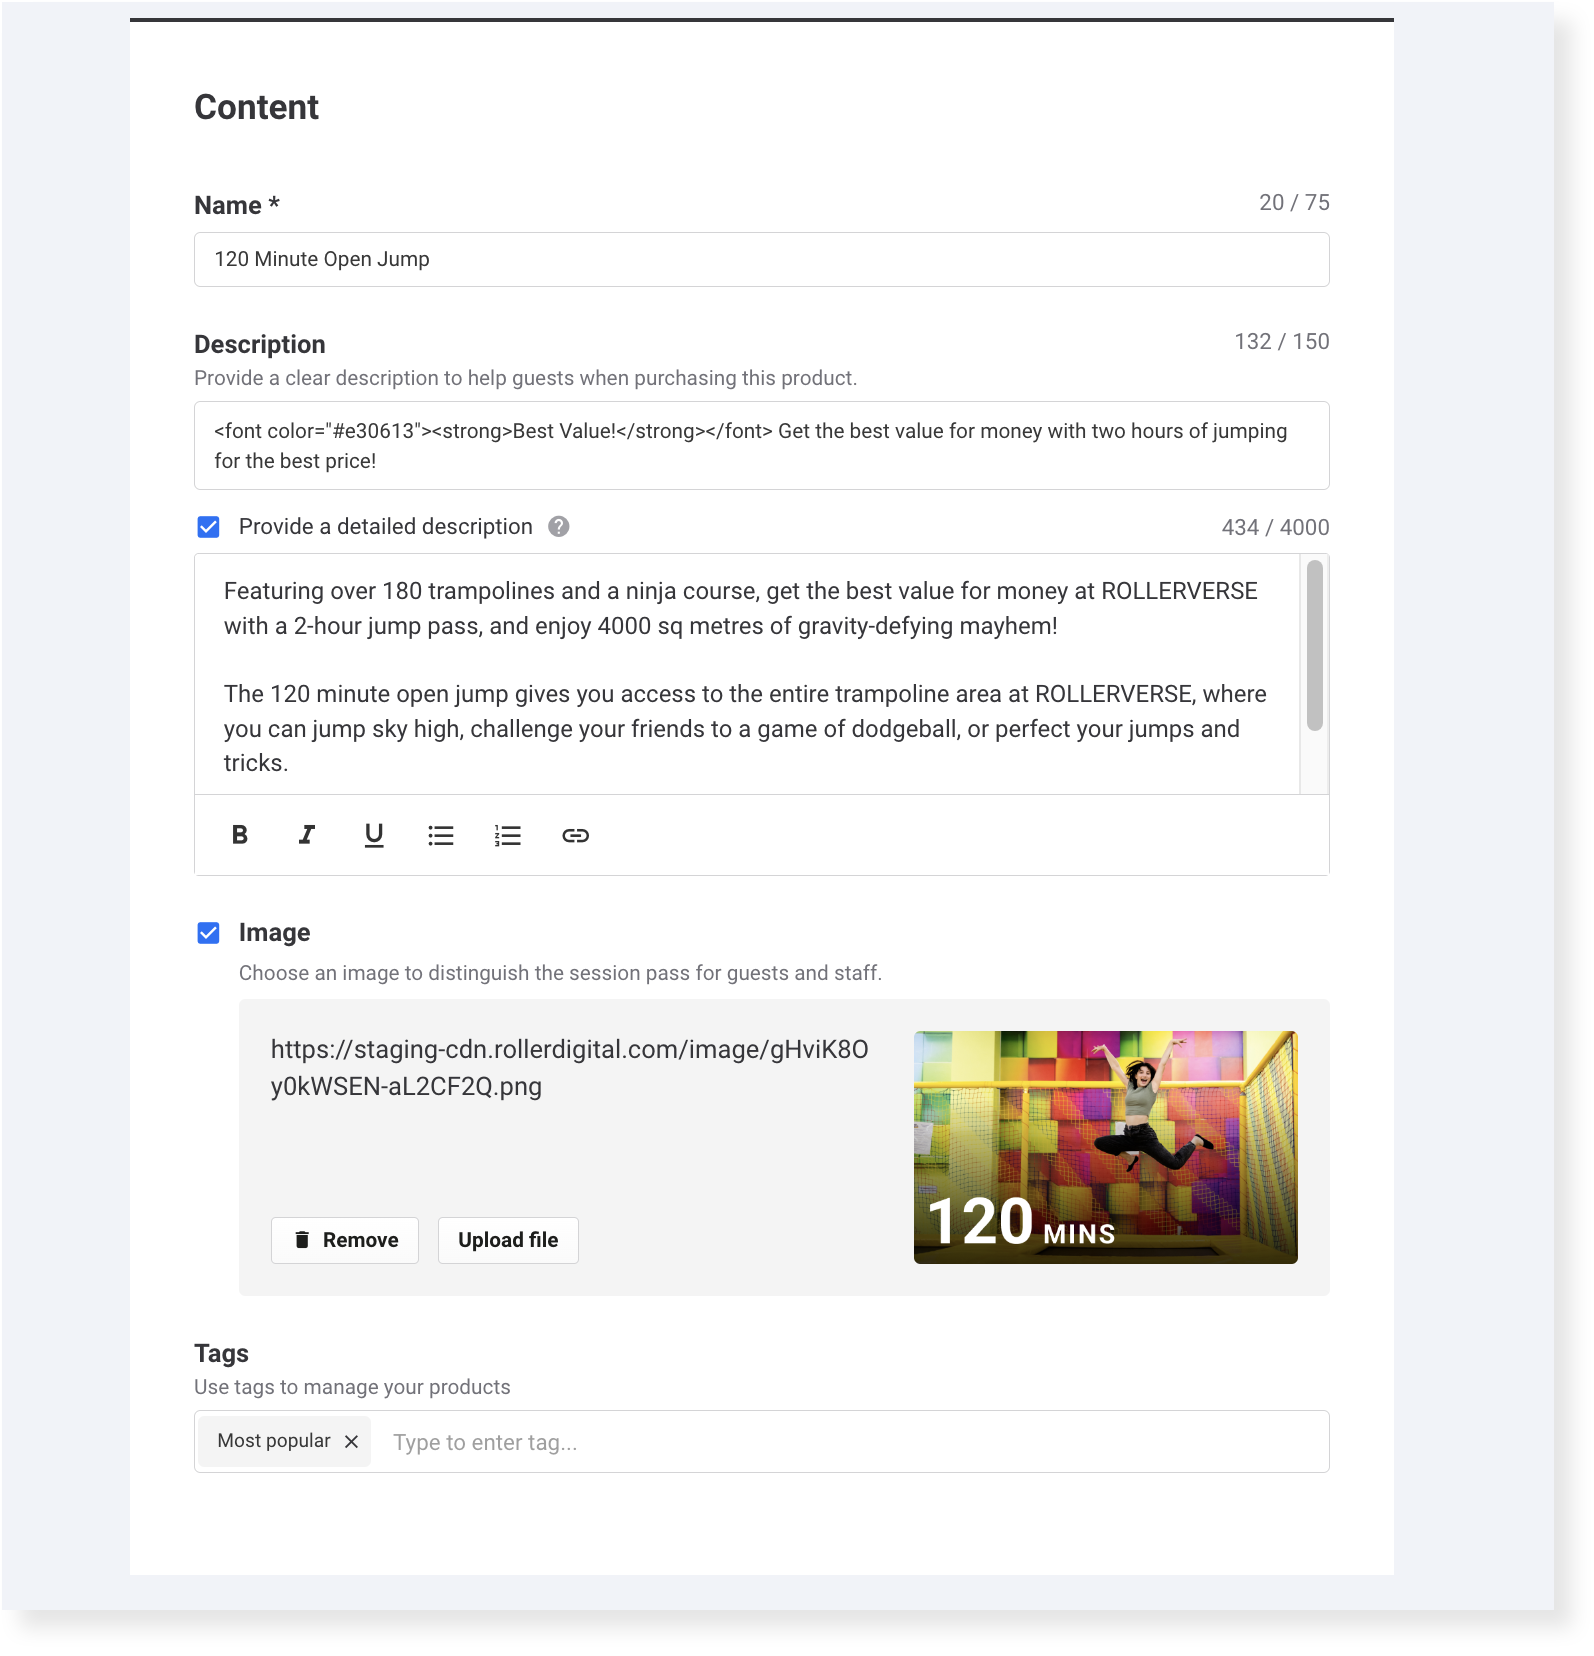
These fields help guests and staff recognize and book an activity.
Field | Description |
|---|---|
Name (required) | The product name shown online and at POS. |
Description | Short summary (max 150 characters) for online checkouts. |
Detailed description (optional) | Longer description shown under a Learn more link in online checkouts. |
Image | Upload a 640 × 390 px, or 5:3 aspect ratio. JPG or PNG. This helps make the product stand out from other products online and at POS. |
Tags | Use tags to organize and automatically add products to checkouts or POS menus. Create new tags or select existing ones from the drop-down menu. |
Generate a description and image with AI (optional)
You can generate a description and a product image from the product name, then edit whatever you generate before saving. This is useful when you’re setting up a new pass and don’t have copy or artwork ready.
AI-generated descriptions and images are available on request. To enable this for your venue, contact your customer success manager or the support team.
Fill in the name, session duration and any other details you have first. The more the AI has to work with, the better the result.
To generate a description:
Select the AI icon next to the Description field.
Choose one of the description options.
Select Use description.
.png)
To generate an image:
Tick the image option, then select Create one for me.
Use the suggested image prompt or write your own, then choose an image style — graphic, realistic or illustration.
Select Generate images. Select it again to generate more options if none of them work.
Once you’ve chosen an image, select Use image.
.png)
Create the description first. The image generation uses the product details you’ve entered, so it produces a better result when there’s a description to work from.
Anything you generate is fully editable, so you can adjust the wording or regenerate the image until it feels right for your venue.
Step 3: Add session pass details
Set the session duration, link resources, add a price rule and create ticket variations. These settings define how the session runs, how capacity is managed and which ticket options guests can buy.
Resource
Select the resources or resource groups used for the activity.
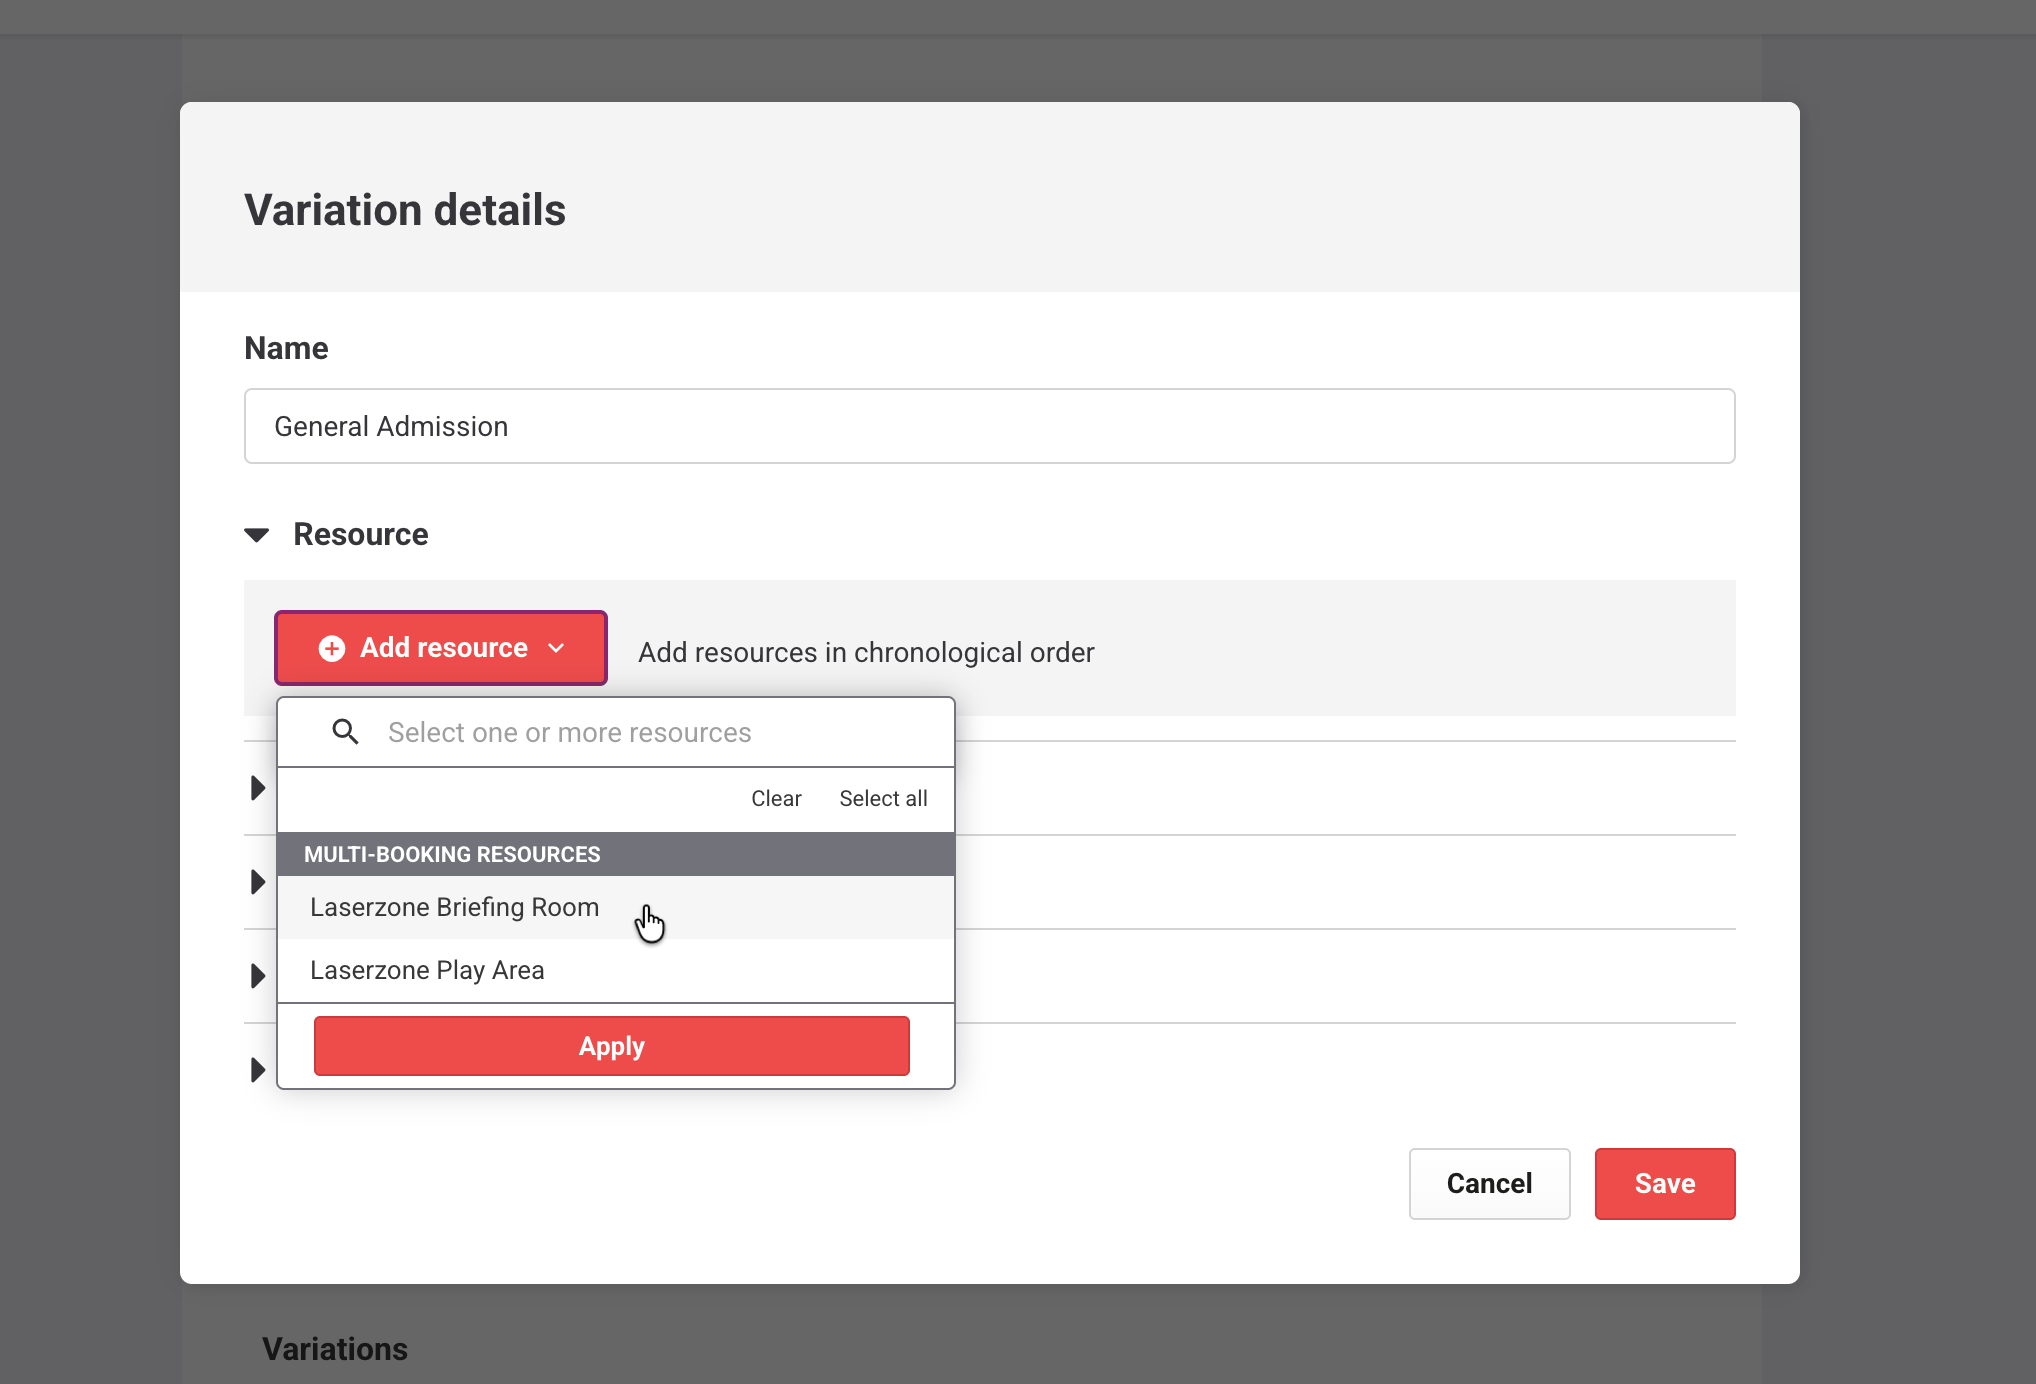
You can select one or more individual resources (eg laser tag briefing room) or resource groups (eg laser tag rooms).
To add resources to ticket variations later, you must first add them here.
Resource groups automatically allocate bookings to interchangeable resources within the group.
Smaller capacity resources are filled first.
If capacities are equal, resources are assigned in list order (eg Room 1, Room 2, Room 3).
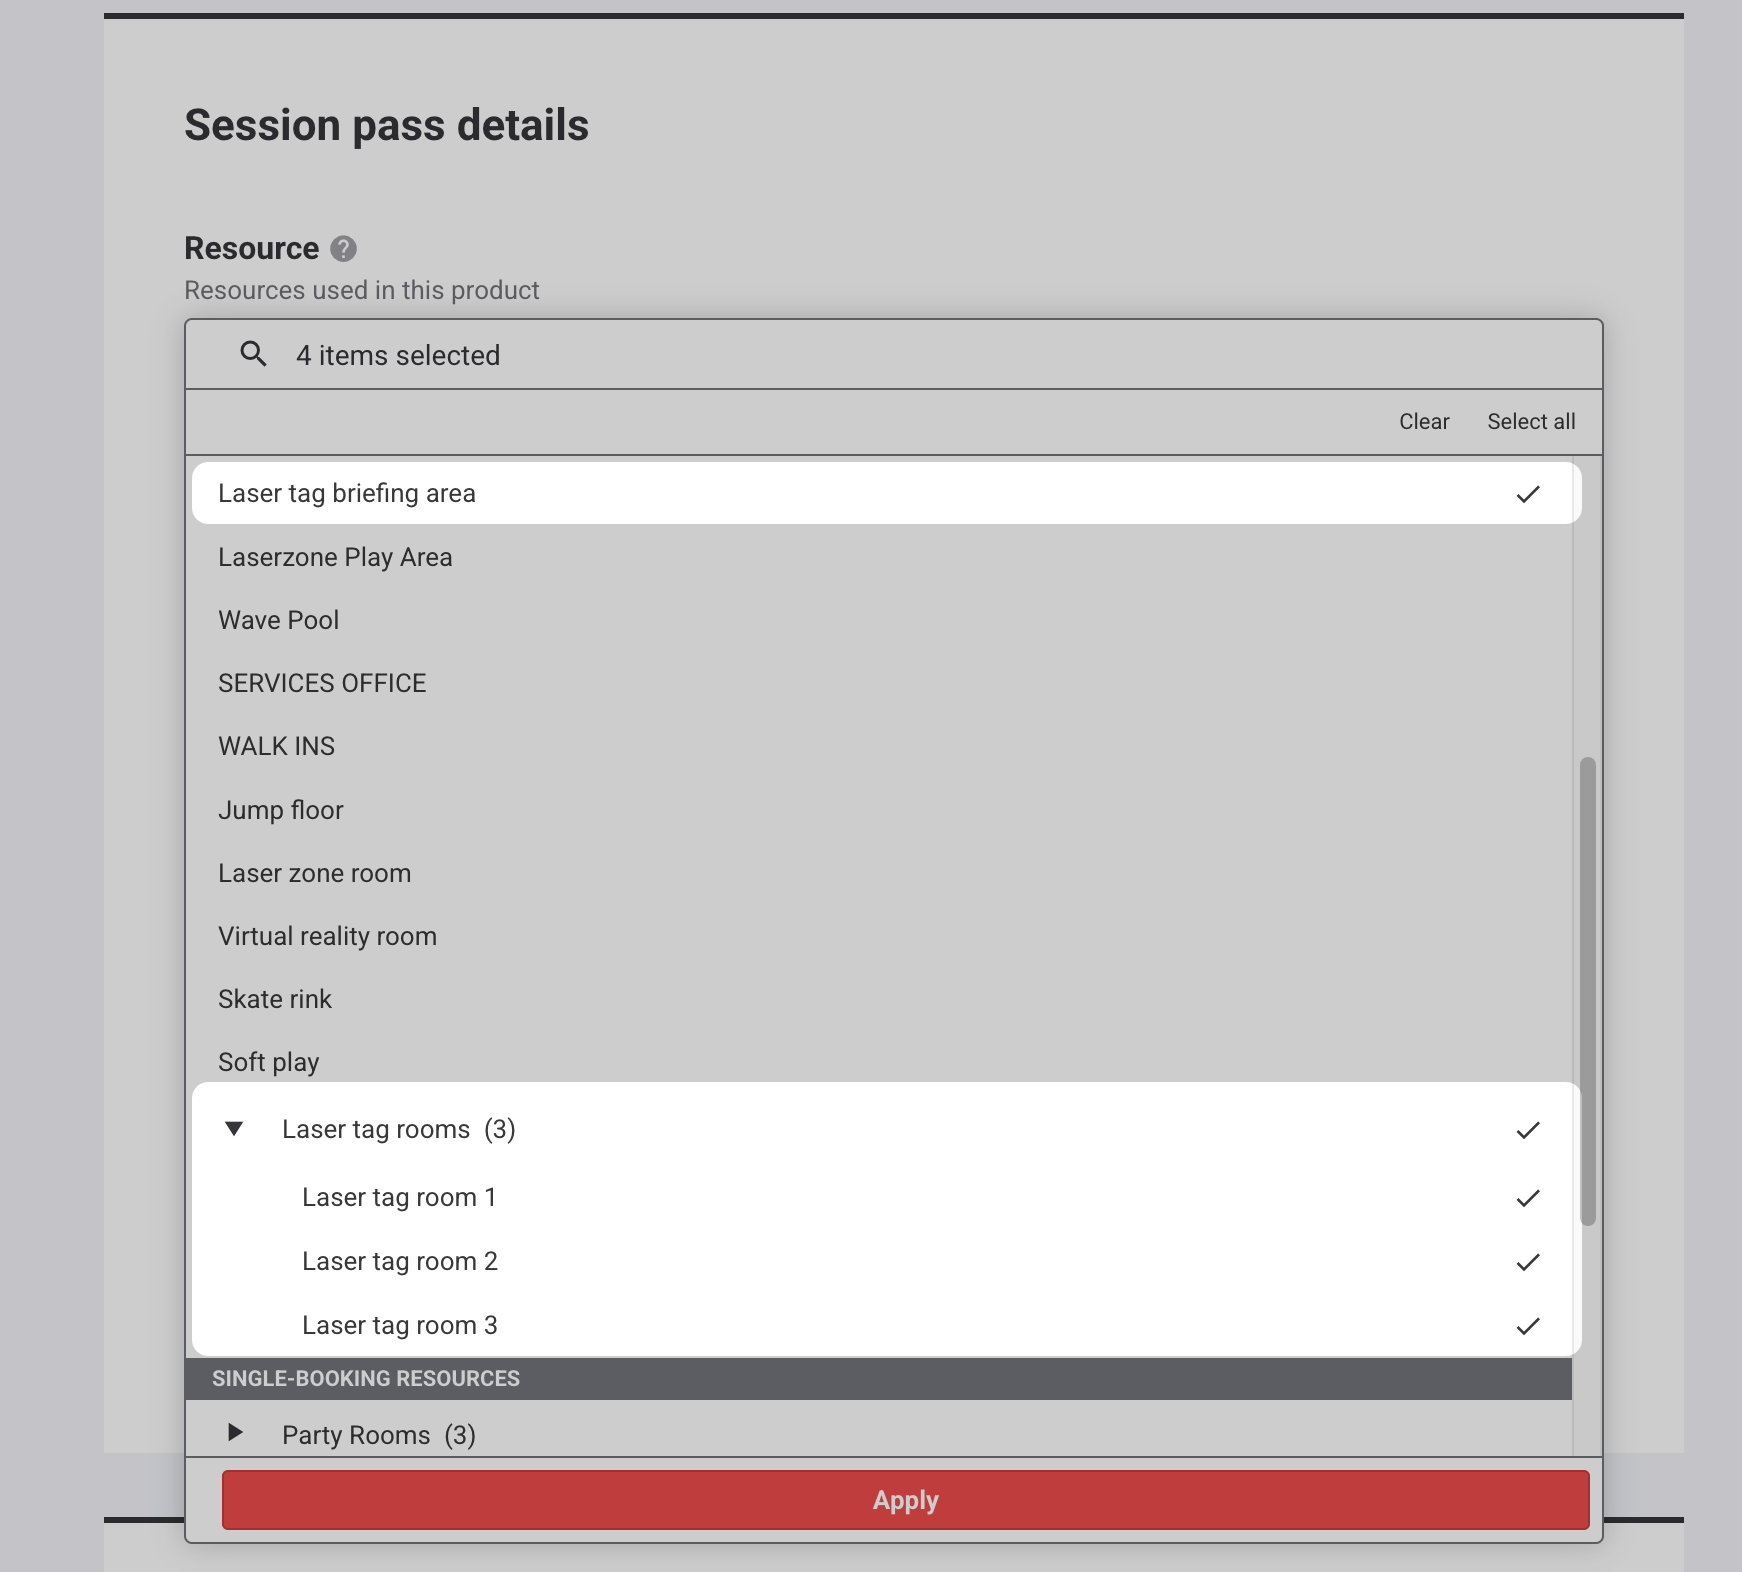
Always check the booking rules for your resources are correct. Multi-booking resources are used for shared spaces that take multiple guest bookings at the same time up until capacity is filled (eg trampoline or play zones). Single-booking resources are used for spaces that are exclusively booked by guests for the session, such as escape rooms, axe throwing booths or party rooms. Go to Settings > Resources to confirm they have been set up correctly.
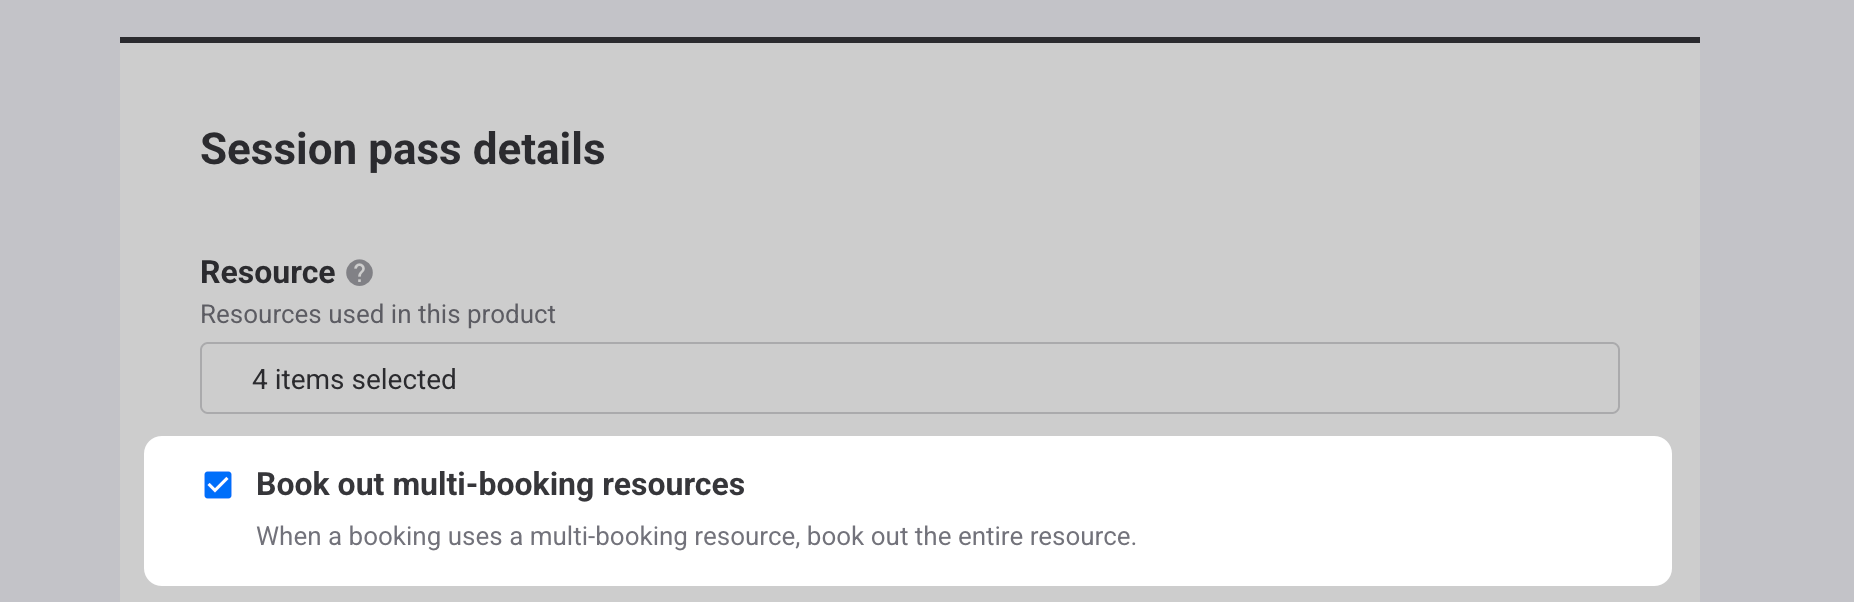
Book out multi-booking resources
Use Book out multi-booking resources for private event products so that you can automatically reserve the entire shared space (multi-booking resource).
When enabled, any session pass booking for the product automatically blocks out all the capacity for any linked resources at the session time (eg all the gym space).
In Daily capacity view, multi-booking resources appear in dark blue (like single-booking resources) so it’s clear the space is fully reserved.
Session duration (required)
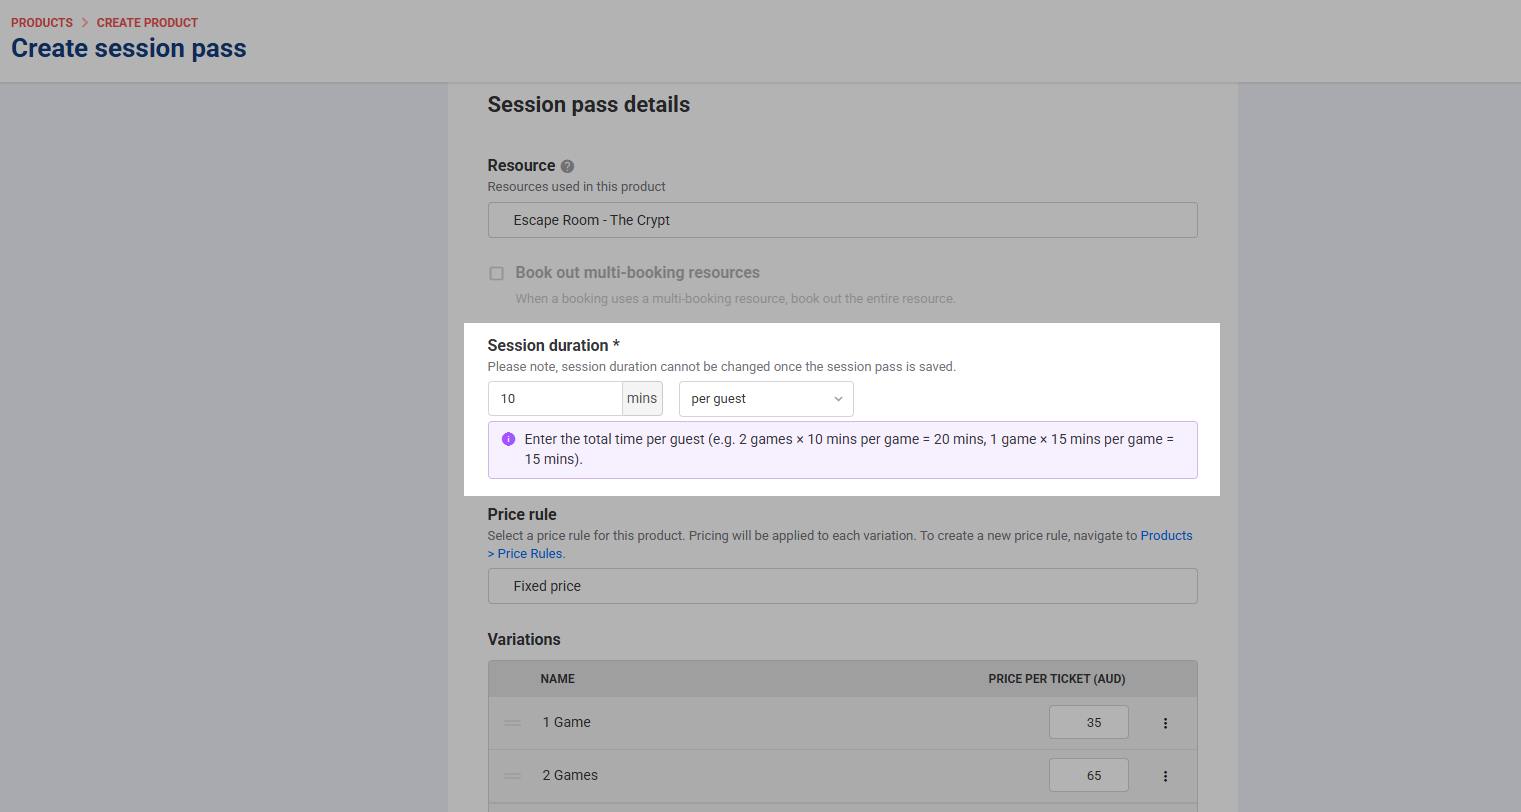
Enter how long each session runs in minutes, and choose how the duration is calculated from the drop-down:
Per session (fixed duration): every booking runs for the same length of time. This is the default and is required if you want to set up group pricing.
Per guest (duration scales with group size): the duration scales with the number of guests in the booking. For example, 10 minutes per guest with a booking of six guests is automatically allocated 60 minutes. Use this when each guest needs their own time on the resource, like bowling, axe throwing or VR.
To learn more about game-based sessions and use cases, see the guide Set up game-based (per guest) session passes.
Keep in mind:
Session duration can't be changed after saving. Confirm the length and session type before saving. To change a saved product’s duration, duplicate it and update the duration before saving.
This duration applies to all ticket variations you add to the product.
If you have different durations for the same activity, create separate products.
Per guest only supports single-booking resources. If you attach a multi-booking resource, per session is selected automatically.
The Group ticket section is only available when the session duration is set to per session.
Price rule (optional)
A price rule prices this product by tier and applies the right tier automatically. What decides the tier depends on the rule type. Build the rule first in Products > Price rules, then apply it here.
Scroll to Price rule and select your rule from the drop-down. The Variations table gains a column for each of the rule's tiers.
Set a price for every ticket variation in every tier.
Select the checkout display checkbox below the Variations table if you want guests to see why the price changes. It does not change what they pay.
Save the product.
One rule per product. The same rule can be applied to as many products as you like. For the rule types available and how to build one, see Get started with price rules.
Keep in mind:
Price rules do not apply to products with consecutive sessions configured.
Adding a group ticket variation disables quantity-based rules for the product. Time-based, early bird and capacity-based rules still work.
Variations
Each ticket variation represents an option guests can choose such as adult, child or family.
To create variations:
Select the placeholder ticket.
Enter the ticket name.
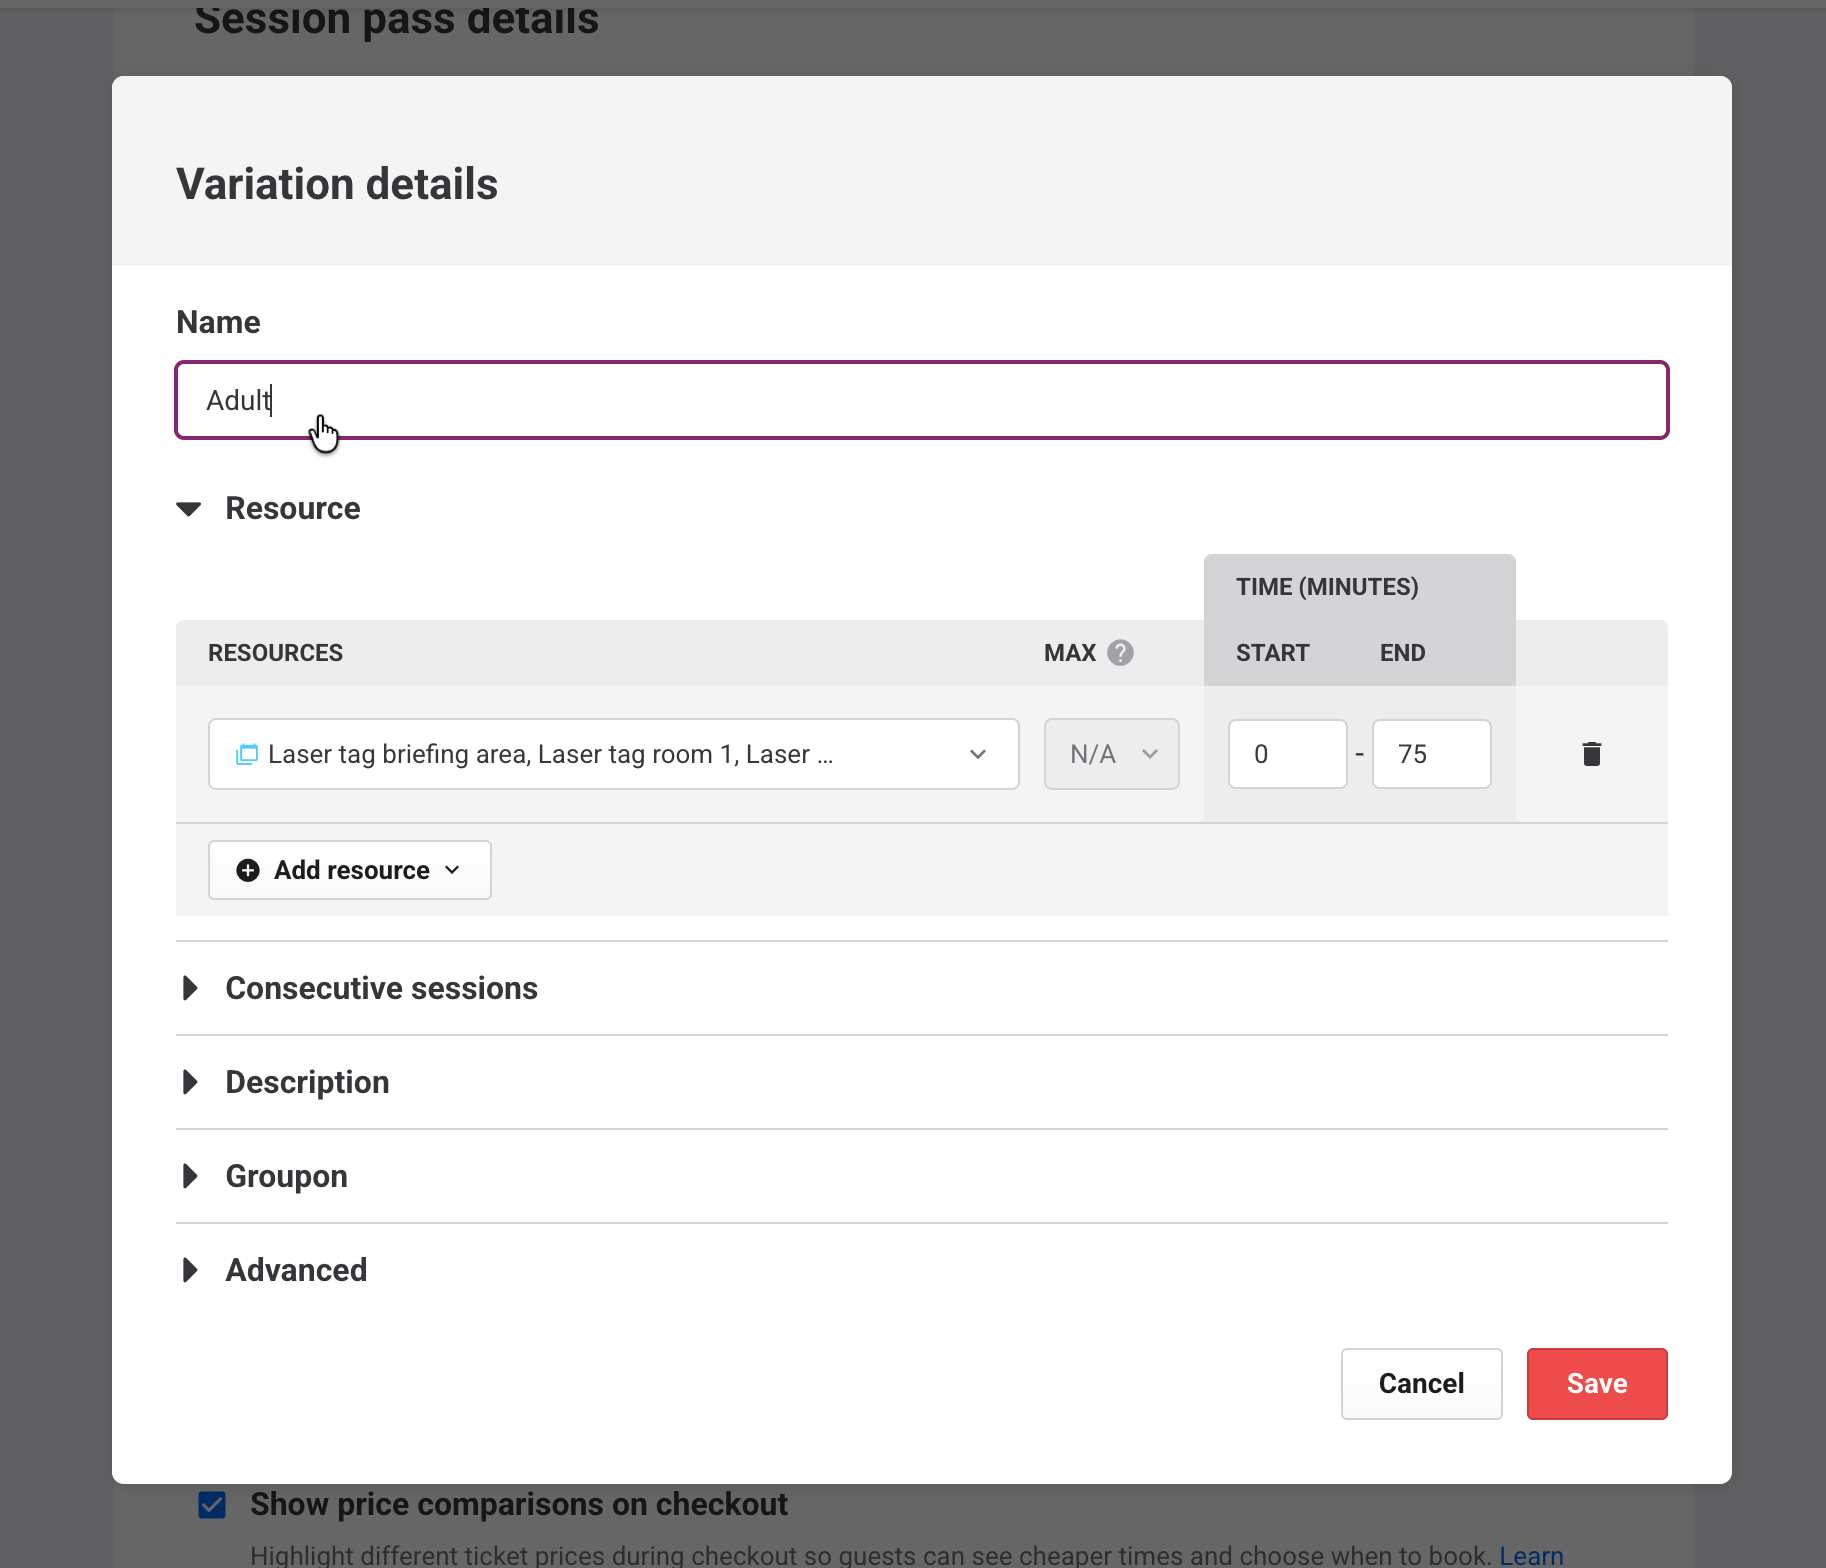
All resources you added to the product above appear in one row in the resources table. Resources in the same row act as a resource group. If you want guests to use different resources at different points in the session, so you’ll need to split them into separate rows.
Select the resources drop-down in the first row and remove any resources that shouldn’t be used first.
Add those resources back in a new row or rows.
Set the start and end times for each stage of the session (eg 0–15 mins briefing, 15–75 mins activity).
If a resource is missing from the drop-down, add it to the product first (see above). Then return here to add it to the ticket variation.
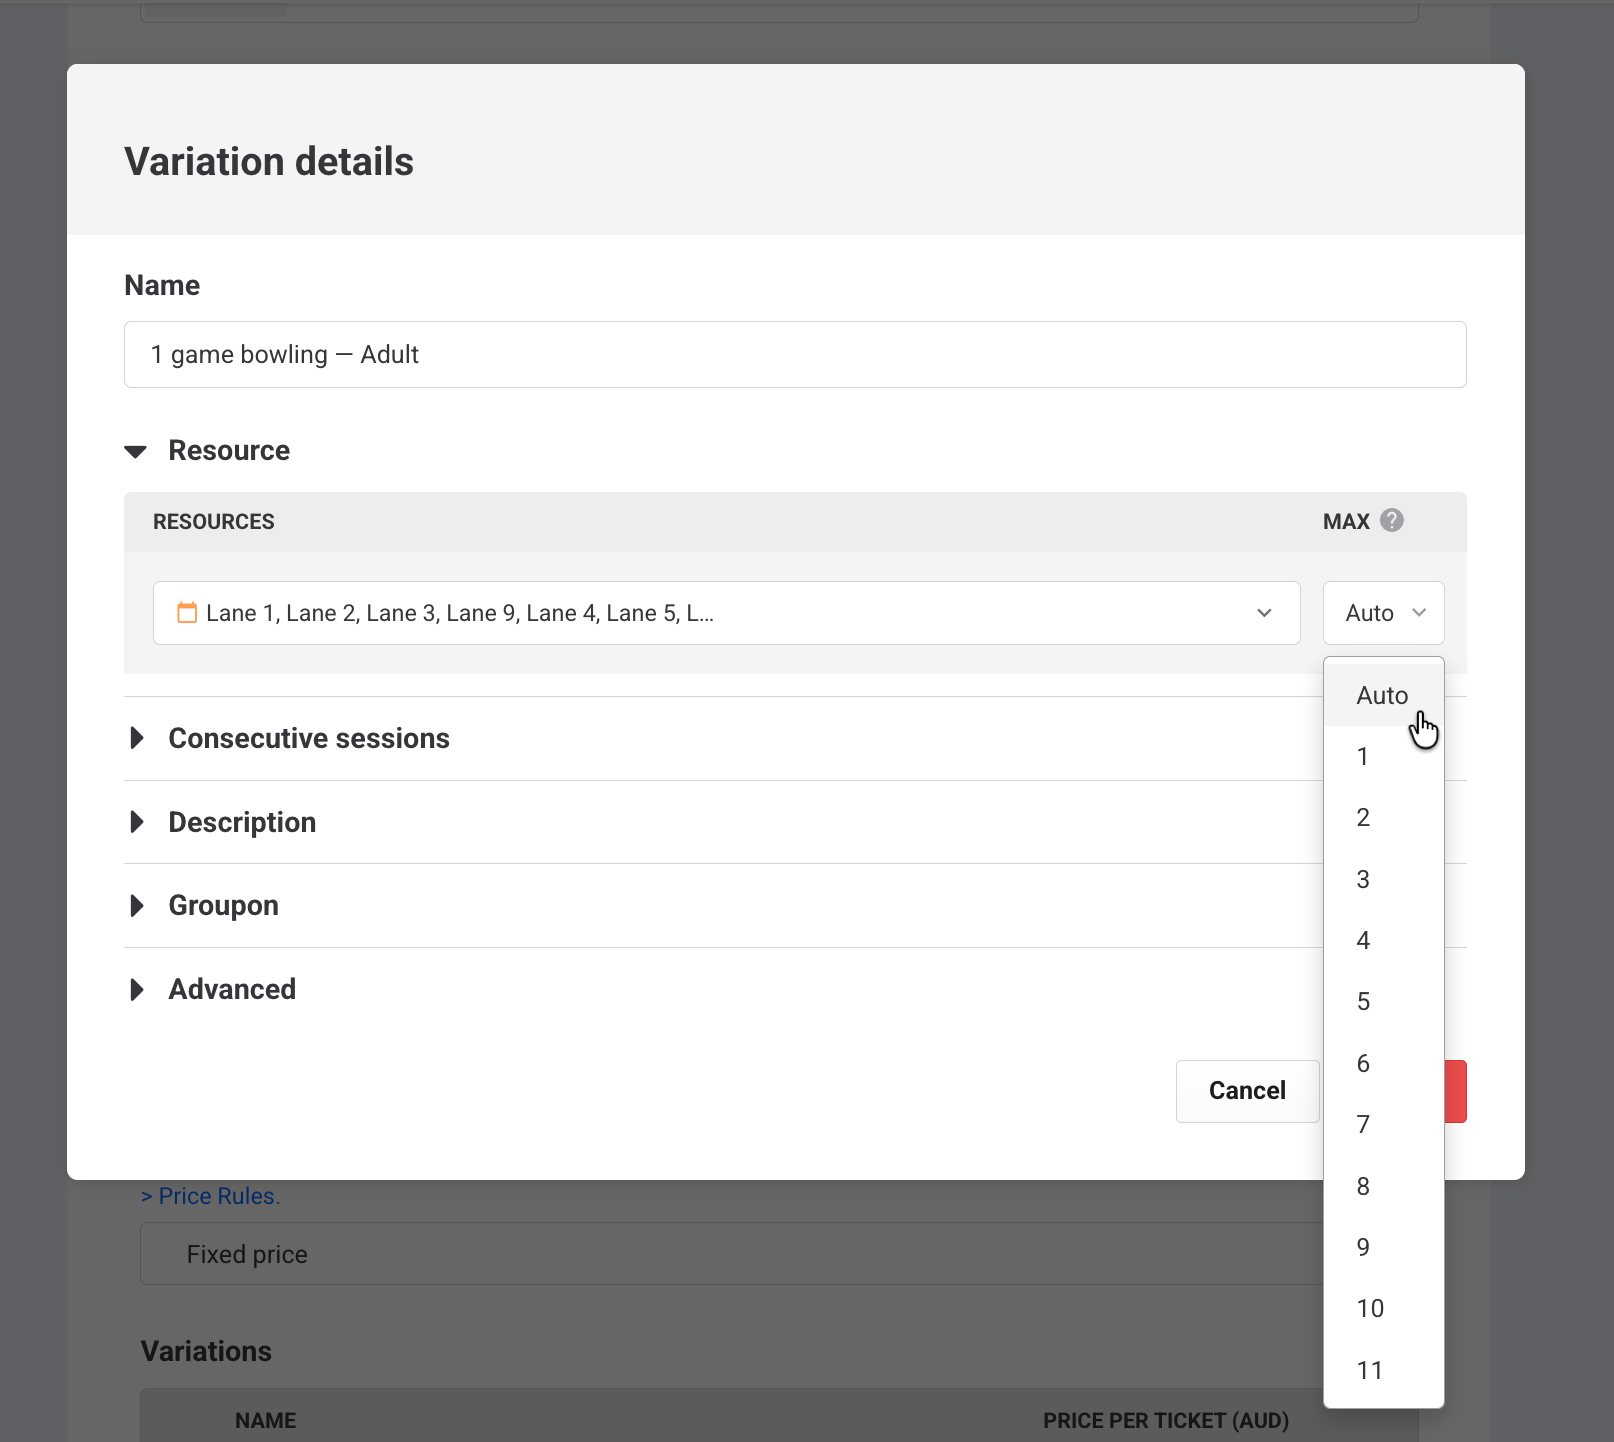
Set the maximum number of single-booking resources guests can book into per session booking. For example, limit to two per booking or set to Auto for ROLLER to automatically assign resources based on number of guests booked.
Save the variation. Then create additional variations as required (up to 20).
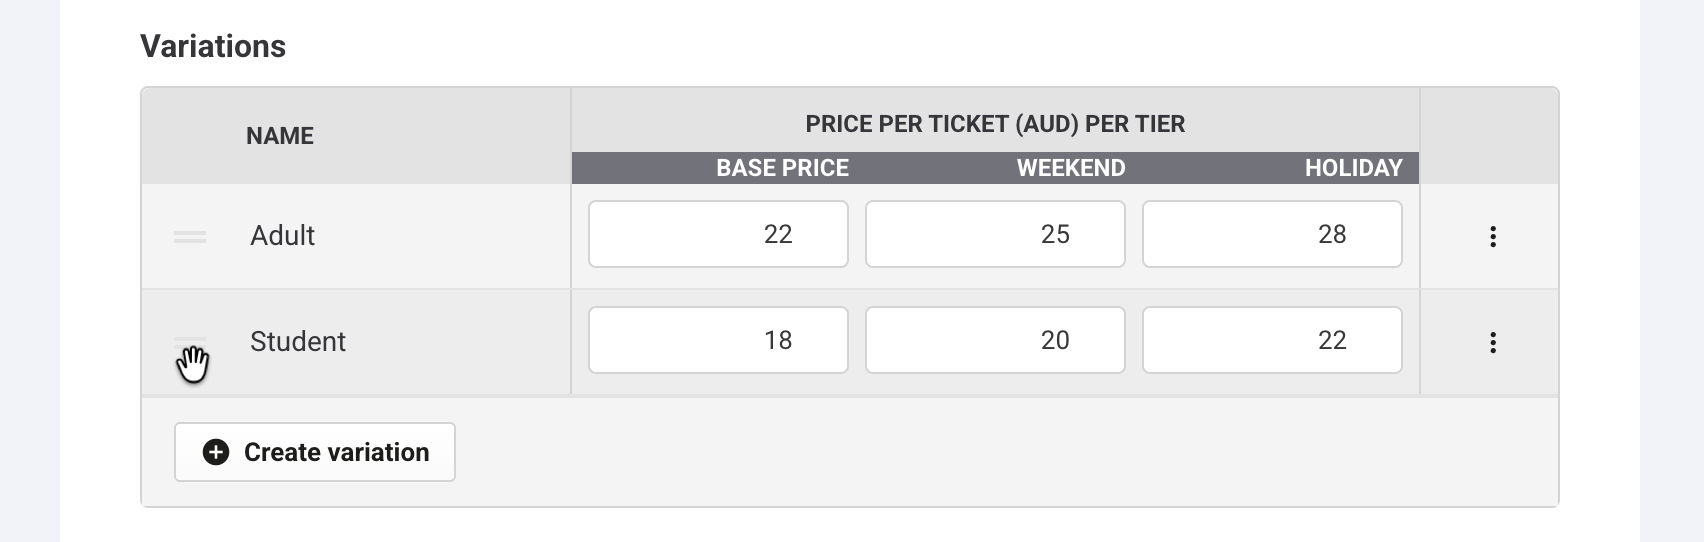
Add pricing per ticket (and per tier if using price rules). For free tickets, you can enter 0.
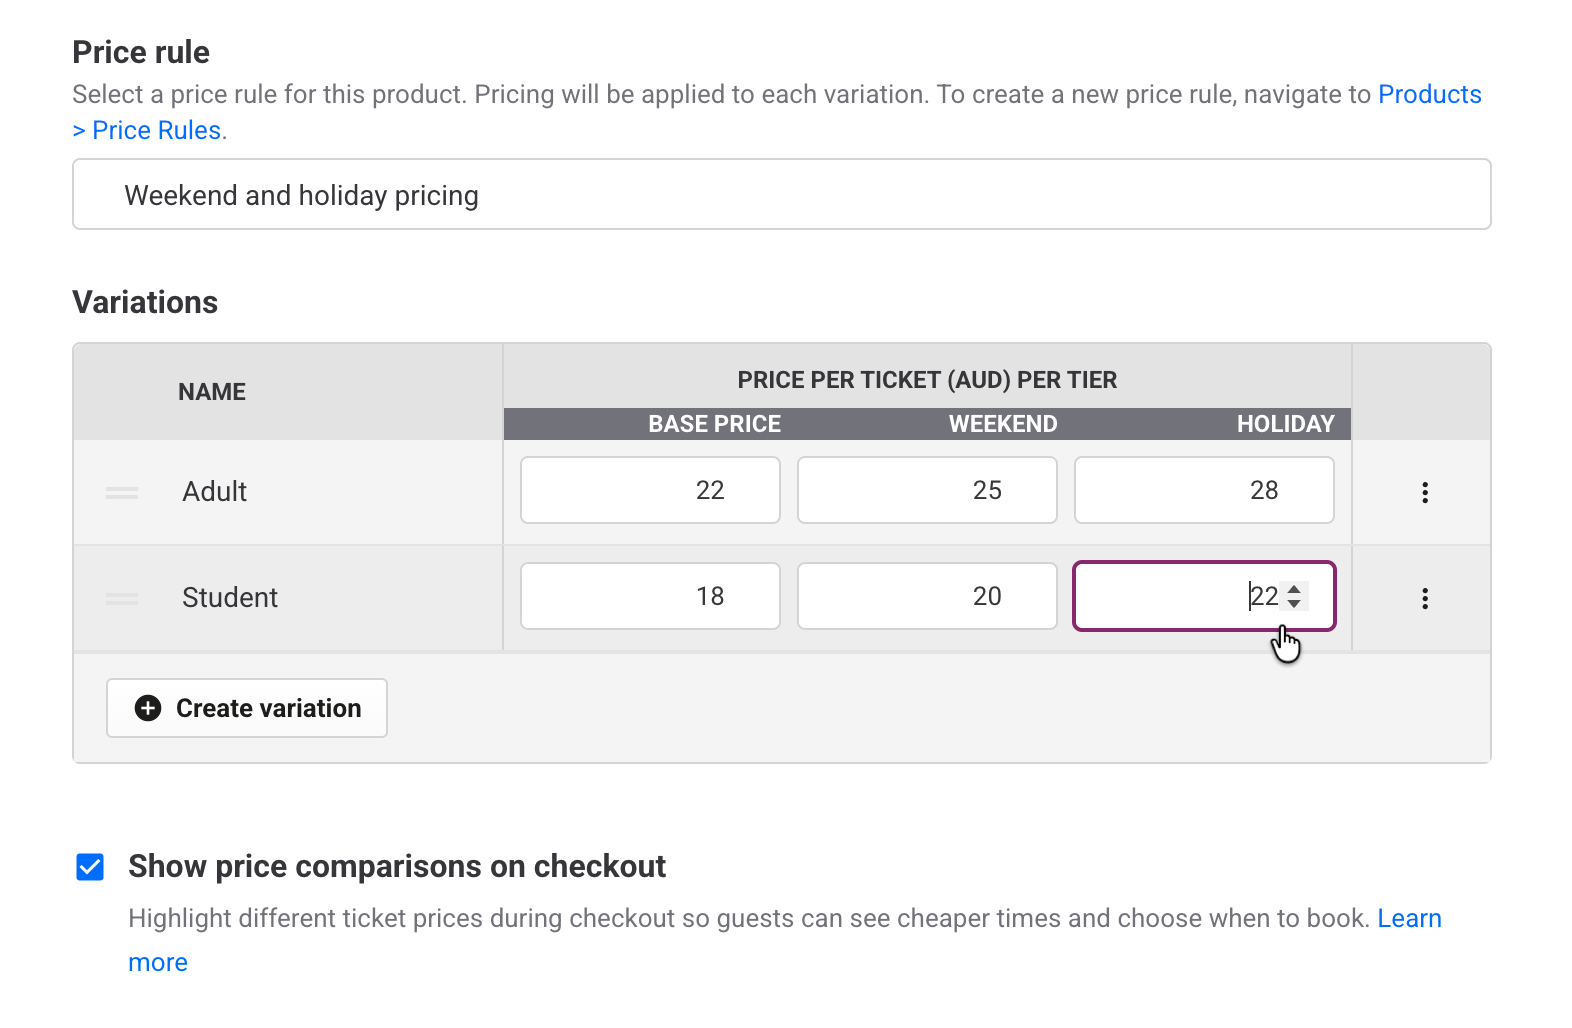
You can reorder tickets using drag and drop to prioritize the most common ones. The order you choose is the order they display in online checkouts.
Other ticket options
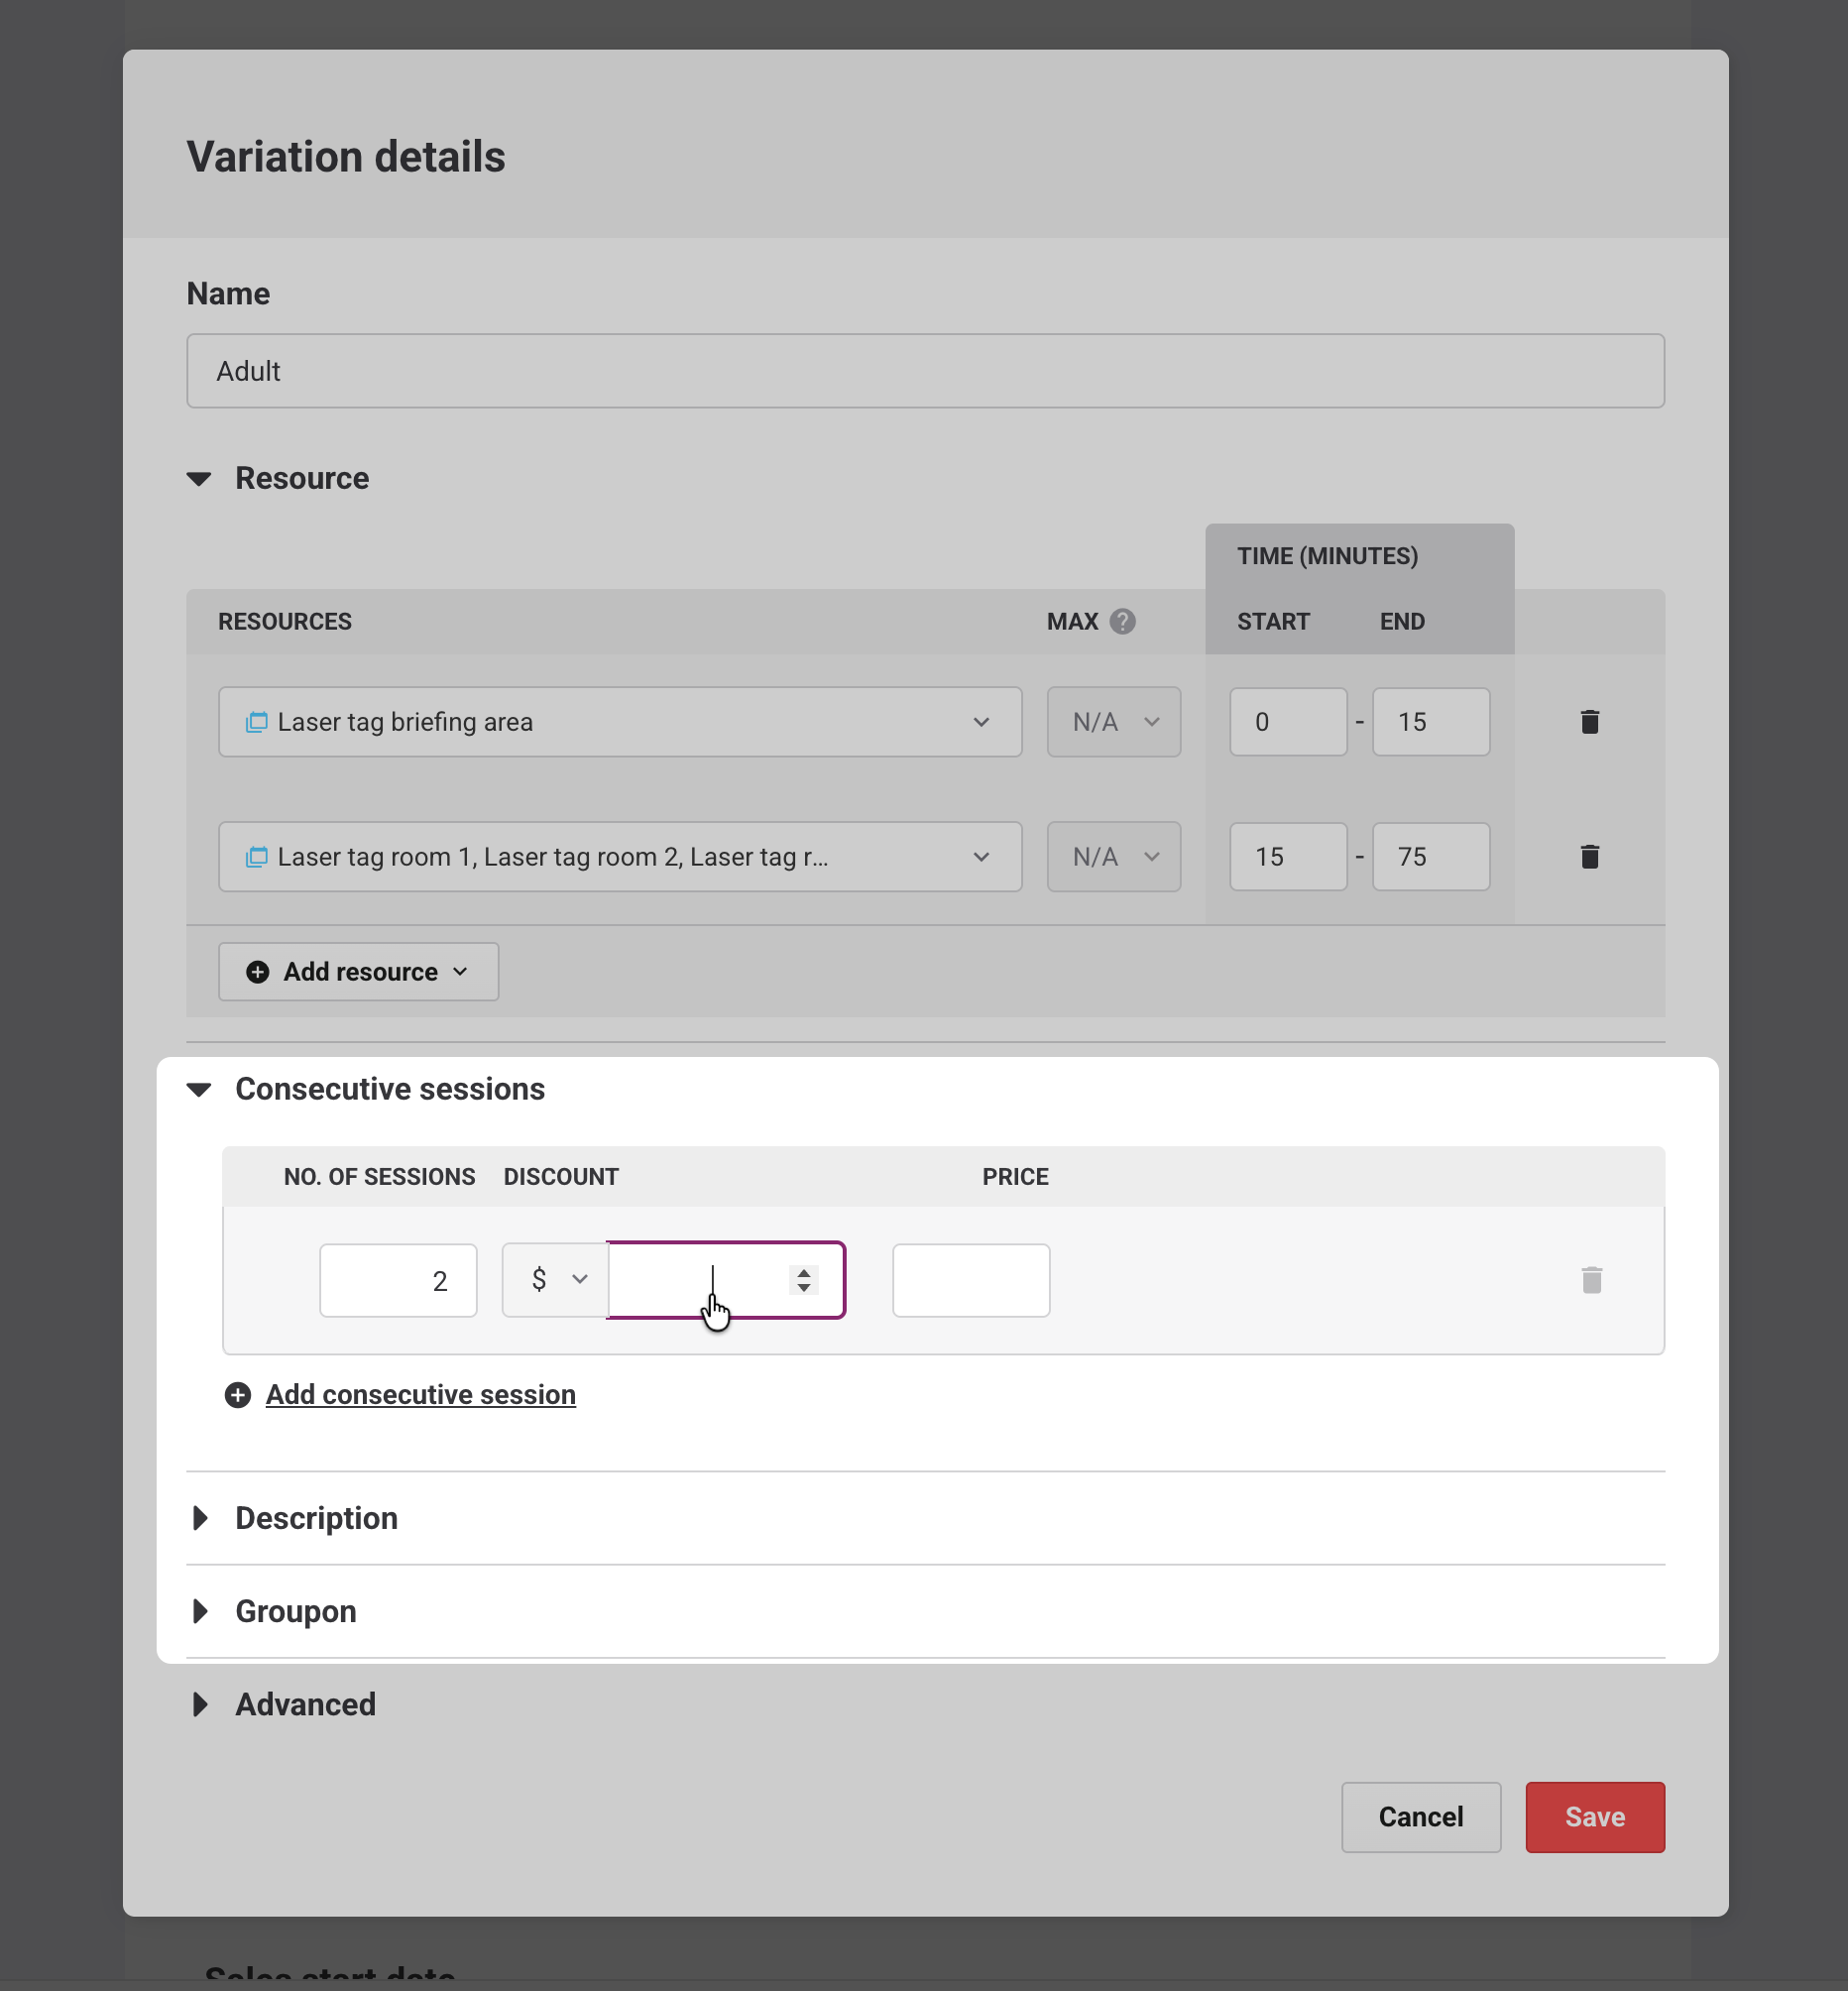
For each variation, you can expand other options to set up consecutive sessions, ticket descriptions and Groupon.
Option | Description |
|---|---|
Consecutive sessions | Let guests extend their session at a discount. Sessions must run at consistent intervals and the end of one session must match the start of the next session. Not currently supported with price rules. You must also configure the settings to Allow guests to choose session duration in the checkout settings Options tab. Guests will then see a drop-down menu next to the ticket, allowing them to increase their session duration by the specified amount. |
Description | Add an extra description for each ticket, shown in online checkouts. |
Groupon | Enable Groupon-specific settings after setting Tax inclusive in advanced options below. |
Advanced ticket options
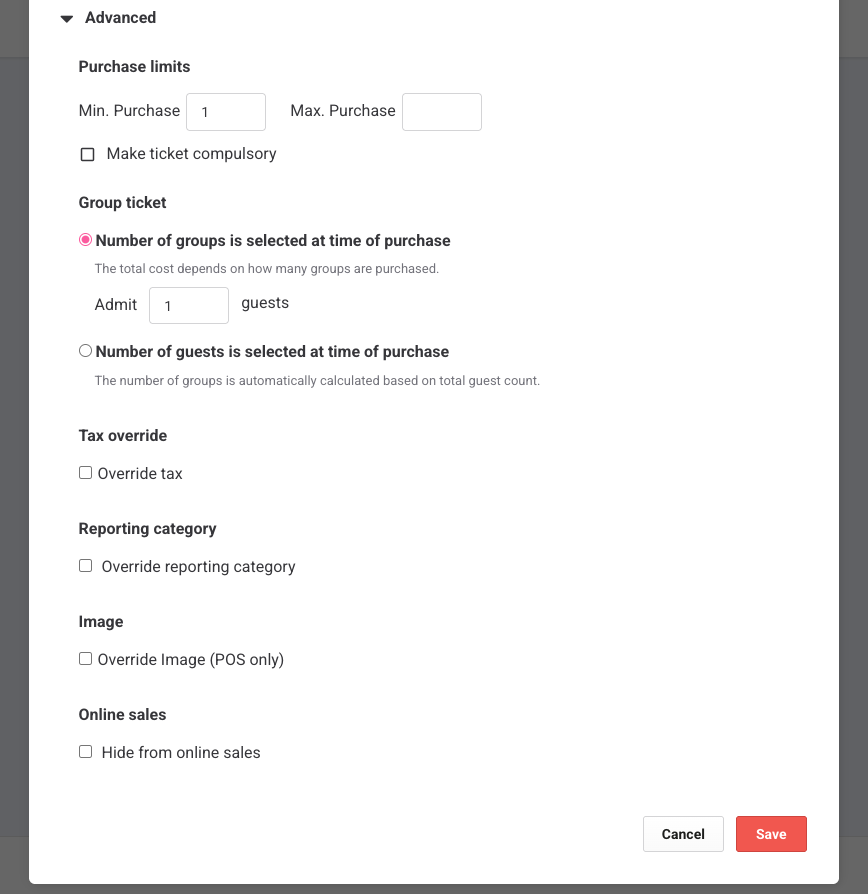
Expand the advanced option in variation details to choose from the following ticket options.
Setting | Description |
|---|---|
Min & Max purchase limits | Set limits on the number of tickets that can be purchased for a product variation by guests purchasing via the online checkout. This does not apply when selling tickets via POS and Venue Manager. Minimum: If you set a minimum of one ticket without specifying a maximum, guests can buy up to the full capacity of the resource linked to the ticket. Example: For example, you can require a minimum purchase of ten tickets at $10 each (totaling $100). Guests can then add more individual tickets at $10 each if desired. |
Make ticket compulsory | Require guests to purchase a specific ticket when buying any tickets in a single session. Example: If adult supervision is required, you might make an adult ticket mandatory, possibly pricing it at $0. |
Group ticket | Sell a variation at a flat price per resource (eg lane, room, bay) instead of per guest. Available only when the product's Session duration is set to per session. Choose how groups are sold:
In both Group ticket modes, pricing is charged per resource. The two modes only change how guests enter the booking quantity at checkout. You can apply time-based, early bird and capacity-based (beta) price rules to your group ticket variations. Note: Adding a group ticket variation to a product disables the quantity-based price rule option for that product.
|
Tax override | Set a product tax rate different from the default rate set in your venue settings. |
Override image (POS only) | Use an image different from the product image for a ticket variation in POS. |
Hide from online sales | Hide the ticket type from online sales, making it only available for sale through POS or Venue Manager. |
Step 4: Set the sales availability
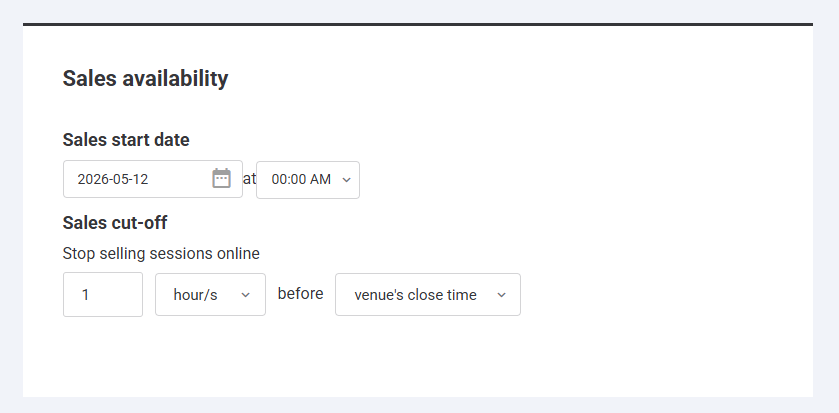
Control when guests can buy tickets online. This helps manage when tickets go on sale and stops last-minute bookings, giving staff time to prepare.
Start date: Delay when tickets go on sale. Default is today.
Cut-off date: Set when online sales close. Choose what to base the cut-off on:
Session start time (default): Sales close a set time before or after each session begins. The default is 1 hour before the session.
Venue closing time: Sales close a set time before your venue closes for the day. Available only when you use operating hours.
This doesn't affect POS or Venue Manager sales.
Sales availability alone doesn't make the pass available. You must also:
Add the product to an online checkout and POS device menu (either manually or by using product tags)
Step 5: Additional options
Use these settings to refine the guest experience or support your operations.
For example:
Add-ons: Offer recommended upsell items during online checkout to boost revenue.
Waivers: Require guests to complete a waiver before check in.
Setting | Description |
|---|---|
Add-ons | Add any product type (except party packages) as recommended upsell items after this product is added to the cart in online checkouts. To help guests avoid booking an add-on session at the same time as the initial session, select the option Next available session. This suggests the next available session time after the initial session finishes. You can also add an additional time buffer between sessions by entering a value in the field next to minute buffer between sessions. Add-ons appear only in online checkouts; for Venue Manager or POS, you'll need to add them manually. |
Alternate address | Provide a different location if the activity occurs away from the main venue. |
Booking reminder email (All plans except Lite Legacy) | Set up automated booking reminder emails to notify the booking holder before their event. The email includes booking details, instructions, and a waiver link (if needed). To enable, check the box and choose how many days before the event to send the reminder. |
Confirmation required | Decide if bookings with this product are labeled with an unconfirmed booking status in ROLLER until manually confirmed by staff. |
Display availability as remaining resources | Shows how availability for single-booking resources is shown in checkout session time buttons.
You must also enable Show number of tickets/resources remaining on session time buttons in the checkout Options tab for remaining availability to display. Use when guests need to know they’re booking a whole resource (single-booking resource) vs a spot within a shared resource (multiple-booking resource). |
Deposit | Allow guests to make a partial payment by setting a deposit as a percentage of the total cost or a fixed amount for this product. |
Forms | Add one or more custom forms you've created in ROLLER to capture additional details for the booking. Guests will be prompted to complete the form post purchase in online checkouts. Select and apply the form from the drop-down menu. |
Instructions | Provide important instructions to guests about this product to display post-purchase in online checkouts, order confirmation emails and booking reminder emails. |
Purchase limits | Set a minimum and/or maximum number of guest tickets required to purchase this product across ticket types for the same session time, enforced by progressive online checkouts. Any ticket type included in the product counts toward the required number. |
Not for individual sale | Select this option when the product can only be purchased as part of a package product. |
Reporting category | Assign products to the reporting categories you've created in ROLLER based on general ledger (GL) codes. You'll need to create your reporting categories first to enable this option. |
Tax override | Set a specific tax rate for the party package, different from the default rate set up in venue settings. |
Terms & conditions | Add specific terms and conditions for this product. These will appear after your venue terms and conditions for guests to agree to in online checkouts. |
Ticket holder captured | Ask for the names of each ticket holder during checkout. |
Custom ticket ID captured | When enabled, staff will be promoted to enter a custom ticket ID value at POS. |
Upgradable | Allow the product to be upgraded to a membership product to boost recurring revenue. |
Waiver | If guests are required to sign a waiver prior to participating in this product's activity, select this option to link the venue's waiver. Guests are encouraged to sign waivers online prior to arriving at your venue, including after purchasing tickets the product in online checkouts, in order confirmation emails and booking reminder emails. |
Show availability in checkout session time buttons
To display ticket or resource availability on session time buttons during checkout, make sure the matching setting in the checkout Options tab is enabled.
From Venue Manager, go to Apps > Progressive checkouts > All checkouts.
For each checkout, select Edit from the options menu (3 dots). Go to the Options tab and enable Show number of tickets/resources remaining on session time button.
For single-booking resources, you can then choose in Additional options whether to display as remaining resources or tickets (see above).
When a price rule is applied to the product and its checkout display setting is on, the session time button shows the price instead of availability. Price takes priority.
Step 6: Schedule and start selling
Select Save and go to schedules.
Create its product schedule by setting the dates and times when the session runs.
Add the product to your online checkout and POS device menus.