A standard pass gives guests the freedom to arrive whenever they like on valid days, with no fixed session times. It suits large venues like theme parks or museums, and even for smaller venues that don’t need strict capacity control.
To create and manage products, you need the Can create products and Can edit products permissions, available to administrator and manager system roles by default. Custom roles can be created with these permissions on Pro plans and above.
When to use
Use a standard pass for experiences that don’t require guests to arrive at set times. They do not require schedules like session passes do.
Common examples include:
Event tickets – entry on a set date with flexible arrival times
Day passes – one-time use, valid any time during the day
Multi-use type passes – multiple visits over a set period (eg every Sunday for a month)
Season or annual passes – unlimited visits within the pass period
If your experience runs in timed sessions (eg every 30 minutes with a 60 minute guest duration), use a session pass instead. See the guide Create a session pass product.
Key terms
Pass: the product a guest buys (eg Day pass, Annual pass)
Ticket type: the option a guest chooses within a pass (eg Adult, Child, Family)
Ticket: what the guest receives after purchase and uses for entry
In Venue Manager, ticket types are called variations.
Before you start
Decide on:
Your ticket types (eg Adult, Child, Family).
Pricing (and any planned peak or early bird pricing).
The days the pass can be used.
Any blackout dates (eg closures, public holidays).
Whether you need capacity control via a resource.
Step 1: Create a new standard pass
From Venue Manager, go to Products > Create product.
Select the Standard pass product type.
The standard pass product settings open for you to customize.
Step 2: Add the content
Add the basic details guests and staff will see in checkout and POS.
Setting | Description |
|---|---|
Name (required) | The name of the pass shown to guests and staff. |
Description | A short summary (max 150 characters) shown in online checkout. |
Detailed description | Longer text available under Learn more for more context or benefits. |
Image | Upload a 640 × 390 px JPG or PNG image. |
Tags | Use product tags to group and manage products (eg “Annual pass”, “Seasonal”) in online checkouts and at POS. |
Keep names and descriptions consistent across similar products so guests can quickly spot the right option.
Step 3: Set up the standard pass details
Create ticket types such as Adult, Child, Concession or Family.
You can also add a price rule to automate your pricing strategy with simple, flexible rules based on time, day or booking session size, keeping sessions full and helping you capture more revenue, without constant updates.
Apply a price rule (optional)
A price rule prices this product by tier and applies the right tier automatically. What decides the tier depends on the rule type. Build the rule first in Products > Price rules, then apply it here.
Scroll to Price rule and select your rule from the drop-down. The Variations table gains a column for each of the rule's tiers.
Set a price for every ticket variation in every tier.
Select the checkout display checkbox below the Variations table if you want guests to see why the price changes. It does not change what they pay.
Save the product.
One rule per product. The same rule can be applied to as many products as you like. For the rule types available and how to build one, see Get started with price rules.
Keep in mind:
Rules price by day for standard passes. Time-of-day tiers need a product with a set start time, which a standard pass does not have.
A group ticket variation is already priced as a fixed bundle, so quantity-based rules are disabled when this is configured for a product. Time-based and early bird rules still work.
Capacity-based rules price by how full a session is, so they need a product with scheduled sessions and resources assigned. Use a session pass if you want to price this way. See How price rules work with different product types.
Add ticket variations
In Variations, select the placeholder row to edit it.
Set variation name and base price per ticket.
If you're using a price rule, enter the price for each tier and ticket variation.
Set the Quantity for the variation.
Any quantity limit you enter in the variation quantity setting will restrict the total number of tickets that can be issued.
For venues with large capacities and tickets where the guest can show up at any time (eg open entry), check the Unlimited box.
You'll also need to select Unlimited if you want to use a resource to manage the ticket's capacity, then add the resource in the ticket's Advanced options. This means that when guests purchase a standard pass ticket, it will reduce the capacity set for the resource for the entire day.
Select Create variation to add another ticket, then repeat the steps above.
Use the drag and drop handles to reorder the different variations to display the most relevant ticket options first in the checkout.
Advanced options (per variation)
When editing a variation, select the Show advanced options checkbox for further options to customize.
Setting | What it does | Notes |
|---|---|---|
Ticket description | Adds text shown on the ticket | Use for inclusions or restrictions. |
Minimum and maximum purchase (online only) | Sets per-order limits for this variation | Does not apply to POS or Venue Manager. |
Force minimum purchase | Enforces the minimum quantity above | Applies to this variation only. |
Resources (optional) | Controls availability by a linked resource’s capacity |
|
Group pass | Sells one ticket that admits multiple guests (eg Family of 4) |
|
Override sales period for this ticket | Sets sale start and end just for this variation | Overrides product-level sales dates set below in Sales availability. |
Override image (POS only) | Shows a different image at POS | Online checkout always uses the product image. |
Hide from online sales | Makes this variation POS or Venue Manager only | Ticking this box will prevent the ticket type from being sold online. It can only be sold by staff through Venue Manager or at POS. |
Tax override | Applies a custom tax or tax-inclusive pricing |
|
Item is sold on Groupon | Flags this variation as a Groupon offer | Enable Tax override and set to Tax inclusive first to make this option available. |
Step 4: Set the sales availability
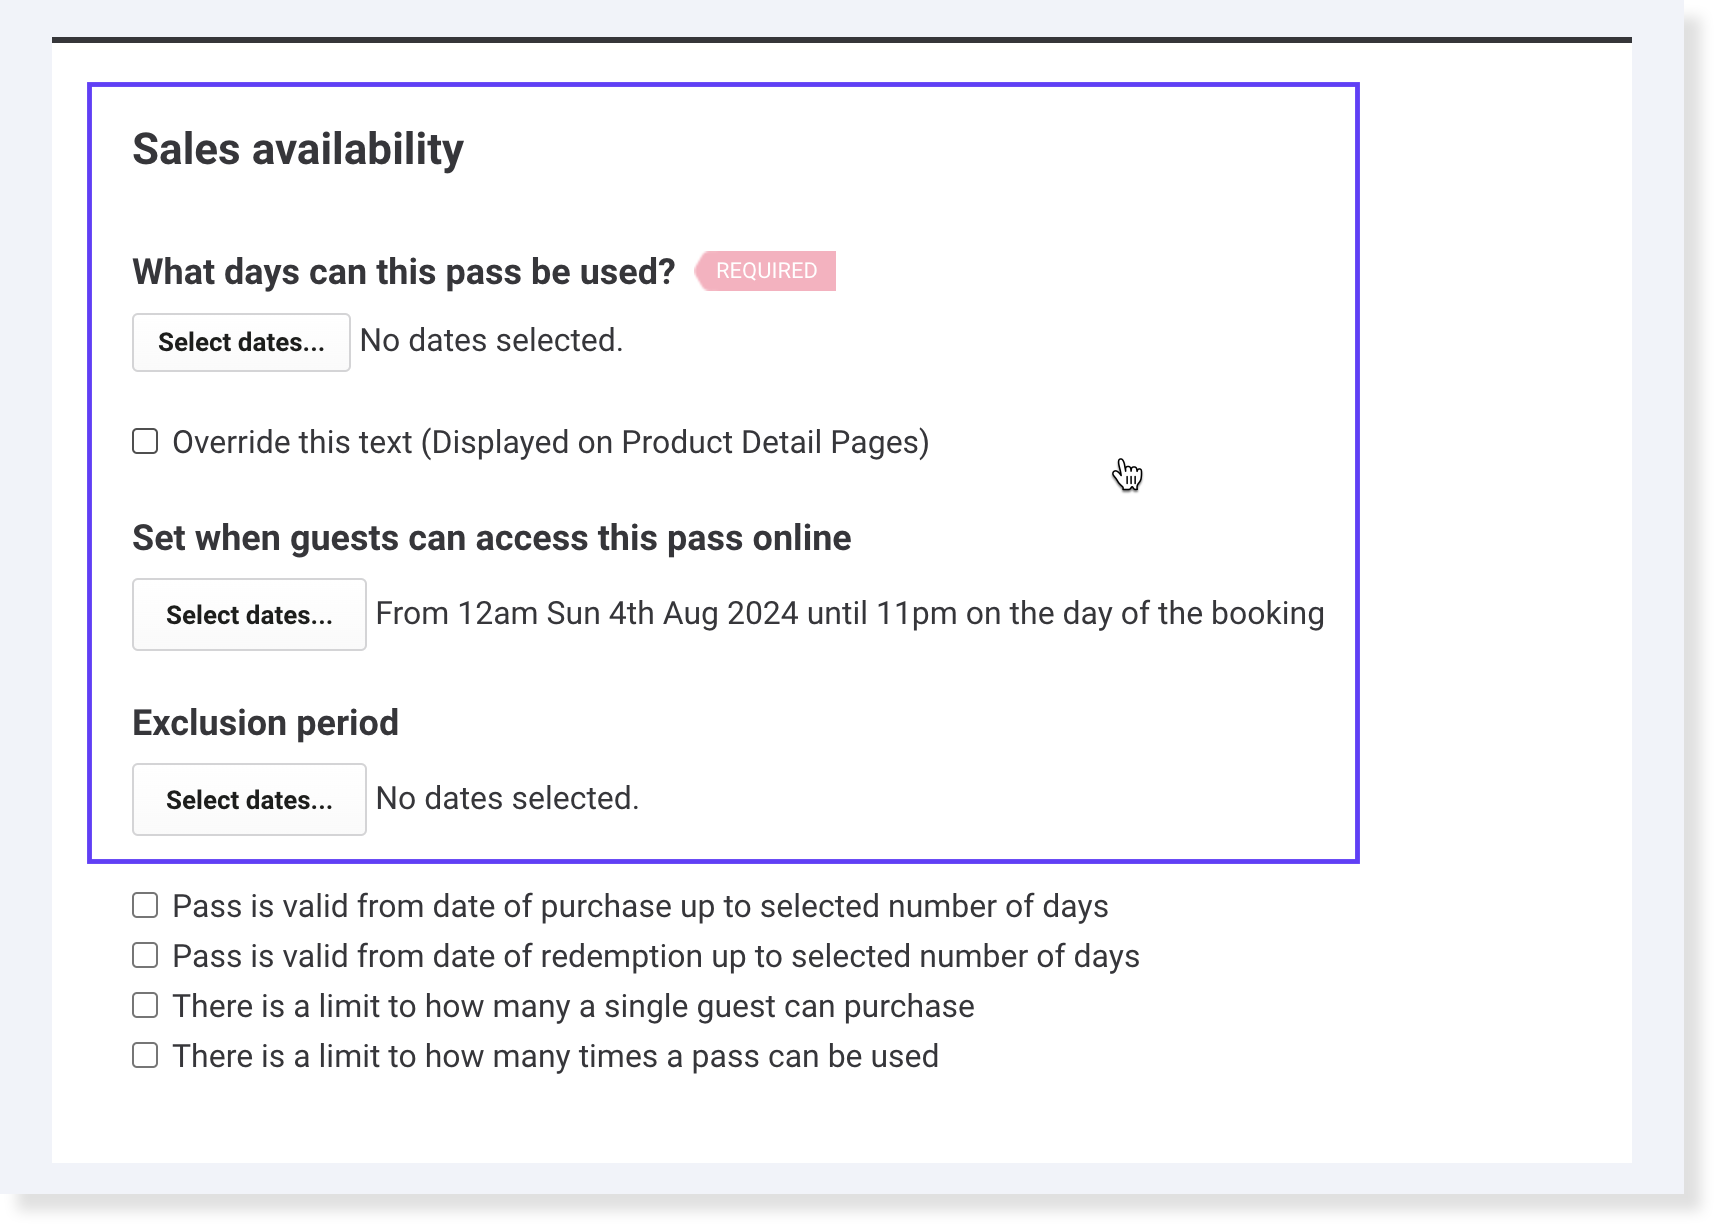
Set when your pass can be sold and used (redeemed). Availability settings control when passes can be sold and used.
Unlike session passes, you don't set up schedules for standard passes. Instead, use these availability settings to configure when the pass is available for purchase.
What days can this pass be used? (required)
Select the dates or recurring days guests can use the pass. Guests can only redeem their pass for entry on these dates.
You can also override the default availability text shown in checkout and confirmation emails to make it clearer when the pass can be used (eg “Valid all summer 2025”).
Set when guests can access the pass online
Set the period when guests can buy this product online. This helps manage demand and gives you full control over product release timing.
Use date rules to:
Open or close online sales for promotions or limited releases
Control daily sale times (eg only from 12 PM each day)
Keep the product always available until a fixed date
Exclusion period
Add blackout dates when guests can’t buy or redeem (eg closures, maintenance days, public holidays like Christmas Day and New Year’s Day).
Optional settings (pass rules and limits)
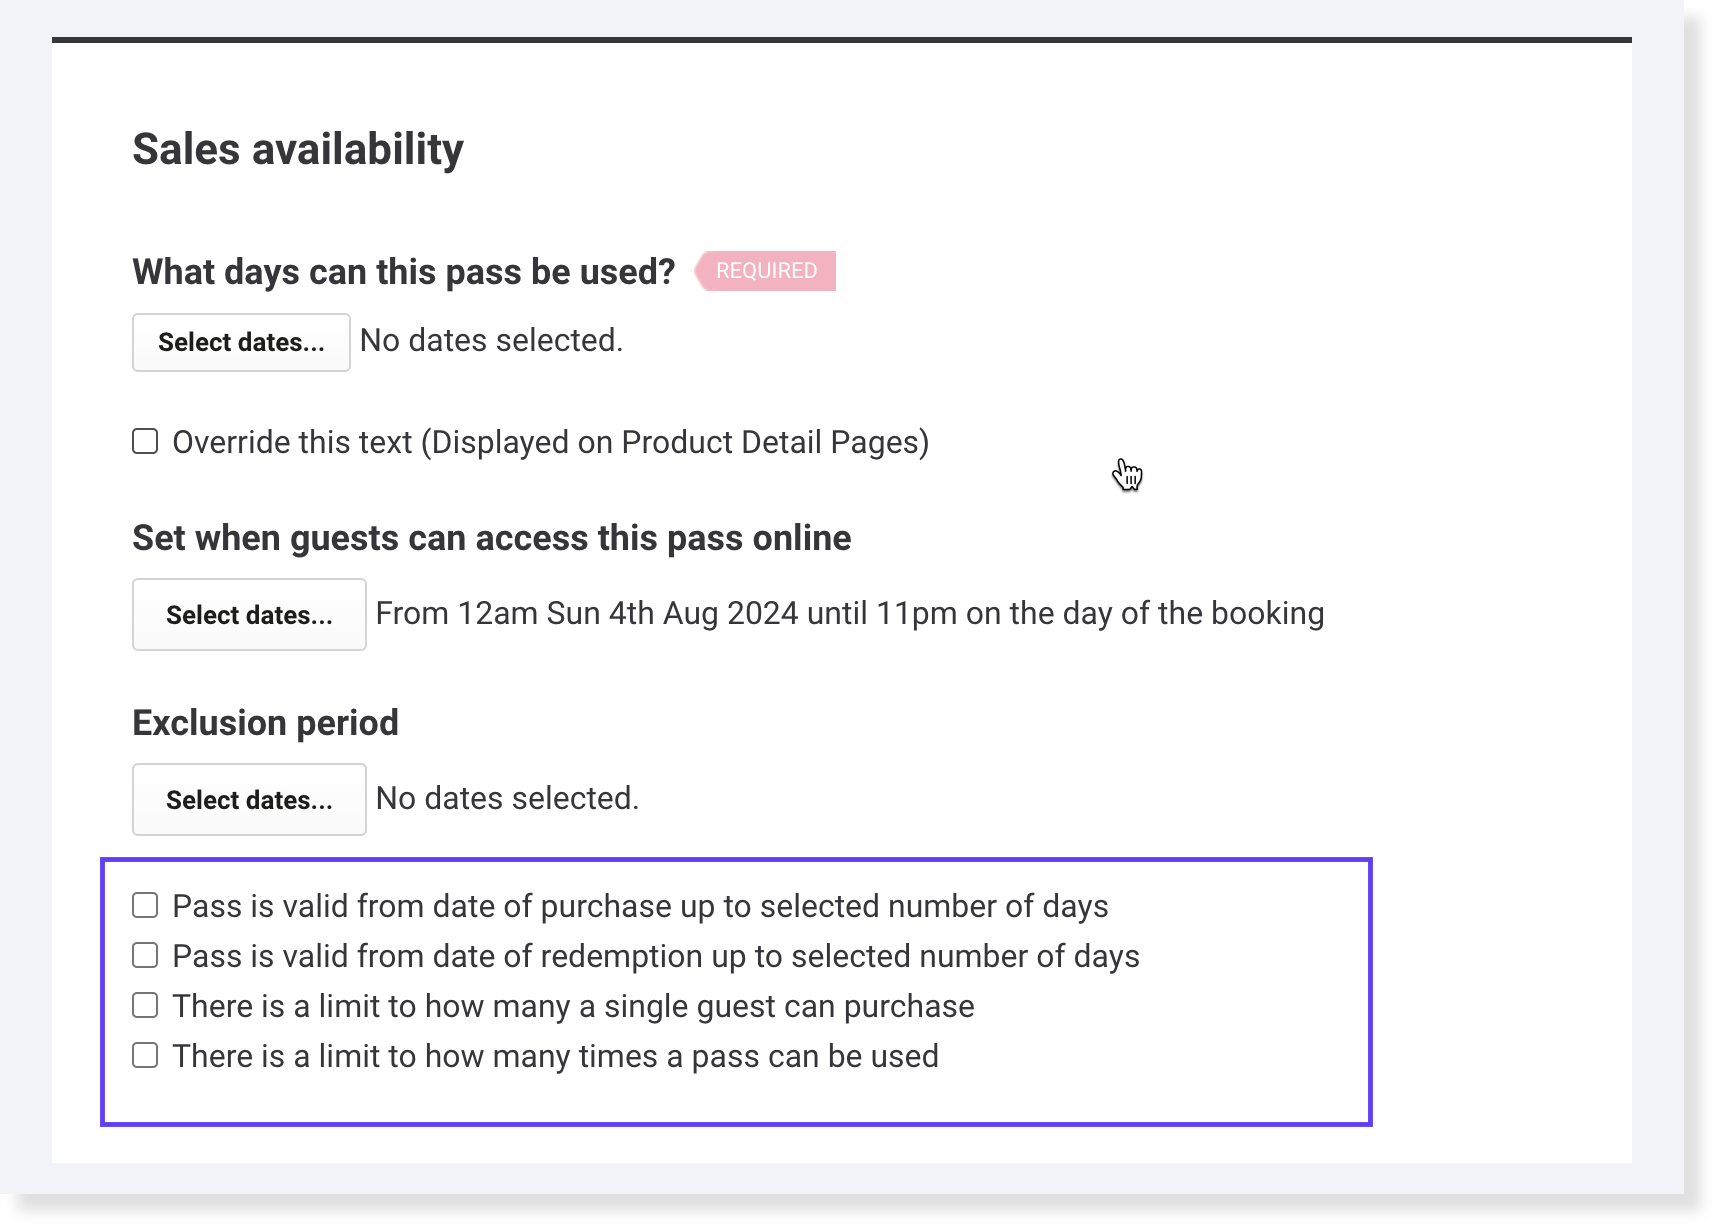
Choose how the pass behaves after purchase.
Setting | What it does | Use it when |
|---|---|---|
Valid from date of booking | Pass is active from the date of the booking (not the purchase date) for a set number of days | For fixed-period passes (eg 30-day pass) |
Valid from date of redemption | Pass becomes active when first redeemed at POS | For multi-visit or “30-days from first visit” passes |
Limit per guest | Restricts how many passes one guest can buy | To prevent bulk buying |
Limit uses per pass | Caps how many times a pass can be redeemed | For walk-in multi-passes at POS |
If you want to create a multi-pass type product that lets guests book online, see the guide Create a multi-pass for guests to book a session online.
Step 5: Additional options
Configure the settings that support your sales flow and operations.
Setting | Description |
|---|---|
Add-ons | Link other products (except party packages) as upsell options during online checkout to increase revenue. Search for products in the drop-down list and select Done. |
Alternate address | Provide a different location if the activity takes place somewhere other than the main venue. |
Booking reminder email (Pro plan and above) | Set up automated booking reminder emails with booking details, instructions and a sign waiver request when waivers are enabled. |
Confirmation required | Choose if bookings for this product should be marked as "unconfirmed" in ROLLER until staff manually approve them. |
Forms | Add custom forms to collect additional details about guests. Select and apply the form from the drop-down menu. |
Instructions | Provide specific instructions for bookings including this product for post-purchase communications, such as in the online checkout, order confirmation emails and booking reminder emails. |
Minimum purchase | Set the minimum number of tickets required per booking, regardless of ticket type (eg adult and child tickets). |
Not for individual sale | Set this option if the product can only be purchased as part of a bundled package product. |
Reporting category | Assign products to appropriate reporting categories based on general ledger (GL) codes. This setting is visible if reporting categories are set up in Venue Manager. |
Hide session duration | Hide session end times and durations in progressive checkouts, email and tickets. This applies to package products containing this pass. |
Tax override | Apply a different tax rate from the default rate set up in venue settings. |
Terms & conditions | Add specific terms and conditions for this product. These will appear after your venue's general terms and conditions for guests to agree to during online checkout. |
Ticket holder captured | Choose whether ticket holder names should be collected during checkout. |
Custom ticket ID captured | When enabled, staff will be promoted to enter a custom ticket ID value at POS. |
Upgradable | Allow the product to be upgraded to a membership product to boost recurring revenue. |
Waiver | If waivers are required before participating in the pass activity, link your liability waiver here. Once enabled, guests will be automatically prompted to sign the waiver after checkout, as well as in booking confirmation and reminder emails. Waivers signed in this way will be automatically linked to the booking. |
Allocate wristbands | Guests will receive wristbands showing their end time when they purchase this product. |
Save and launch
Select Save.
Add the pass to your online checkout or a POS device menu. Or, use product tags to add products automatically to checkouts and POS menus.
Use product tags to add products automatically to checkouts and POS menus.
Quick launch checklist
The pass appears in the right checkout or POS menu.
Sales dates are open for the right period and times.
Valid use days match what staff and guests expect.
Blackout dates are added for closures.
Variations are ordered with your most common ticket types first.
If the pass isn’t appearing online or at POS, check sales availability first.