Documentation Index

Fetch the complete documentation index at: https://mysupport.roller.software/llms.txt

Use this file to discover all available pages before exploring further.

Create a time-based price rule

Prev Next

Time-based price rules automatically adjust ticket prices by day, time, or specific date ranges (such as holidays). They help you fill quieter sessions, protect revenue during peak periods, and keep pricing consistent across checkout, POS and Venue Manager — all with one setup.

For example, set lower weekday morning prices to boost attendance, add a weekend premium to capture high demand, and apply a "Holiday" tier to peak periods like school breaks or special events.

The permission Can manage price rules is required to create and edit price rules. The permission Can edit products is required to apply the price rule to products.

Why use time-based pricing

Use time-based rules when you want to:

Goal

Venue example

How to use it

Maximize holiday revenue

All attractions (trampoline parks, ice rinks, escape rooms, FECs)

Choose your holiday dates, set a premium “Holiday” pricing tier for those days, and keep lower tiers for quieter hours (eg Mon–Thu, 10 AM–2 PM)

Fill off-peak sessions

Trampoline park

Lower weekday morning prices, add a weekend premium and add a holiday tier for peak periods (eg Dec 20–Jan 5).

Smooth weekly demand

Ice skating rink

Set Mon–Fri daytime as a standard off-peak rate (base rate), add an evening peak (5–9 PM) and include special event dates like school-holiday shows.

Maximize capacity

Escape room or laser tag

Keep Mon–Thu at standard pricing, add weekend peaks (Fri–Sun), and choose long-weekend dates to capture demand.

Lift weekday attendance

Indoor play centre

Discount weekdays during the school term, add a weekend premium and create a Holiday tier for school breaks.

How time-based pricing works

Time-based rules automatically adjust prices based on when guests book — by day, time or custom date range (for special events and holidays).

Think of tiers as levers you can pull to shape demand and revenue. Base keeps pricing steady most of the time, while other tiers (eg Weekend, Evening, Holiday) let you raise or lower prices when demand changes.

Tickets

Tier: Base (off peak)

Tier: Weekends (peak)

Tier: Holidays 

60-min admission

$20

$23

$25

60-min 6 & under

$15

$17

$18

Family of 4

$60

$60

$60

Tiers follow this priority:

  1. Custom dates (eg holidays or special events)

  2. Override times (specific hours within a day; session passes only)

  3. Recurring days (eg every Saturday and Sunday)

  4. Base tier (applies when no other tier does, often the off-peak times)

How pricing appears in sales channels

Once your rule is applied to a product and tier prices are set, ROLLER automatically updates pricing across checkout, POS and Venue Manager.

Guests always see the correct price for the day or time they select in the online checkout.

If a booking is updated — whether by staff in POS or Venue Manager, or by a guest in their online account — the price automatically recalculates to match the correct tier.

The example below shows how different tiers might appear in checkout once your rule is applied. The checkout automatically reflects your setup, encouraging guests to choose quieter times while keeping premium pricing for sessions that have no issues filling out.

What guests see depends on how you’ve configured your rule and which tiers apply to each day or time.

In this example, weekday sessions use the Base tier — the standard price taken from the first ticket type listed in the product settings. The checkout automatically displays this price in each available session time. Because this is the lowest price available, guests aren’t prompted to switch days.

Weekend sessions use the Peak tier, set at a higher price. When guests select a weekend date, a message appears encouraging them to save by booking another day. If they browse different days, lower prices display automatically for those days. 

By keeping peak periods at full price, you avoid discounting tickets you’d sell anyway — protecting your best-earning sessions while using lower weekday prices to fill quieter times.

Example of weekend peak tier pricing in checkout

This example shows a time-based override for Friday afternoons. The rule lowers prices earlier in the day (10 AM–2 PM) to $20.00, with the $23.00 peak rate crossed out. 

Later sessions (3 PM–7 PM) show the peak $23.00 rate for times that have no issues filling out. The strikethrough highlights off-peak savings for guests, encouraging bookings in quieter hours and helping you balance demand while keeping premium pricing for your busiest times.

Holiday sessions use the Holiday tier, set at premium rates to maximize revenue during high-demand periods. Guests will see a message prompting them to save by choosing a cheaper day if one is available.

Check compatibility before you start

Make sure your product type and setup are supported before creating a rule.

Supported product and ticket types:

  • Session passes, standard passes and party packages.

    • For standard passes, time-based rules apply by day only (eg weekday vs weekend). Time-of-day tiers (eg morning vs afternoon) require session passes, because standard passes don't have a set session time.

    • For party packages, price tiers apply to party tickets only. Inclusion prices (food, drinks, merch) stay the same across all tiers.

  • Standard admission tickets (eg Adult, Child).

  • Group ticket variations (eg "Family of 4," "Group of 10"). Set peak pricing for your group passes.

Not currently supported with:

  • Packages (package pricing overrides price rules)

  • Discounted consecutive sessions

  • Legacy checkout and self-serve kiosks

Step 1: Create the price rule

Set up tiers that control when prices change.

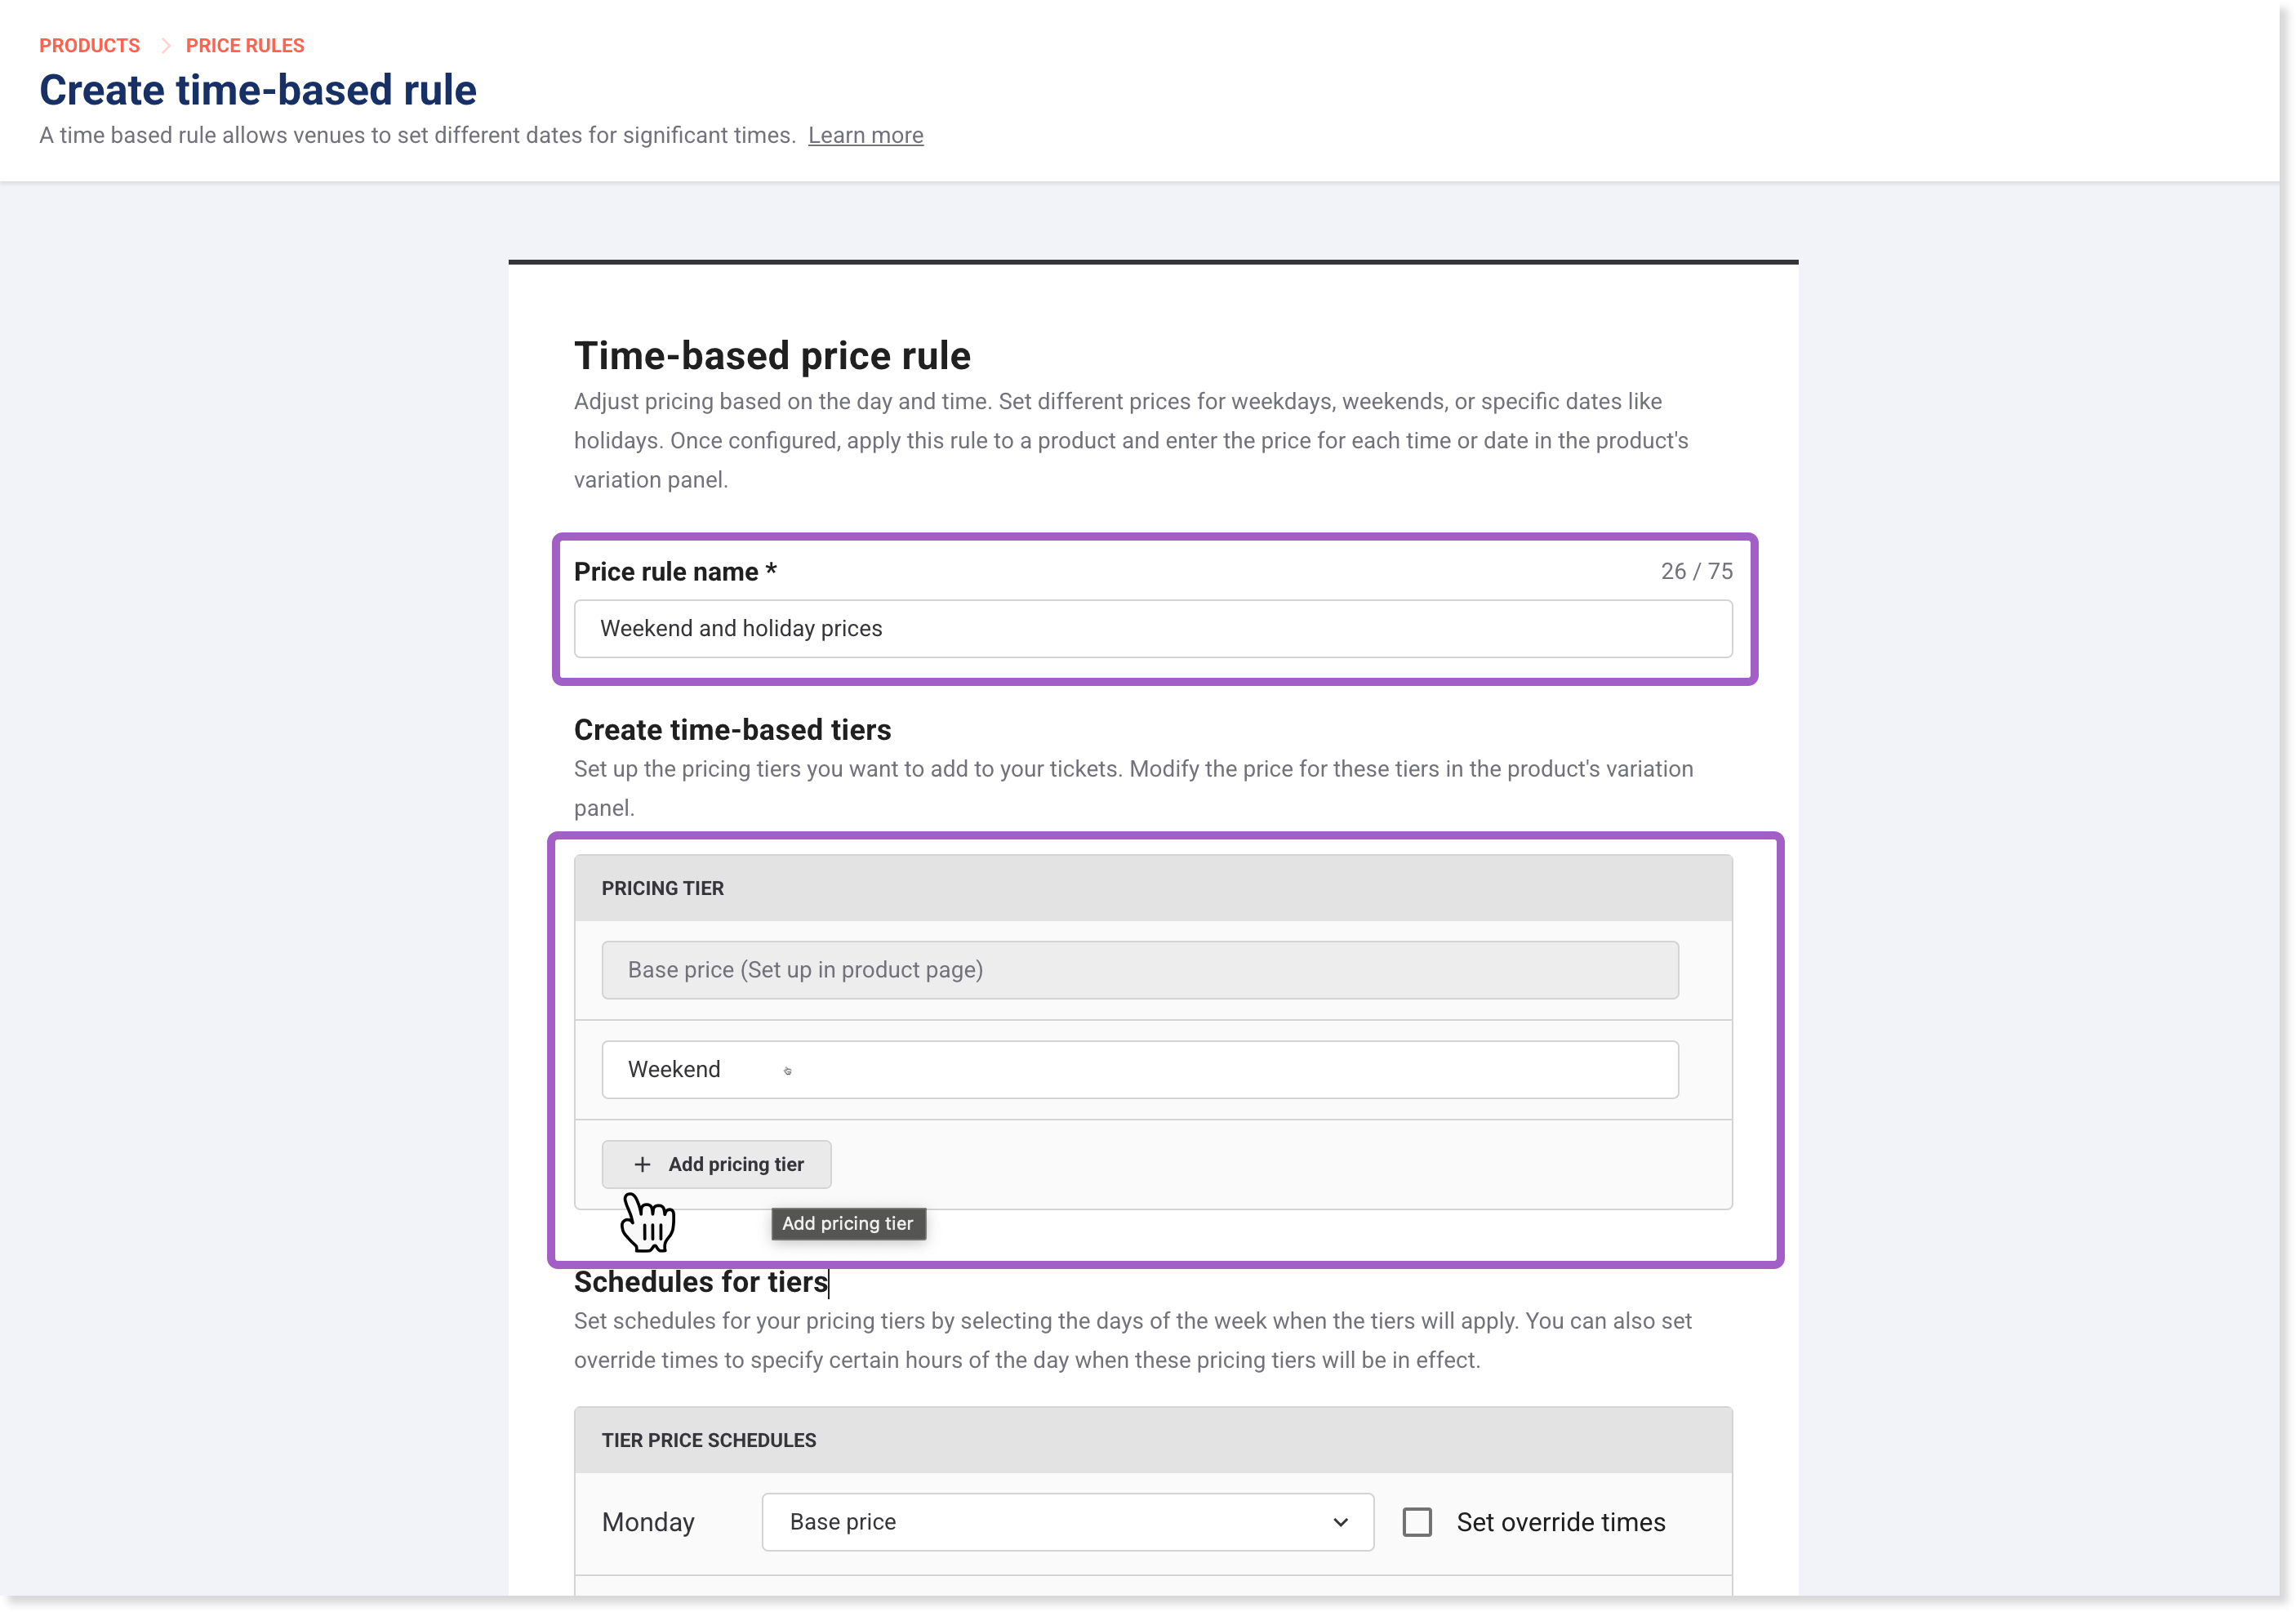
  1. From Venue Manager, go to Products > Create price rule.

  2. Select Time-based pricing.

  3. Enter a name (eg Weekend and holiday prices).

  4. Set up your time-based tiers

    • Base tier is already created for you. This is the default price when no other tier applies (eg standard weekday price, often your off-peak times).

    • Add tiers for exceptions (eg Weekends, Holidays) when you want to increase or decrease pricing. These will override the Base tier on the days, times or dates you will define next.
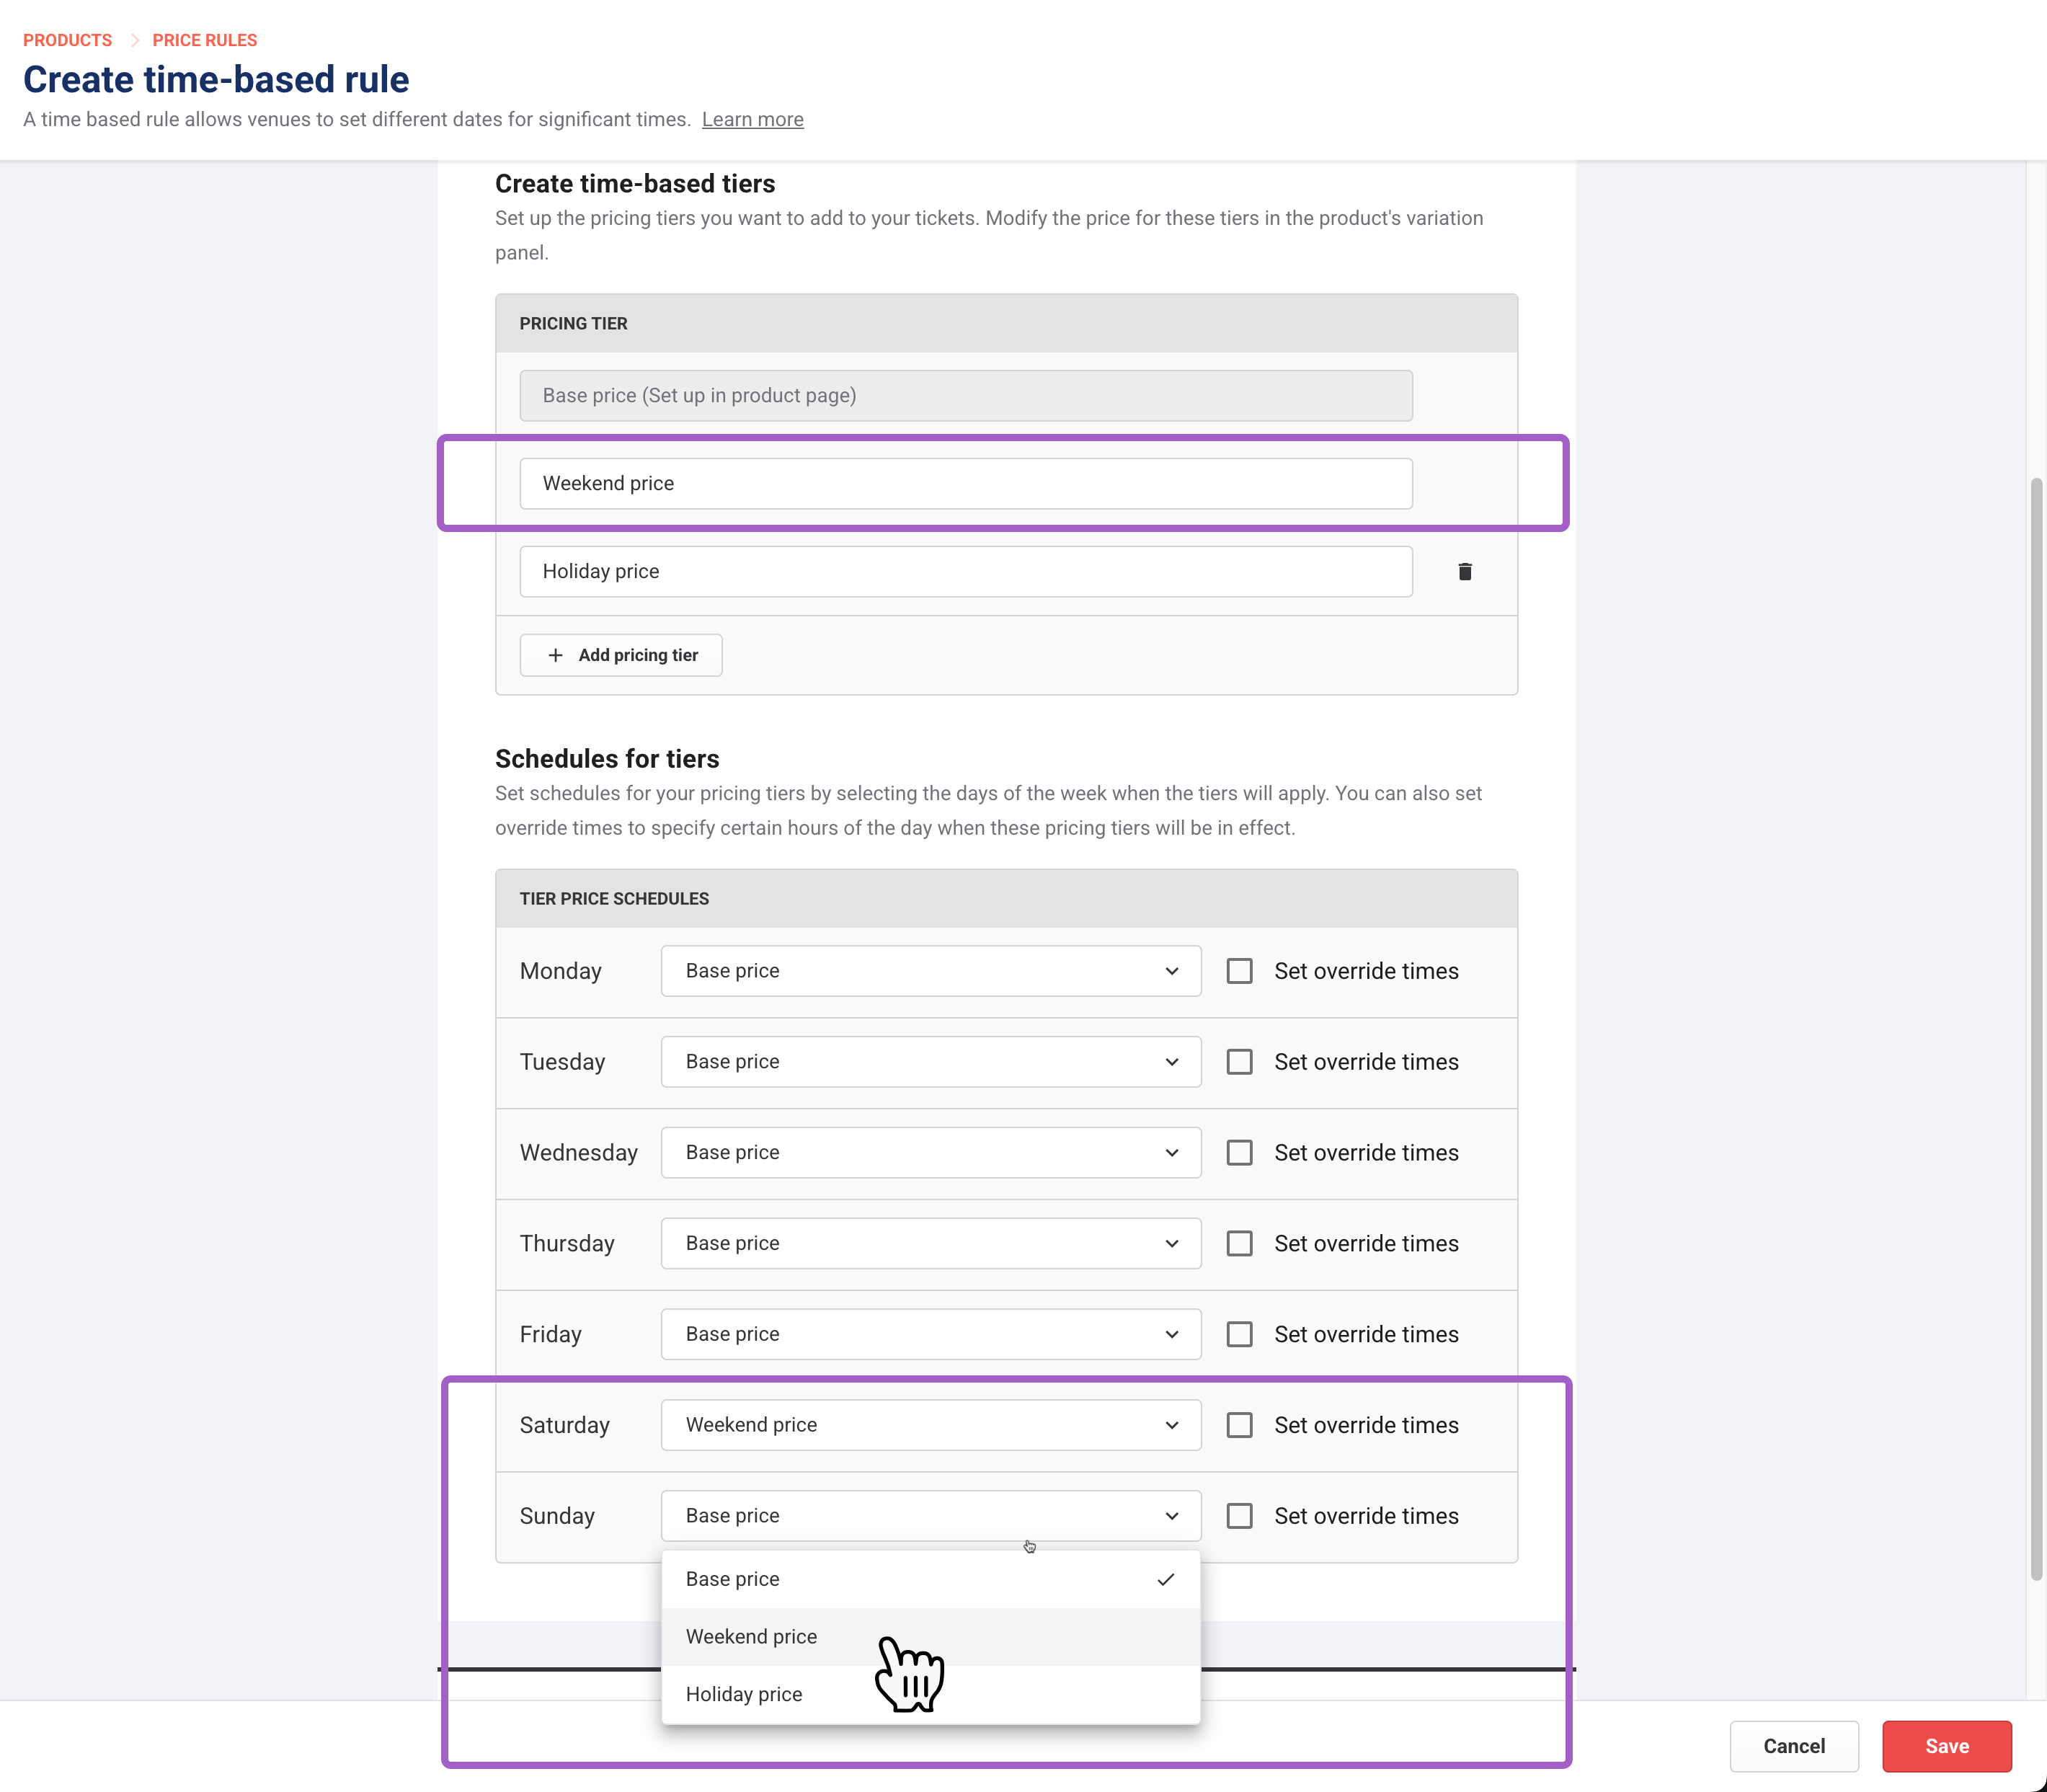
  5. Assign when each tier applies:  

    • Use the drop-downs to schedule tiers for recurring days (eg Weekend pricing tier for every Saturday and Sunday).

    • For example, base pricing applies Monday to Friday and Weekend pricing applies Saturday and Sundays for peak times.
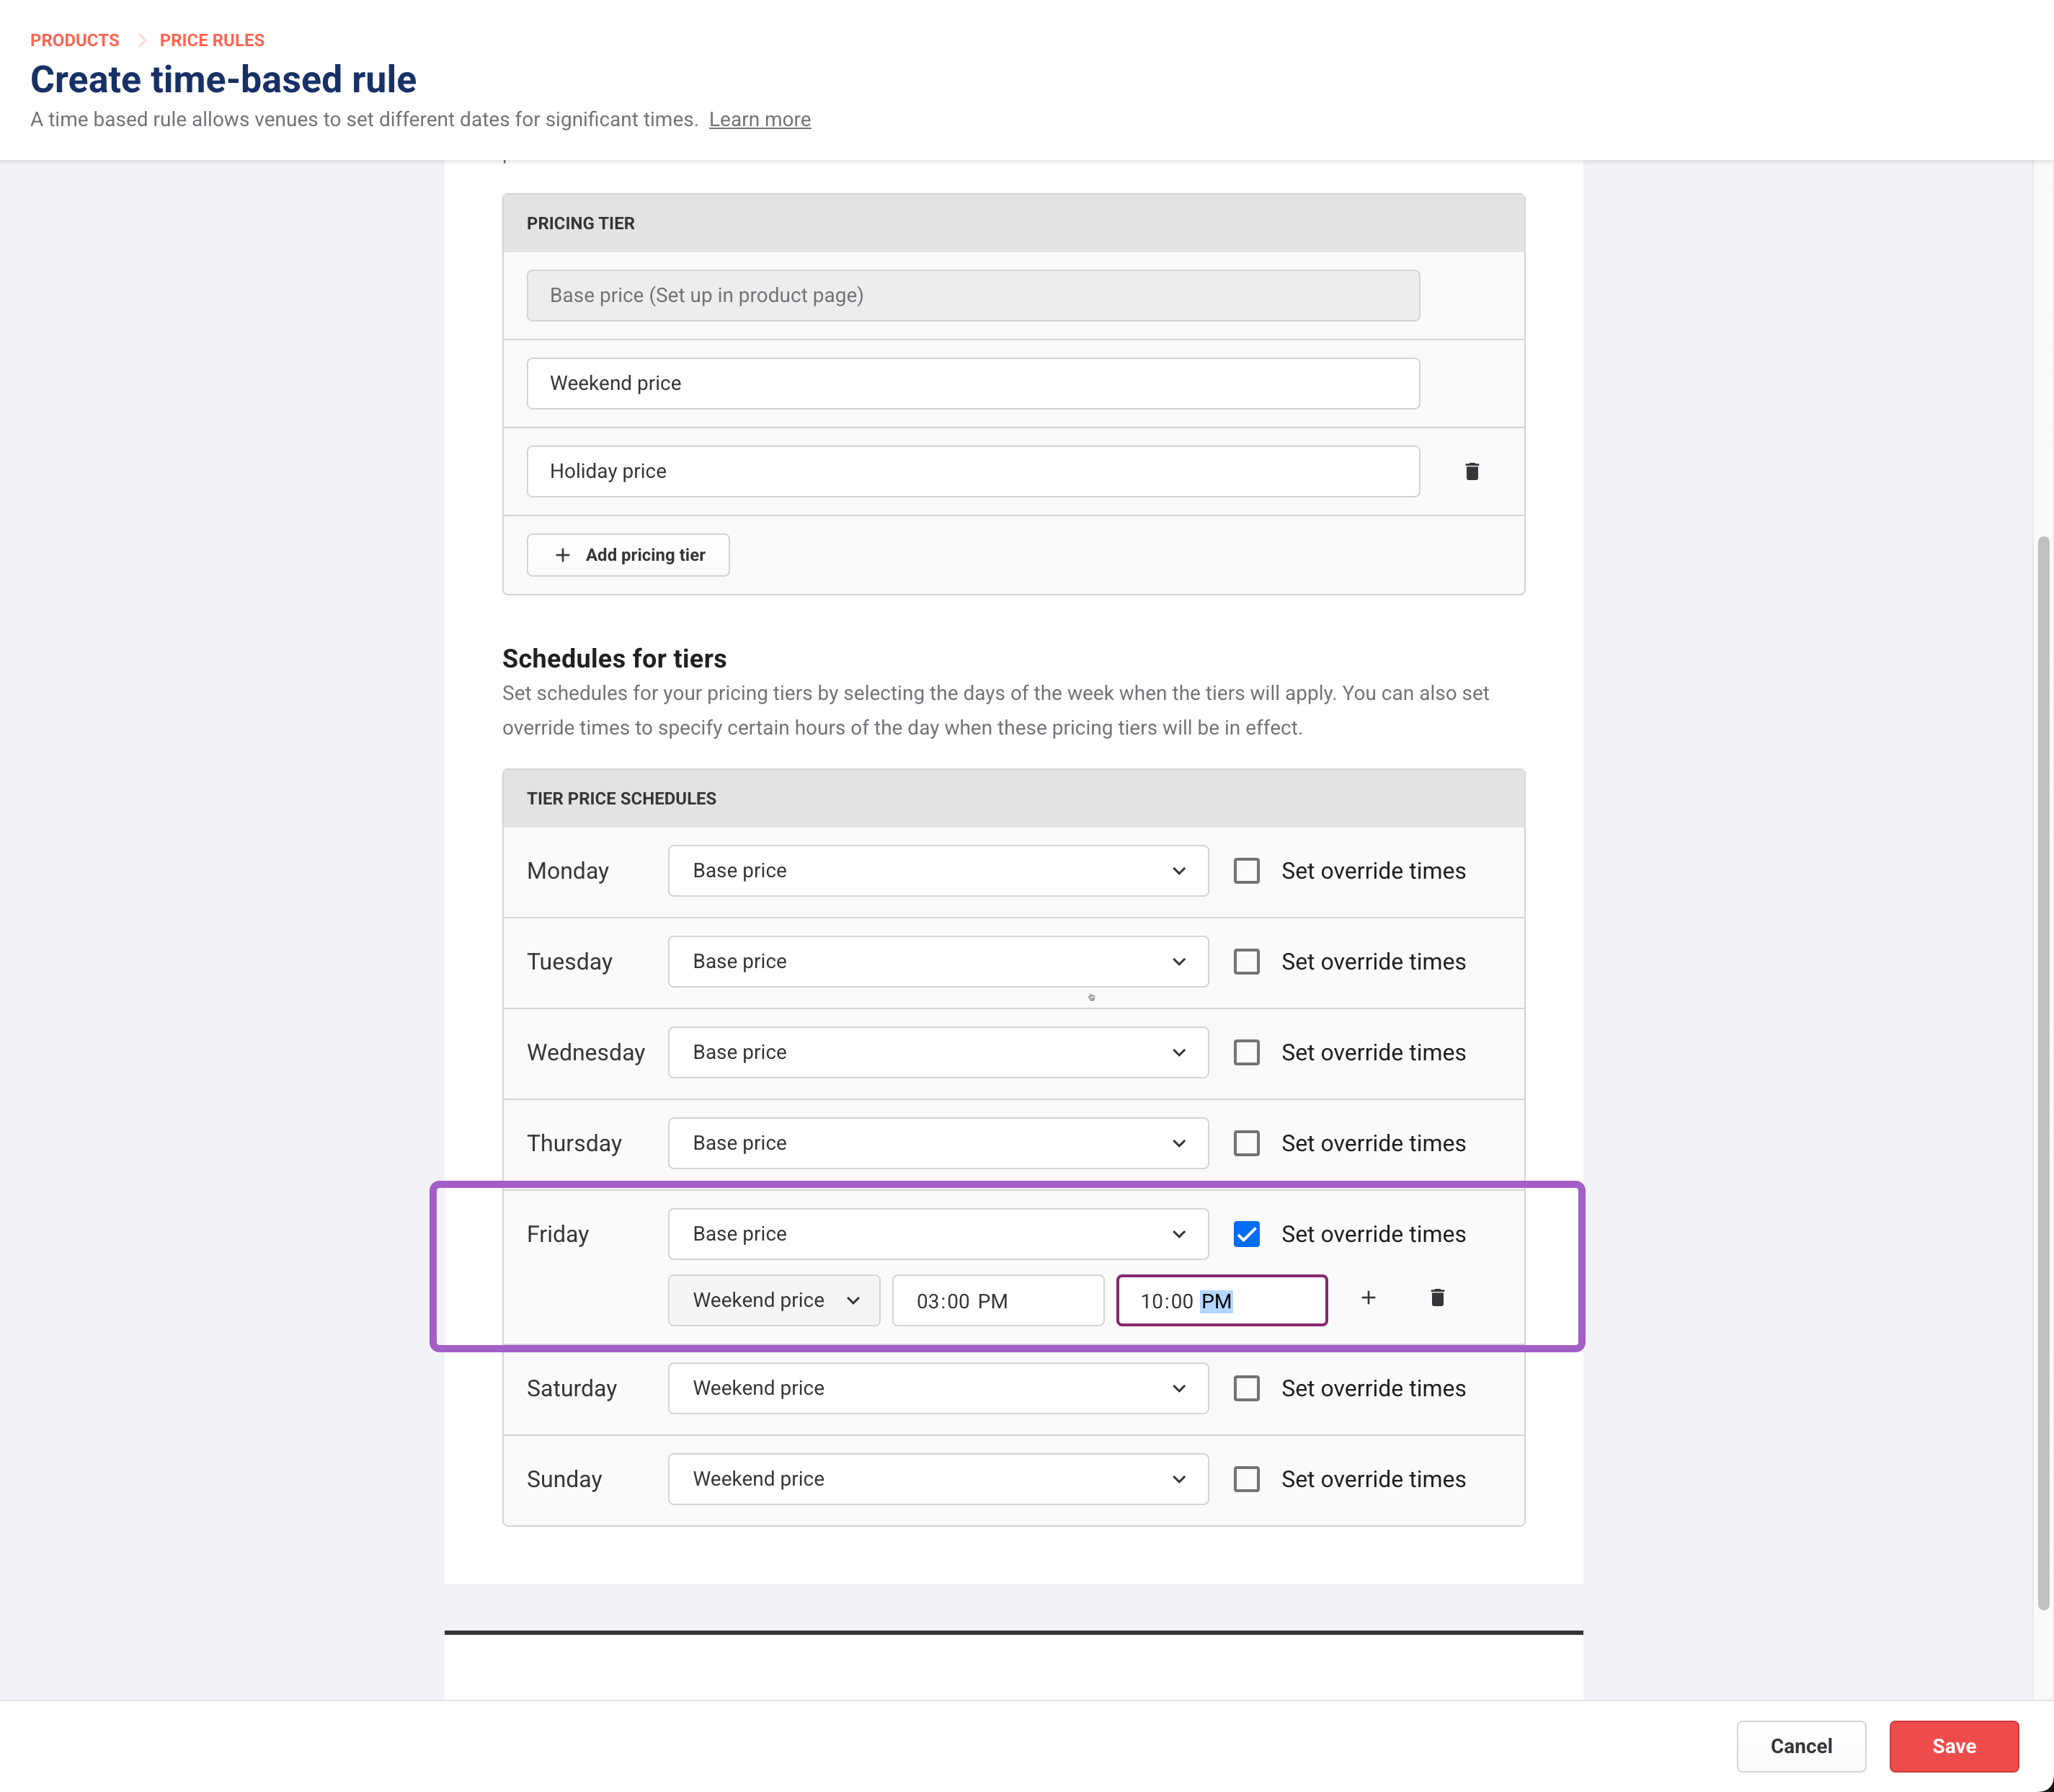
  6. Set override times for specific hours a tier will apply (eg Weekend price for Fridays 3 PM – 10 PM). Override times only applies to session pass product types. You can create multiple override times.
  7. To create custom date groups (for holidays or special events): 

    • Select Add custom date group, name it (eg Christmas holidays).

    • Select Edit tier pricing.

    • Choose a default pricing tier (eg Holiday).

    • Select single dates or ranges (eg Dec 20–Jan 5).

    • (Optional) Apply per-day or time overrides within that period.

    • Select Save to save the custom date group.
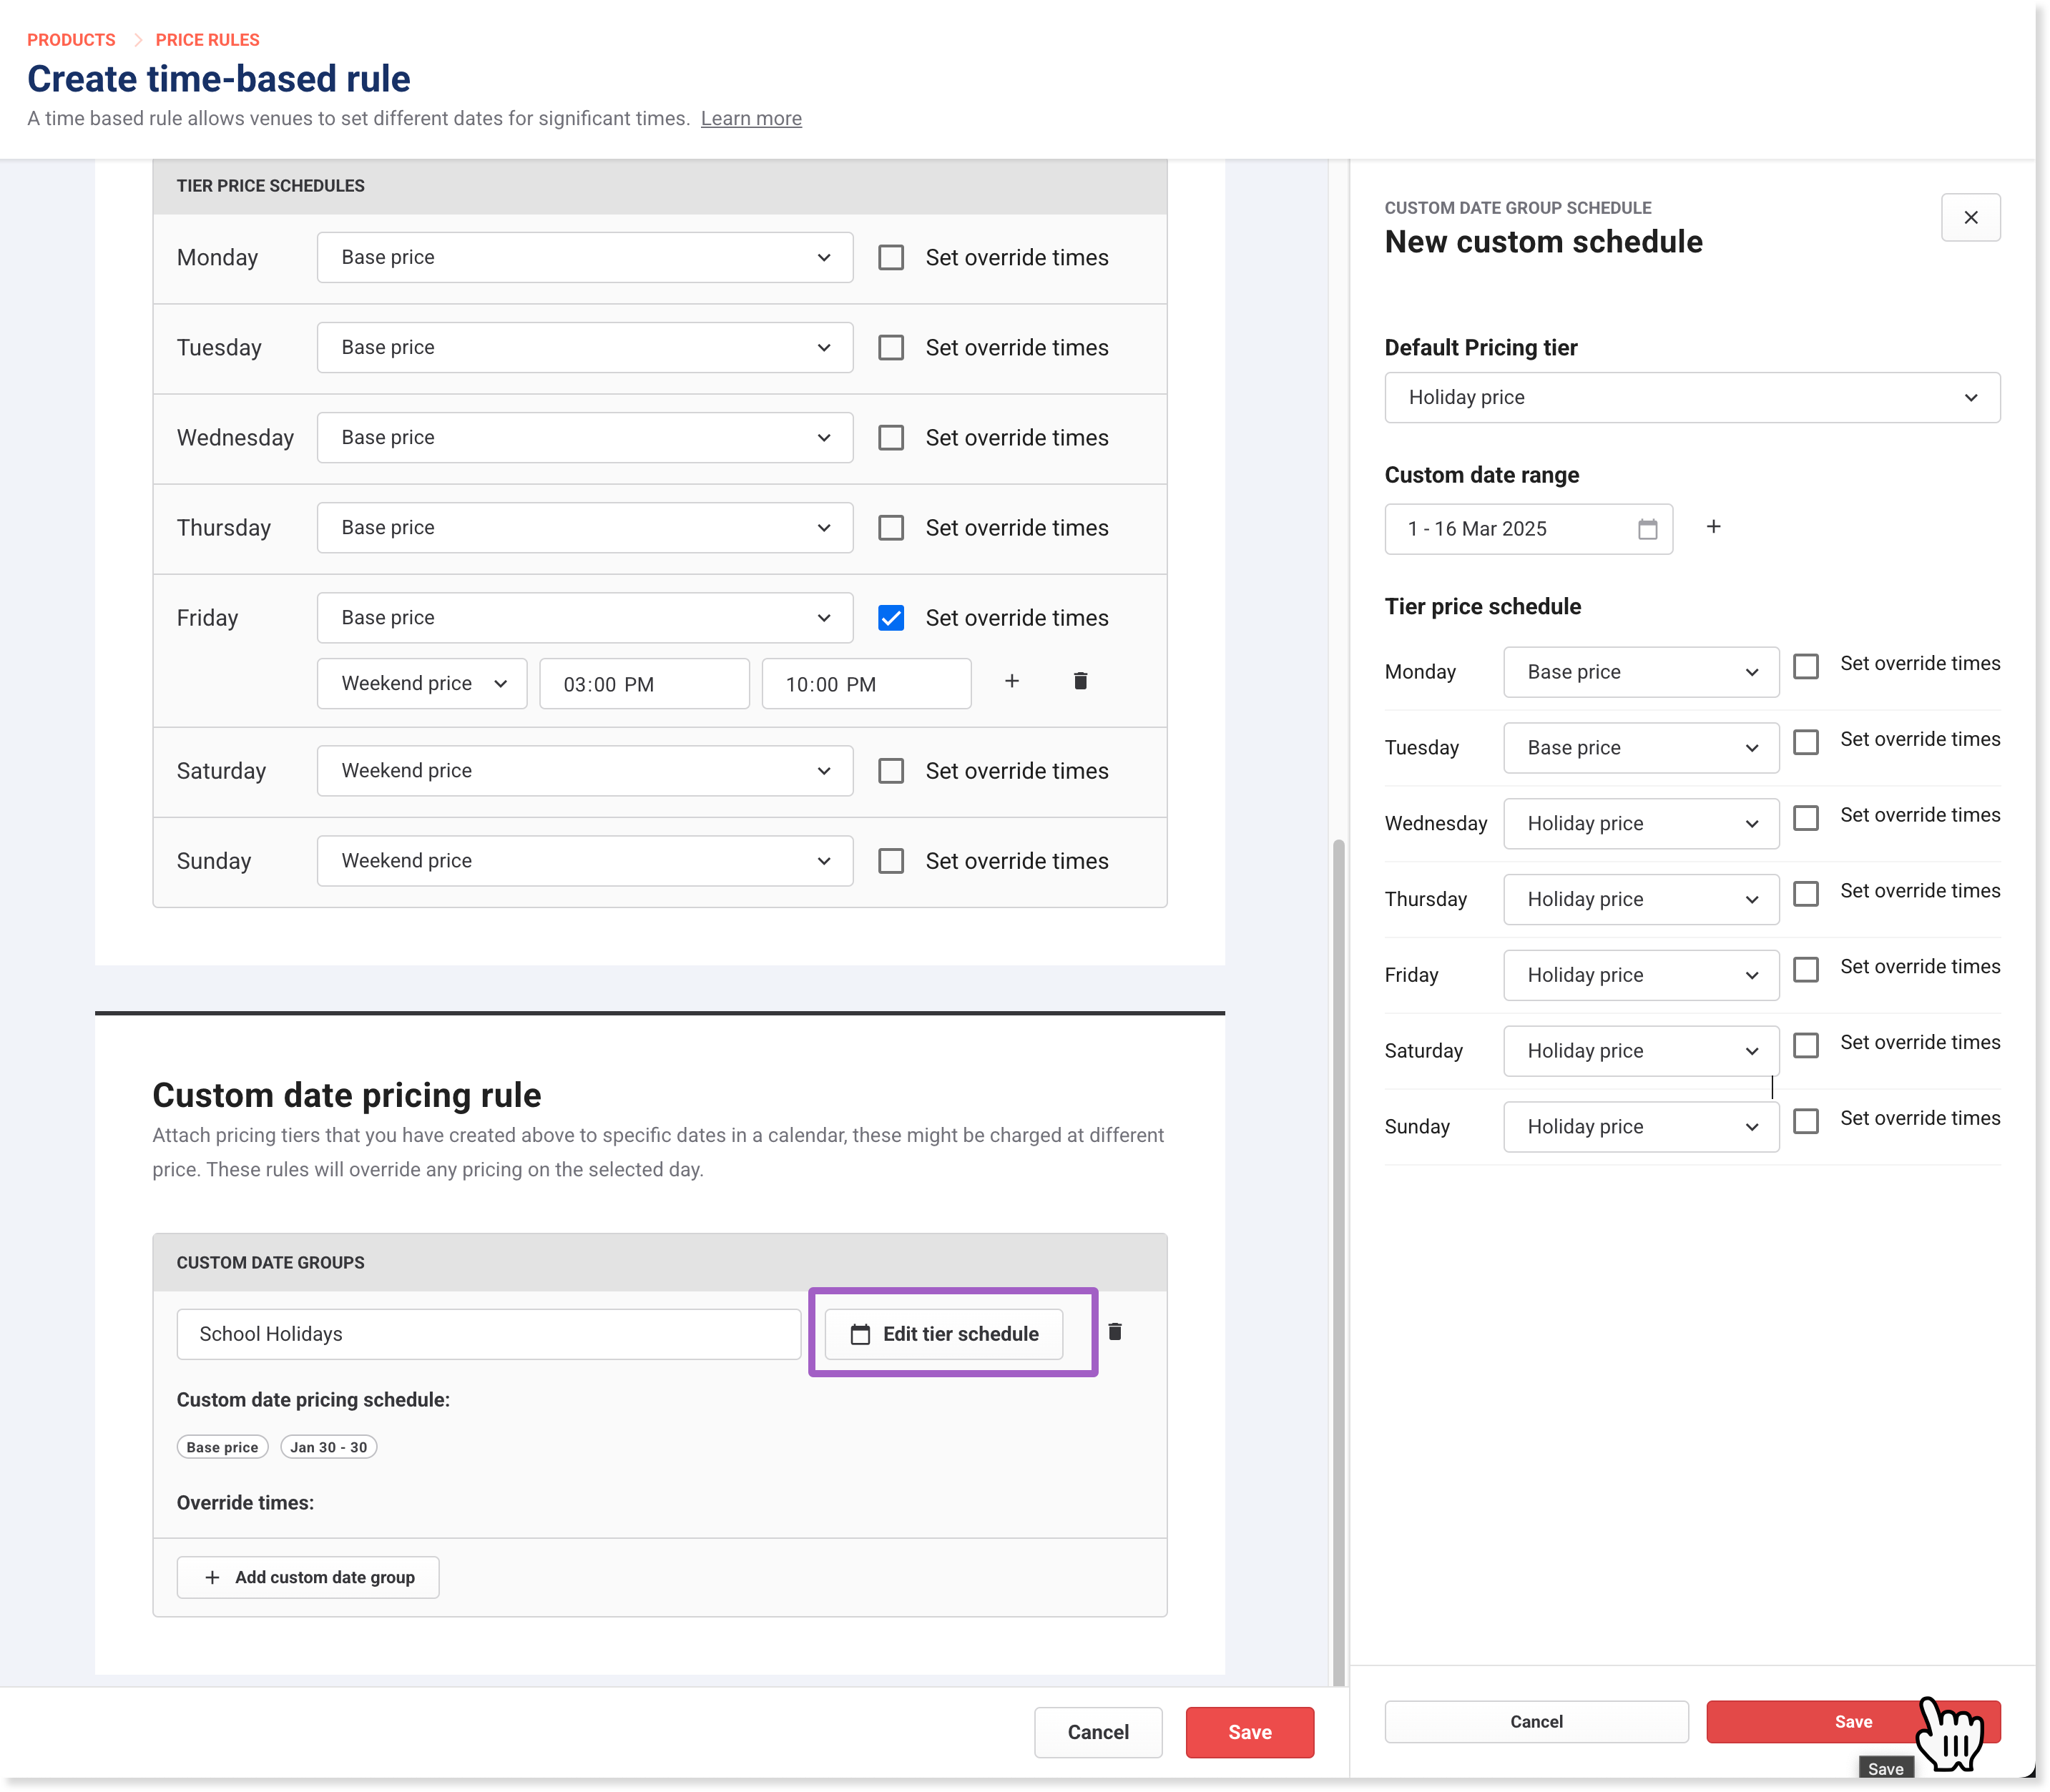
  8. Select Save to save the price rule.

Custom date groups always override recurring day and time settings, ensuring holiday pricing automatically applies during your busiest periods — then reverts when the range ends.

Step 2: Apply the rule to products and set prices

Once your time-based price rule is created, link it to a product and set the prices for each tier.

  1. From Venue Manager, go to Products > All products.

  2. Select a session pass, standard pass or party package product you want to update.

  3. Scroll to Session pass details, Standard pass details or Price rule, depending on the product type.

  4. Select the time-based price rule you want from the Price rule drop-down.

  5. The variations table now includes columns for the time-based tiers that you've set up.

  6. For each ticket type (eg Adult, Child, Family of 4), set the price you want for each tier.

  7. Recommended: Turn on Show price comparisons at checkout to highlight estimated savings for cheaper days and times during checkout (currently, only for session passes). Guests see savings messages such as “Book a different day - Save up to 40%”.

  8. Select Save.

Allow managed venues to edit custom date group dates (HQ only)

In HQ, you can allow individual managed venues to edit the dates within custom date groups. This means each managed venue can reflect their local calendar, for example adjusting school holiday date ranges that vary by region, without you needing to manage every variation centrally. Tier prices and the rule structure stay locked at HQ.

To allow managed venues to override a custom date group:

  • From HQ, go to Products > Price rules and open the time-based rule you want to update.

  • For the custom date group you want venues to be able to edit, open the tier schedule and check Allow managed venues to override.

  • Select Save.

Venue staff at each managed venue can now update the dates and times to reflect their local schedule.

If you later uncheck Allow managed venues to override, the HQ-defined dates are pushed back down to the venue, overwriting any local edits. Let your venue managers know before removing override permission.

Show time-based price comparisons at checkout

This optional feature displays an estimated savings message to guests, encouraging them to book cheaper dates and times. This helps you fill slower periods while maintaining premium prices for peak sessions.

Availability: Session pass products only (not yet available for standard passes)

What it does

When enabled, guests see: 

  • The "Book a different day" percentage saving when a cheaper option exists.

  • Highlighted calendar dates showing lower prices (when they select "View dates").

  • The message disappears once they select a lower-priced time slot.

How to enable it

  1. From Venue Manager, go to Products > [your product] > Session pass details 

  2. Check the box: "Show price comparisons at checkout".

  3. Save.

How prices are calculated

  • ROLLER compares the selected date against the cheapest available ticket across all days.

  • Shows the estimated savings percentage (eg Saturday $25 vs Monday $15 = Save up to 40%).

  • Uses the price of your first ticket variation listed (eg Adult ticket). If Child tickets are cheaper than Adult, the calendar still shows Adult prices

  • The message disappears when guests select a lower-priced day.

  • When guests select View dates, cheaper sessions are highlighted in the calendar automatically. This replaces the remaining resource availability indicators shown.

  • When price comparisons are enabled in the session pass product setup, the remaining ticket or resource count on each session time button (when enabled in checkout setup options) is replaced by the price of the first listed ticket type for that day and tier, as price takes priority.

  • The checkout homepage and product previews display the minimum ticket price across all ticket variations for the day for both product-led and date-led checkouts (when enabled in checkout setup options).

Optimize your pricing

Once your rule is available on products, review how it behaves in checkout and adjust as needed to maximize impact.

Test your setup

  • From the online checkout, view sessions across different days and times — prices should update automatically based on the correct tier.

  • From POS and Venue Manager, create a few test bookings and move them between days or times to confirm the correct pricing applies.

Review performance

  • Focus your tiers on clear demand patterns (eg weekdays vs weekends, mornings vs evenings).

  • Review seasonal tiers regularly to keep pricing aligned with holidays and special events.

  • Check sales and attendance data in reports to see the impact on sales, revenue and attendance.

Optimize for results

  • Use weekday or morning discounts to drive earlier and quieter sessions.

  • Keep peak and holiday prices firm to protect sessions that have no issues filling out.

  • Update your custom date groups after each holiday season or special event to reflect changing demand patterns.

Once you’re confident your rule is performing well, reuse it across similar products to save time and keep pricing consistent.

Manage your rules

You can view, edit, or reuse your time-based price rules anytime in Venue Manager.

  • To view all price rules and linked products, go to ProductsPrice rules > All rules.

  • The table shows every rule, its type, and which products it’s applied to.

image.png

Rename a rule

Rename anytime to clarify purpose (eg Weekend and Holidays, Peak and Super-peak).

Edit or delete tiers

You can only edit or delete rule settings (such as tiers or schedules) if the rule isn’t currently applied to any products.

To make changes:

  1. From Venue Manager, go to Products > All products.

  2. Select the product you want to update. 

  3. Remove the rule from the Price rules drop-down (switch the product back to Fixed price).

  4. Repeat for all products using the rule.

  5. Return to ProductsPrice rules > All rules to view and edit, or delete the price rule.

Update prices in applied products

  • Adjust prices for each tier directly in a product’s variations table at any time.

  • Updates apply only to new bookings — existing bookings keep their original prices.

FAQs

Can I apply one time-based rule to multiple products?

Yes. A single rule can be reused across multiple products.

What happens if a guest reschedules their booking?

If a booking moves to a new time or date, the price automatically adjusts to match the correct tier.

Can I edit or delete a time-based rule?

Yes. You can edit price rule settings. To delete or change tiers, first remove the rule from all products using it.

Can I edit prices after a rule is applied?

Yes. You can change prices for each tier directly in the product’s pricing table. Updates apply only to new bookings — existing ones keep their original price.

Learn more