Get each new ROLLER Payments terminal connected, confirmed for your venue and paired with POS, ready to take card payments.
Use this guide to set up each terminal, then run a test payment and refund.
Before you start
Before setting up payment terminals, follow the preparation steps in the guide Set up and test your POS hardware for ROLLER.
If you’ve purchased an Ethernet-enabled terminal, note that Ethernet cords are not included in delivery and must be sourced separately.
Set up POS payment terminals
After you have prepared each POS station, set up each terminal using the following steps:
Step 1: Charge the terminal
Plug the supplied power adapter into a power outlet.
Connect it to the card terminal.
The terminal starts up straight away. Keep it plugged in until setup is finished. The terminal restarts several times during updates, and a low battery can drop its connection.
Steps 2 and 3 use the keys on a keypad terminal. On a touchscreen terminal (S1F2 or AMS1), follow your model's user manual for these steps. You'll find it in Terminal details in the guide Choose and order ROLLER Payments terminals.
Step 2: Connect to the network
Connect your terminal to the internet:
Ethernet (recommended for reliability and performance): Connect the terminal via Ethernet cable to your local area network.
Wi-Fi (if Ethernet isn't available):
On the terminal, press Configure network.
Select WiFi and toggle it on.
Select Add network and choose your WiFi from the list.
Enter the password and press Green.
Once connected, press Red until you return to the welcome screen.
If your venue's network has a firewall, see Configure your network for ROLLER Payments terminals to allow the ports and addresses the terminal needs.
Step 3: Update software
On the terminal, press 9 and then Green.
If the terminal asks for a PIN, enter 0166, then press Green.
Go to Software > Update (tap it, or press 2 then Green).
Wait for the update to complete. The terminal may restart several times and can take up to 1 hour.
Step 4: Board the terminal
From November 2026, your terminal arrives already assigned to your venue. You only need to confirm it's the right one.
On the terminal, press Board terminal.
Check that Store location shows your venue's name and address, then press Confirm. If the location is wrong, stop and contact your customer onboarding manager or the support team.
Wait for the process to complete (up to 5 minutes).
When finished, the terminal shows the welcome screen with the ROLLER Payments logo.
If the message “Can’t find your store” appears, the terminal isn’t assigned to your venue. Stop and see Why does my ROLLER Payments terminal say it can't find my store?
Step 5: Pair with ROLLER POS
Go to More > Settings > Device:
Check that your computer is allocated to the correct POS device profile.
If incorrect, scroll down, select Deactivate device, then choose the correct profile.
Go to More > Settings > Hardware and set:
Auto print merchant card receipt? and Auto print guest card receipt?: your preference (if shown).
Offline card payment?: off.
Use ROLLER Print Service?: on.
Prompt guests for tip at payment terminal: on, if you want the terminal to ask guests for a tip.
In ROLLER Payments terminal model and serial number, select your terminal, or type its model and serial number (eg V400m-346304914). You'll find them on the back of the terminal. If your terminal isn't in the list, check it's online and has finished updating, then refresh POS.
Select Save Settings.
Press Ctrl + Shift + R (Cmd + Shift + R on a Mac) to refresh POS.
Watch how to pair your terminal with POS:
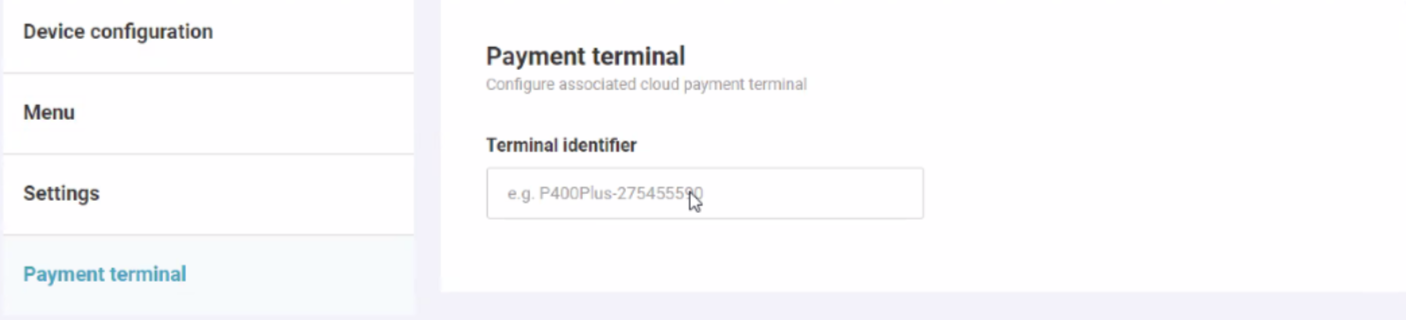
Step 6: Pair with self-serve kiosk (if applicable)
From Venue Manager, go to Apps > Self-serve kiosk > Devices.
Find the device and select the options menu (3 dots).
Select Edit > Payment terminal.
Enter the card terminal serial number in the ROLLER Payments terminal identifier field.
Refresh the kiosk browser and test with a card purchase.
Repeat for each kiosk device.
Test the terminal
Before you open, run one test payment and one refund on each terminal. It's the quickest way to catch a pairing or receipt problem.
Process a payment:
Create a booking, select Pay total > Card > Pay, and follow the terminal instructions.
Check your receipts print the way you want. Terminals with a built-in printer (eg S1F2) have their own receipt settings. See How do I change which receipts print from my card terminals?
Process a refund:
From POS, go to the booking (Go to booking or More > Activity).
Select Refund > Card > Total > Issue a credit refund.
Wait for the refund to complete.
For refunds, guests do not need to insert or tap their card. The terminal shows a zero amount, whatever the refund amount.
Once you have completed these steps for all of your payment terminals, the setup is complete and you can start taking payments.
FAQs
I moved a terminal from another venue. Do I need to set it up again?
Yes. A terminal is assigned to one venue at a time. Until it's moved, the payments it takes still go to the other venue. Contact the support team with the terminal's model and serial number, and they'll assign it to your new venue.
Keep the terminal switched on and connected to the internet while the change goes through. It can take up to 3 hours. Then restart the terminal and pair it with POS (see Step 5: Pair with ROLLER POS in this guide). If the terminal asks you to board it, follow Step 4: Board the terminal first.
My terminal arrived damaged or won't turn on. What should I do?
Contact the support team straight away with the terminal's serial number and a photo of the screen or the damage. Make sure you report it while the terminal is still under warranty.
Why isn't my terminal in the list in POS?
POS only lists terminals that are online and assigned to your venue. If yours is still updating or has lost its connection, wait for it to finish, check it's connected, then refresh POS. If the terminal shows “Can’t find your store”, it isn’t assigned to your venue yet. See Why does my ROLLER Payments terminal say it can't find my store?
Can I connect the terminal to a mobile hotspot?
Yes. Add the hotspot as a Wi-Fi network on the terminal, the same way as your venue's Wi-Fi. It also keeps you taking payments while your network is down. If the terminal works on the hotspot but not on your Wi-Fi, ask your IT team or internet provider to check your network.
Can two POS devices share one terminal?
Pair each POS device with its own terminal. POS lets you pick the same terminal on two devices, but a terminal handles one payment at a time. If both send a payment at once, one of them fails.
Why does my terminal still print receipts when I've turned them off in POS?
A terminal with a built-in printer (eg S1F2) prints payment receipts only, meaning the cardholder and merchant copies. Itemized guest receipts print from POS. In POS, Auto print merchant card receipt? and Auto print guest card receipt? decide whether POS also prints a copy of the card receipt on your POS receipt printer. They don't change what the terminal prints. To change the terminal's receipts, see How do I change which receipts print from my card terminals?
I turned on the tip prompt, so why doesn't the terminal ask guests for a tip?
Prompt guests for tip at payment terminal is set separately on each POS device, so check it's on for the one you're using. The terminal also skips the tip screen for refunds, and for payments where a tip was already added in POS. See Prompt for tips at card terminals with ROLLER Payments.