Create a recurring pass product to sell term-based classes, programs, or holiday activities that run over a set duration.
This guide explains how to create a recurring pass product, then add schedules guests can book. For an introduction, see About recurring passes.
Before you start
Create the venue resources you need to manage capacity.
Check your resource booking rules to prevent overbooking.
Decide the session duration before you save it.
Create a new recurring pass
From Venue Manager:
Go to Products > Create product.
Select Recurring pass.
Complete the product settings.
Add the content
Complete the basic product information in Content:
Name (required): This is the name guests see online and staff see at POS.
Description: Add a short description for online checkouts (150 characters maximum).
Detailed description: Add more information guests can open from a Learn more link in online checkouts.
Image: Upload a JPG or PNG image that is 640 x 390 pixels or uses a 5:3 aspect ratio.
Tags: Add tags to group and manage products, including in online checkouts.
Set the recurring pass details
Set the duration
In Duration:
Enter the session duration in minutes.
Use one recurring pass product for each duration.
Keep in mind that you can't change the duration after saving.
Add resources
In Resources:
Select all resources needed to manage capacity across all product variations.
Use the selected resources later when assigning resources to product variations.
Keep in mind that you must add resources before you can create schedules.
Make sure your resource booking rules match how the activity runs. For example, use a single-booking resource for exclusive use, or a multiple-booking resource when more than one guest booking can use the same area or activity at the same time.
Create product variations
Create a variation for each ticket type you want to sell, for example adult, child, concession, peak or off-peak.
For each variation, complete these fields:
Name and price (required): Enter the ticket name and price. You can enter 0 for a free ticket.
Resource assignment: Select the resource that should track capacity for this ticket variation.
Description (optional): Add extra information guests can review during online purchase.
Example
If your venue capacity is 100 people, assign the 100-person capacity resource to each general admission ticket option. This makes sure only 100 guests can book each session.
Review the advanced ticket options
In Advanced (optional), you can configure these options.
Setting | Description |
|---|---|
Min & Max purchase limits | Set the purchase limits for your product variations per online purchase. If you set the minimum to one ticket and leave the maximum empty, guests can purchase up to the maximum capacity of the resource assigned to the ticket. |
Make ticket compulsory | Enable this option to force guests to purchase the minimum ticket amount if purchasing any tickets in this product. For example, if you have a ticket where adult supervision is necessary, you may want to make this ticket type compulsory. In this case, you may want to set the adult ticket price as 0. |
Group ticket | A product variation setting that's designed to admit multiple guests (eg a family pass or party group). If you want to sell a ticket for a family of four for $100, enter 4 in this field, and ROLLER automatically issues four tickets, taking four spaces from the resource assigned to the ticket. |
Tax override | Allows you to choose a custom tax option for the product variation which is different from the default tax rate you've selected in your venue settings. |
Override image (POS only) | Override the product variation image so it is different from the product image for the product in POS only. |
Hide from online sales | Enable this option if you want to hide this product variation from online sales. This means the variation can only be purchased through POS or Venue Manager. This will only work if you have a second product variation. |
Set the sales availability
In Sales availability, control when the product can be sold:
Start date: Set when the product appears for sale online, at POS, and in Venue Manager.
Cut-off date: Set when online sales stop before each session starts.
Keep in mind that the cut-off date does not affect sales through POS or Venue Manager.
Review the additional options
In Additional options, you can add extra product features such as:
Add-on upsell items for online checkout.
Waivers guests must complete before taking part in the activity.
Create the recurring pass schedules
After you save the product, create the dates and times guests can book.
Select Create schedule.
Enter the schedule name and description.
In the Add sessions pop-up, select the first session start time and the last session start time for the day.
Enter the session interval (eg every hour).
Review the Tickets and Resources tab and adjust it if needed.
Select Add sessions.
Review the sessions in the right-side panel and remove any tickets from time slots you do not want to sell.
To add more sessions, select Add sessions in the side panel.
Select the Dates for the schedule.
Select the Plus icon, then select a date or date range.
Choose which days of the week the schedule applies to.
If needed, clear Include every day of the week and select only the days you want.
To remove dates such as public holidays, open the options menu and select Exclude dates.
Select Save.
Repeat these steps for any other schedules.
What to expect when you create recurring pass schedules
Recurring pass schedules work differently from session pass schedules.
If you select one day across multiple weeks, the guest is booked into that session each week for the full schedule period.
If you add multiple days to the schedule, the guest is booked into each selected day for the full schedule period.
If you offer the same time options on multiple days, the guest chooses one matching time pattern across those days.
Examples
If a learner class runs at 5:30 PM every Tuesday and Thursday, guests are booked into both days across the pass duration.
If a learner class runs at 5:30 PM and 7:30 PM every Tuesday and Thursday, guests can choose one of those time patterns for both days each week.
5:30 PM Wednesday and Friday.
7:30 PM Wednesday and Friday.
They can't choose 5:30 PM Wednesday and 7:30 PM Friday unless you create those as separate schedules.
Recurring pass schedule examples
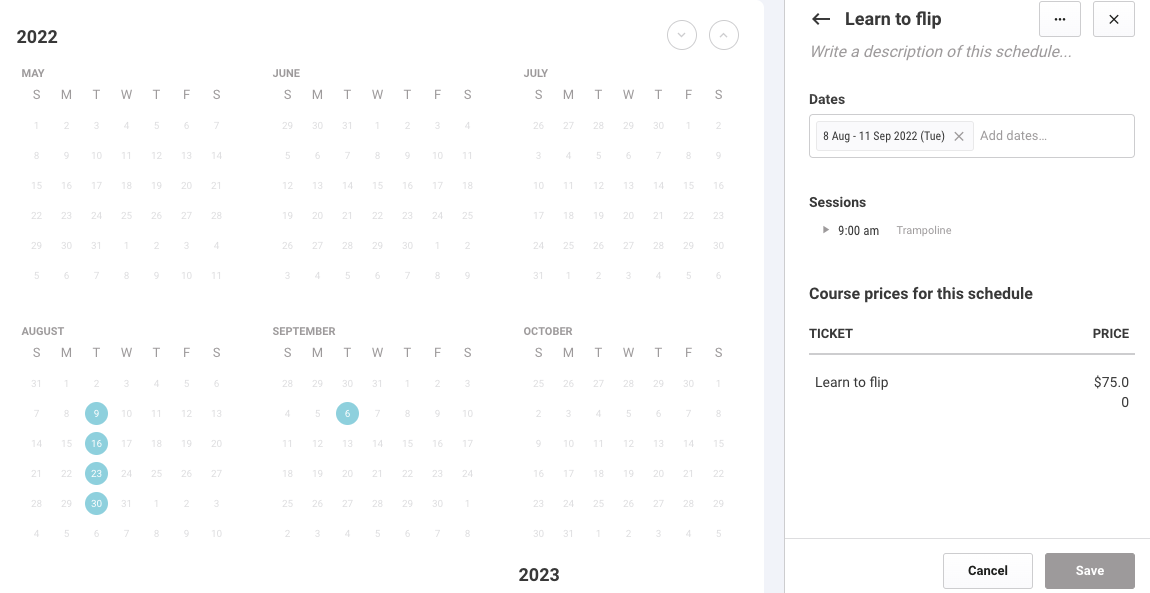
One day and one time
Use this setup when guests should be booked into one set day and time for the full pass duration.
Multiple days with the same time
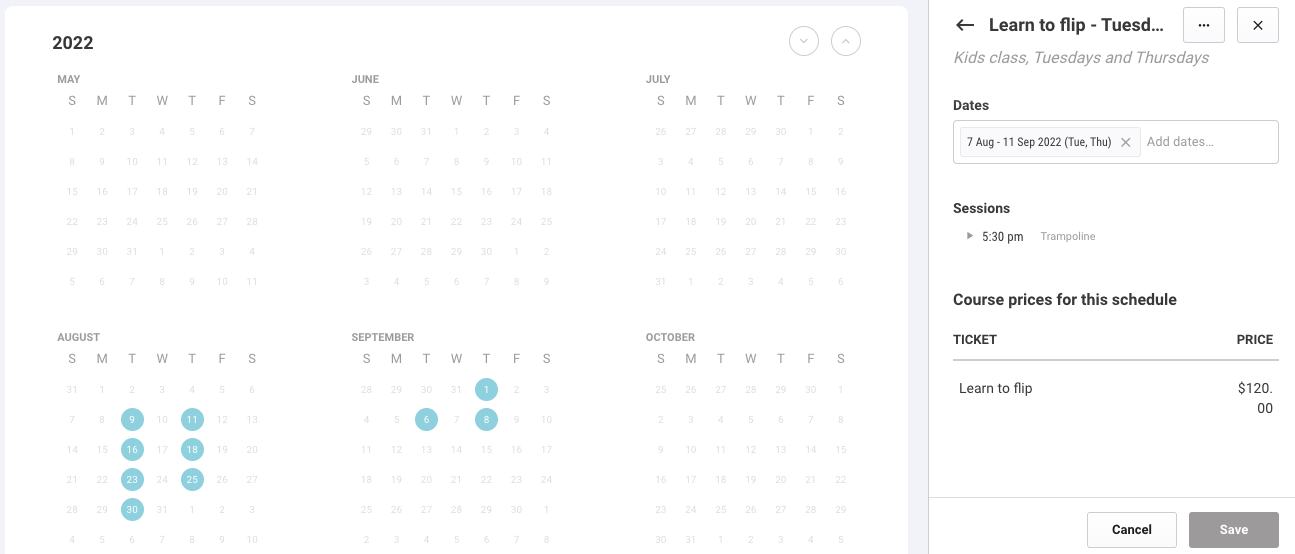
Use this setup when guests should attend more than one day each week at the same time.
Example
If a learner class runs at 5:30 PM every Tuesday and Thursday, guests are booked into both days across the pass duration.
Multiple days but with various time options
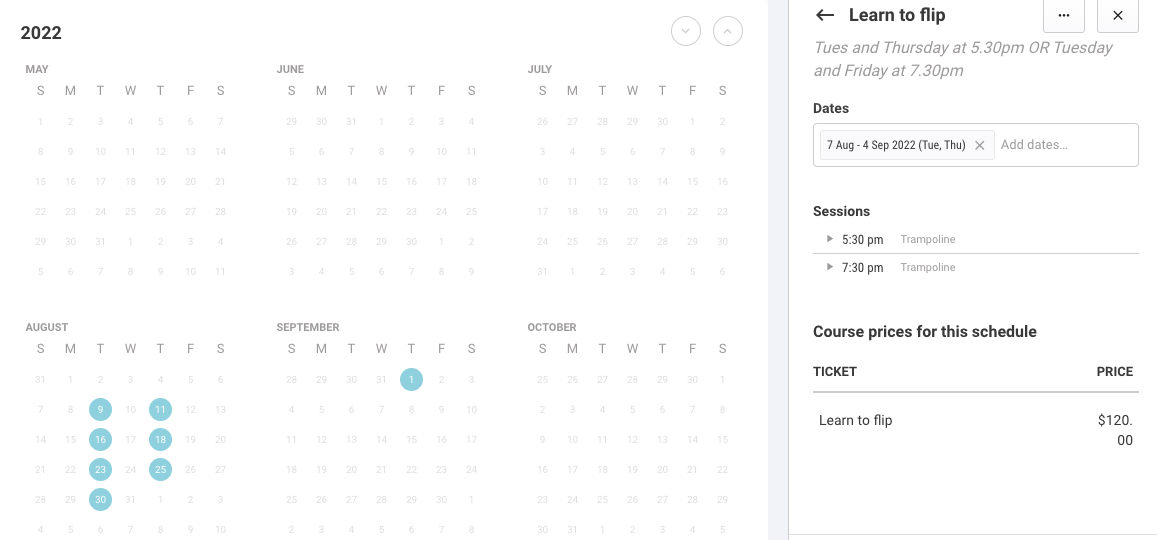
Use this setup when guests should attend more than one day each week and choose from available time patterns.
Example
If a learner class runs at 5:30 PM and 7:30 PM every Tuesday and Thursday, guests can choose one of those time patterns for both days each week.
Check the result
After saving the product and schedules:
The recurring pass product is available in your product list.
The product variations are attached to the product.
The schedule dates and session times are available for guests to book based on your sales availability settings.
After adding hte product to the online checkout and POS menus, check it is displaying correctly.