
ROLLER's Self-Serve Kiosk (SSK) solution enables guests to self-initiate and complete purchases at your venue without interacting with staff. This helps reduce wait times, improves staff productivity, simplifies the guest experience in your venue and often increases guest average spend.
This guide outlines how to configure SSK devices in Venue Manager to sell standard or session passes.
Device templates: Pro feature
Keep menus synced across devices used for the same sales with SSK device templates. To unlock SSK device templates, contact your customer success manager or the support team.
Bear in mind
When deciding if an SSK is right for your venue, consider the following points:
When guests make a reservation through SSKs, a docket containing a QR code is generated and printed. Guests then take this docket to the front desk for redemption. To facilitate this process, you will need to connect your SSK with a supported receipt printer. Note that SSKs do not generate a confirmation email for the bookings.
Each SSK device can sell either standard passes or session passes, but not both product types simultaneously. When setting up your SSK device in Venue Manager, you'll need to specify the type of pass you want to sell. SSKs are not able to sell memberships or packages that include these product types.
SSKs only process single card payments. They do not take cash payments.
SSKs are designed to display available session times for the day. If no session times are available for the day, the SSK will not display any products for purchase. When testing, make sure you have sessions available for the day.
How it works
Each physical device used as a self-serve kiosk requires its own SSK device profile that you create in Venue Manager.
Hardware requirements for your SSK stations are available in the guide Minimum Hardware Requirements.
There are three options for creating SSK devices:
New device using a template | This creates an SSK device with all the settings from an existing SSK template and links the SSK device to the template. Updating the template affects all linked devices. Use this option if you have multiple SSK devices to manage. |
New device | This allows you to configure your standalone SSK devices individually. You can apply a standalone SSK device to a template at a later date or create a template from a standalone SSK device. NOTE: The steps to create a standalone SSK device or SSK template are the same. |
New template | This allows you to create a new SSK template. NOTE: The steps to create a standard SSK device or SSK template are the same. |
Using SSK devices created from a template is an efficient way to manage your venue. If you want to edit the menu for a device which is linked to a template, then edit the menu from within the template, not the individual SSK device. Editing the template then changes all of the devices linked to that template.
Create a new device or template
The steps to create a standard SSK device or SSK template are the same.
From Venue Manager, go to Apps > Self Serve Kiosk > Devices
Click Create a device.
Select your device type:
New device using a template > select your template
New device
New template
Device configuration
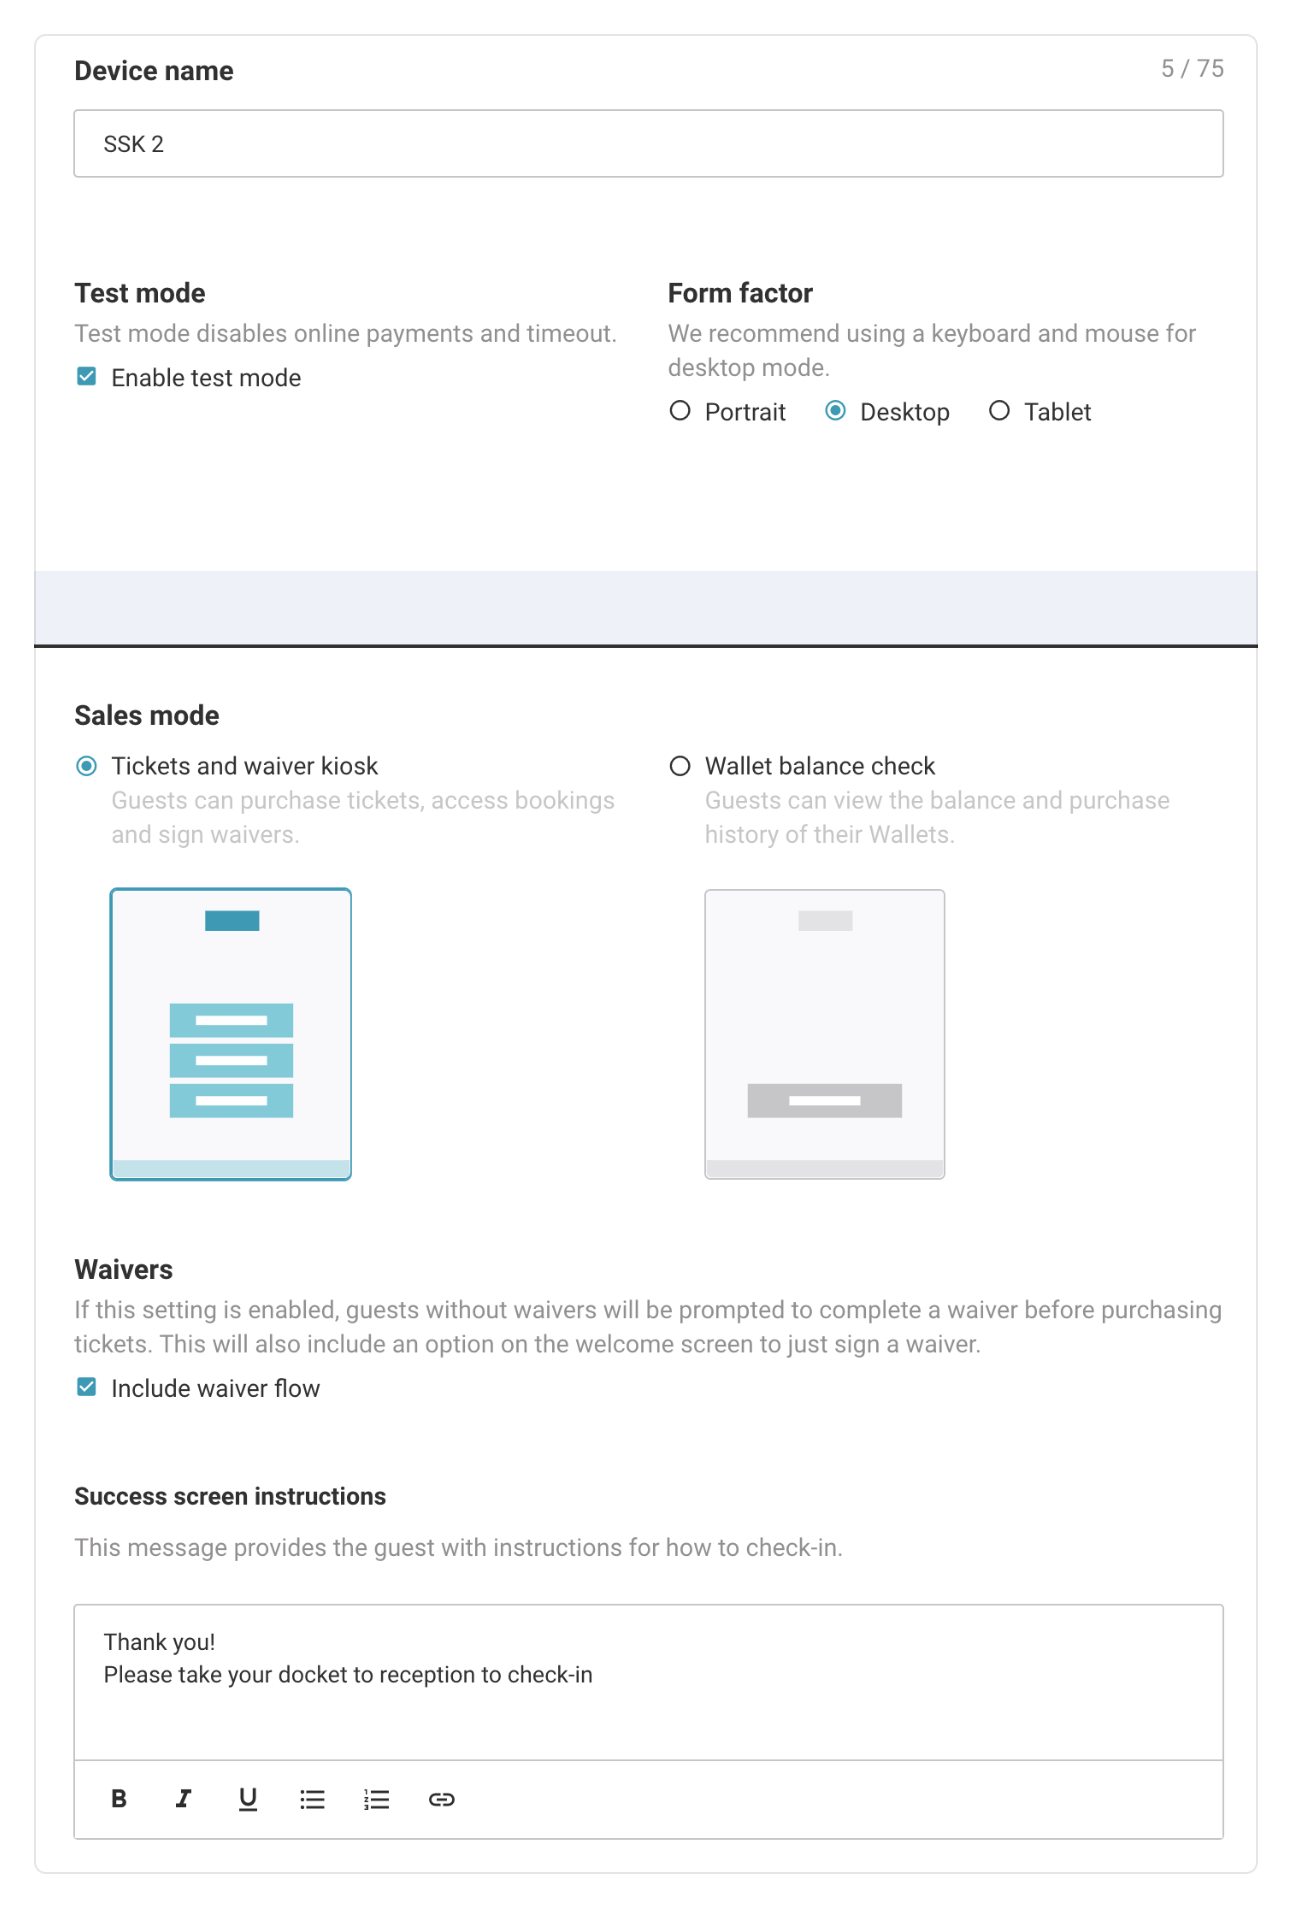
From the device configuration tab, adjust how your SSK device operates:
Device name | Name your SKK device or template. The name is displayed on booking receipts and in reports. |
Test mode | This setting disables payments and the device timeout to help conduct tests on your SSK device. |
Form factor | Adjust the layout of the SSK based on your physical device. Choose between Portrait, Desktop or Tablet. |
Tickets and waiver kiosk mode | Guests can use the SSK device to purchase tickets, access bookings and/or sign waivers. |
Wallet balance check | Guests can view the balance and purchase history of their wallets. |
Include waiver flow | If this setting is enabled, guests without waivers will be prompted to complete a waiver before purchasing tickets. This will also include an option on the welcome screen to just sign a waiver. |
Success screen instructions | This message is displayed after completing transactions at the SSK device. Use it to tell guests how to check in to your venue. |
Menu
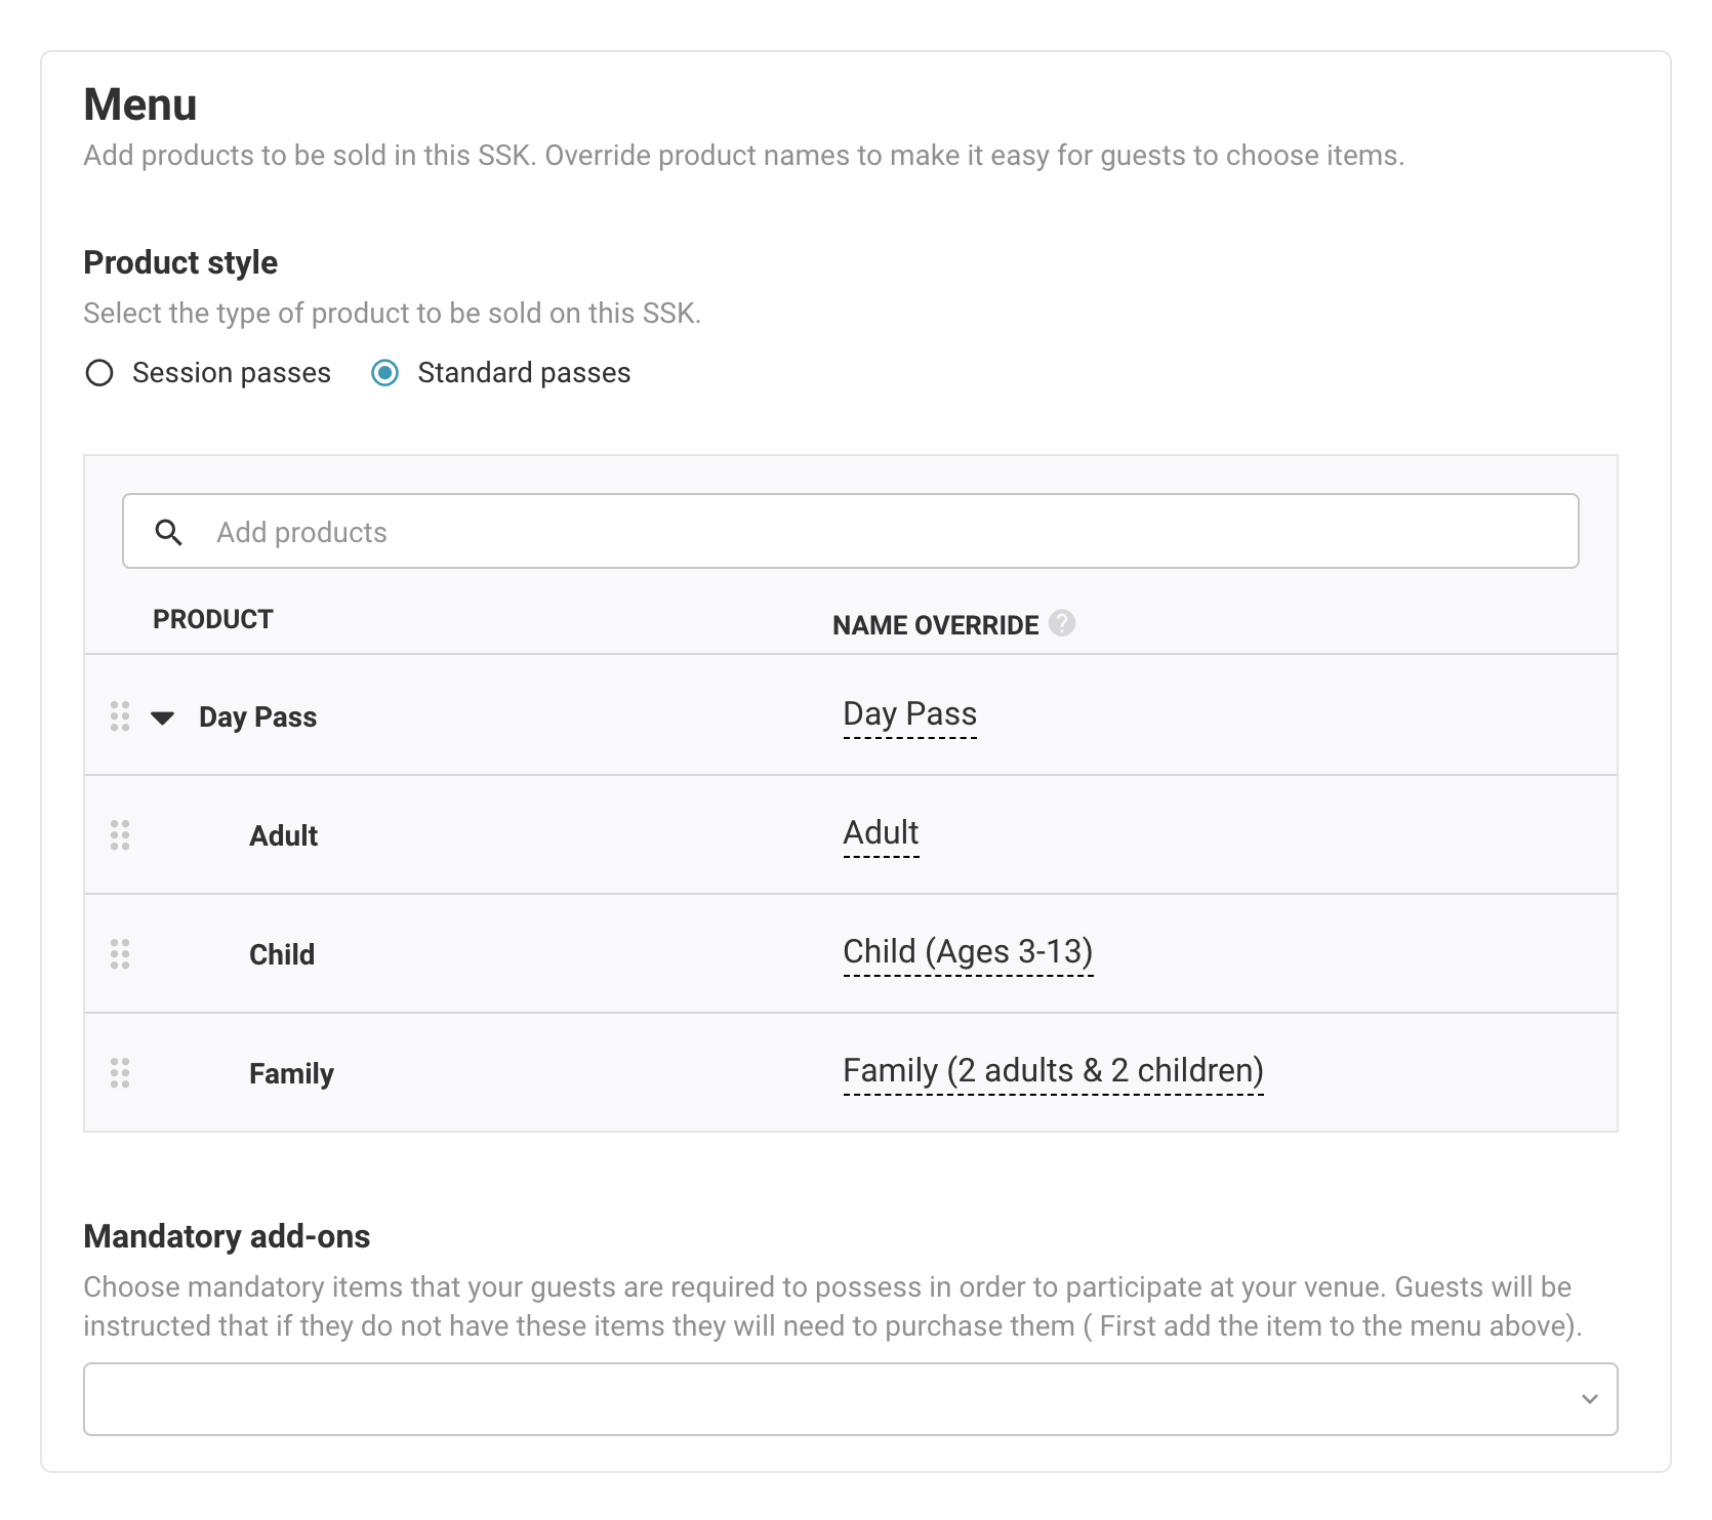
From the menu tab, add the products and add-ons to sell.
Select the Menu tab on the left-side panel.
Select the types of products you want to add and any add-ons.
Product style | Choose the type of pass product to be sold on the SSK. You can select either session passes or standard passes in addition to stock or add-ons. NOTE: You cannot sell both types of passes on a single SSK device. |
Add products | Choose products including any add-ons such as stock or add-on products. |
Mandatory add-ons | Optional feature to make a stock or add-on a mandatory item to participate at your venue. Guests are instructed that if they do not have these items they will need to purchase them, for example grip socks. |
Device settings
From the Settings tab in the left-side panel, configure the settings and terminal relevant to the individual SSK device:
Allow guests to redeem gift cards | Allows guests to redeem a gift card to complete the transaction. |
Allow guests to apply discount codes | Allows guests to enter a discount code to apply to the transaction. |
Payment terminal - Terminal identifier | Enter the serial number of the payment terminal that will be linked to the specific SSK device. |
You must also configure SSK settings for all your devices. See the guide Configure your self-serve kiosk settings to learn more.
Manage SSK devices linked to a template
To create a new SSK device from an existing template:
From Venue Manager, go to Apps > Self Serve Kiosk > Devices.
Click Create a device.
Select New device using a template.
Select the existing template you want to use.
Give the SSK device a unique name and adjust the device configuration as required.
Click Save once done.
Alternatively, you can:
From Venue Manager, go to Apps > Self Serve Kiosk > Templates.
Find the template you wish to use and click the options menu (3 dots) on the right hand side of the template.
Select Create device from template.
Given the SSK device a name and adjust the device configuration as required.
Click Save once done.
To manage the SSK devices that are linked to a template:
From Venue Manager, go to Apps > Self Serve Kiosk > Templates.
Find the template you wish to use. Click the options menu (3 dots) on the right hand side > select Edit.
Click Unlock to edit template.
Update Device configuration, Menu and Settings options as required.
Click Save once done.
Changes made to the template will be applied to all linked SSK devices.
Apply a template to an existing device
You can apply (or re-apply) a template to an existing device. This updates all menus in the device with those in the template.
This feature is helpful if you unintentionally unlink a device from a template!
From Venue Manager, go to Apps > Self Serve Kiosk > Devices.
Select the options menu (3 dots) for the device.
Select Apply template.
Select the template.
Click Apply.
Confirm that you want to update all menus in the device with those in the template.
The device is now linked to the template.
Create a template from an existing device
You can create a template from an existing device.
This is helpful if you create a new device first and want to turn it into a template to use the same menus with additional devices.
From Venue Manager, go to Apps > Self Serve Kiosk > Devices.
Select the options menu (3 dots) for the device.
Select Create template from device.
The device is turned into a template.
Select Save.
Lock down your self-serve kiosk
Refer to the guide Lock down a self-serve kiosk