This guide refers to the installation process for EPSON printers if using ROLLER Connect for printing. If using production management, refer to the guide Get started with cloud printing for production management.
This article is a guide to installing an EPSON printer on a Windows device:
TM-M30
TM-T88 IV / V / VI
TM-T82II
TM-T20II
TM-T70I
If you're unsure which model your EPSON printer is, locate the model/serial number sticker on the underside of the device. Click here for a visual explanation.
Examples in the following sections relate to the EPSON TM-M30 specifically, however, the installation process is the same for all models.
ROLLER is not responsible for any hardware devices including printers. If you're unable to fully install and test your receipt printer, DO NOT contact ROLLER Support, please contact your IT/technical support representative.
Installation process
The sections below explain the process to install an EPSON printer for a Windows device (USB or Ethernet/Wifi):
USB printer
Steps to install a USB EPSON printer are:
Ethernet or Wifi printer
Steps to install an Ethernet or Wifi EPSON printer are:
Disable Windows user account controls (optional)
Use the Search bar and type User Account Controls and click to open
In the settings window, select the option Never notify and click Ok
If prompted to confirm again, click Ok.
Printer driver installation
Download drivers
Download your specific EPSON printers driver by clicking the relevant link below:
Open the downloaded Zip folder by double-clicking the file
Click Extract all
Tick the checkbox to Show extracted fields when complete & click Extract
Install the printer driver
Find and open the executable file (exe) with a name starting with "APD_511R1_....."
Wait for files to unpack then click Next
Click Agree to accept the licence agreement and then click Install
Wait for the printer driver to finish installing and then click Next
Close all open windows.
Configure your printer
USB printers
Add and configure USB port
Ensure your receipt printer is plugged via USB (USB type A to Type B) into your POS device and its powered on (you should see a blue light)
Use the Windows search bar to find the EPSON configuration utility by typing the Epson model name such as Epson TM-M30 Utility and click the application to open.
DO NOT click the application which has APD5 in the titleClick Add port
Click USB tab
If your printer is connected correctly then the port should auto-populate with its port setting.
Take note of this port number as you'll require this in subsequent installation steps.
Troubleshooting steps
If no port selection appears then try the following steps to rectify:
Make sure the device is powered on and you can see the power light illuminated
Check for any error status lights
Ensure the USB cable is fully connected at both ends
Try a different USB port on the POS device, power the printer off and then back on
Shut down and restart the POS device
If none of the above steps resolve the issue, speak to an IT specialist to diagnose and resolve.
Communication test
Click the Communication test button to verify communication between the Printer and the POS device.
If you receive a success response click Ok to close the test
Click Ok again twice to close the configuration window
Click Ok to close the configuration utility application.
If the communication test fails then follow the Troubleshooting steps above to resolve the issue.
Ethernet or Wifi printers
Networked device installations are generally more complex and involve multiple connections to routers and network switches. If you are not experienced with managing local area networks we highly recommend that you consult an IT professional to configure your networked devices.
Add port and install printer
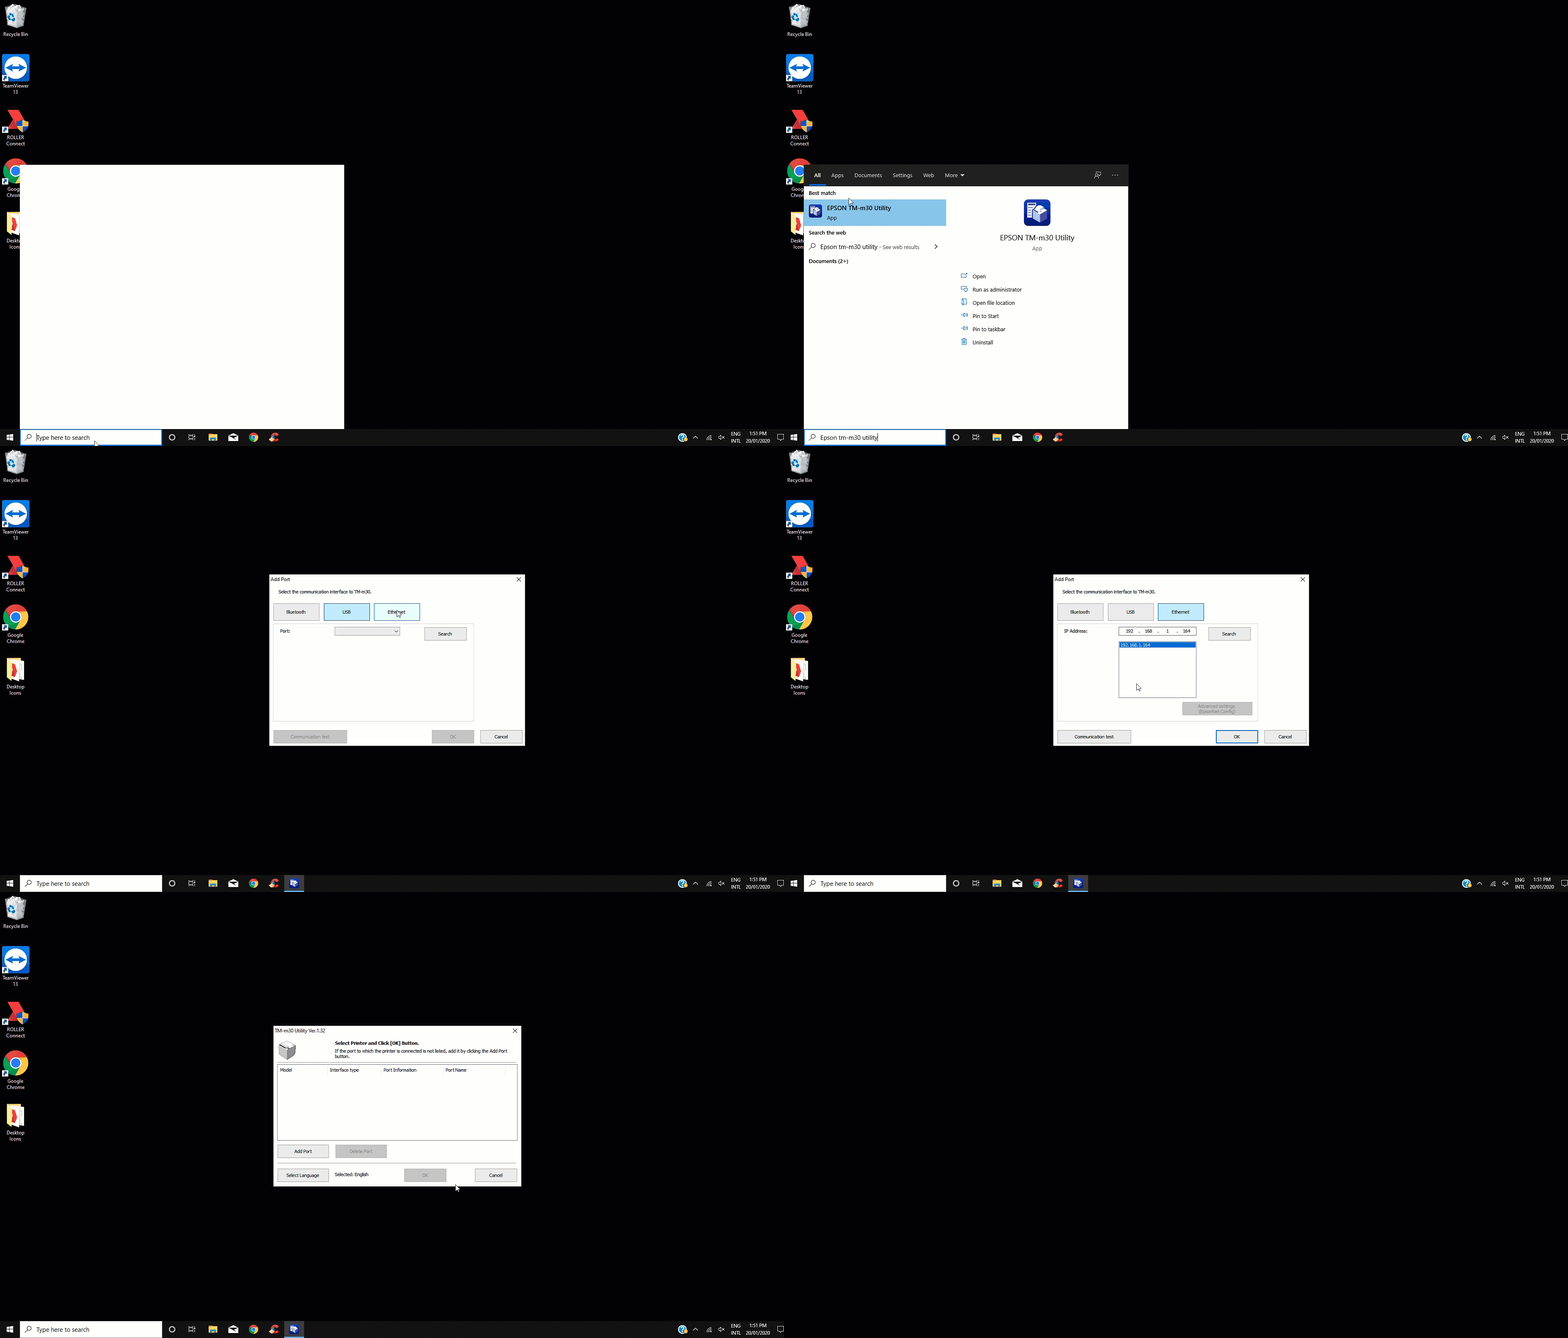
Ensure your receipt printer is connected to the network and it is powered on (you should see a blue light)
Use the Windows search bar to find the EPSON configuration utility by typing the Epson model name such as Epson TM-M30 Utility and click the application to open.
DO NOT click the application which has APD5 in the titleClick Add port
Click Ethernet tab
Click Search
The utility will display the IP Address of ALL EPSON printers connected to the network
If your printer is connected correctly then the port should auto-populate with its port setting.
Take note of this IP Address as you'll require this in subsequent installation steps.
Troubleshooting steps
If no IP Addresses are displayed selection try the following steps to rectify:
Make sure the device is powered on and you can see the power light illuminated
Check for any error status lights
If an Ethernet printer, ensure the cable is fully connected at both ends by removing and making sure you hear it click when reconnecting
Power off and on your network router and any network switches
Shut down and restart the POS device
If none of the above steps resolve the issue, speak to an IT specialist to diagnose and resolve as a networking issue will be the most likely cause of any communications issues.
Communication test
Click the Communication test button to verify communication to the printer and the POS device.
If you receive a success response click Ok to close the test
Click Ok again twice to close the configuration window
Click Ok to close the configuration utility application.
If the communication test fails then follow the Troubleshooting steps above to resolve the issue.
Driver test print
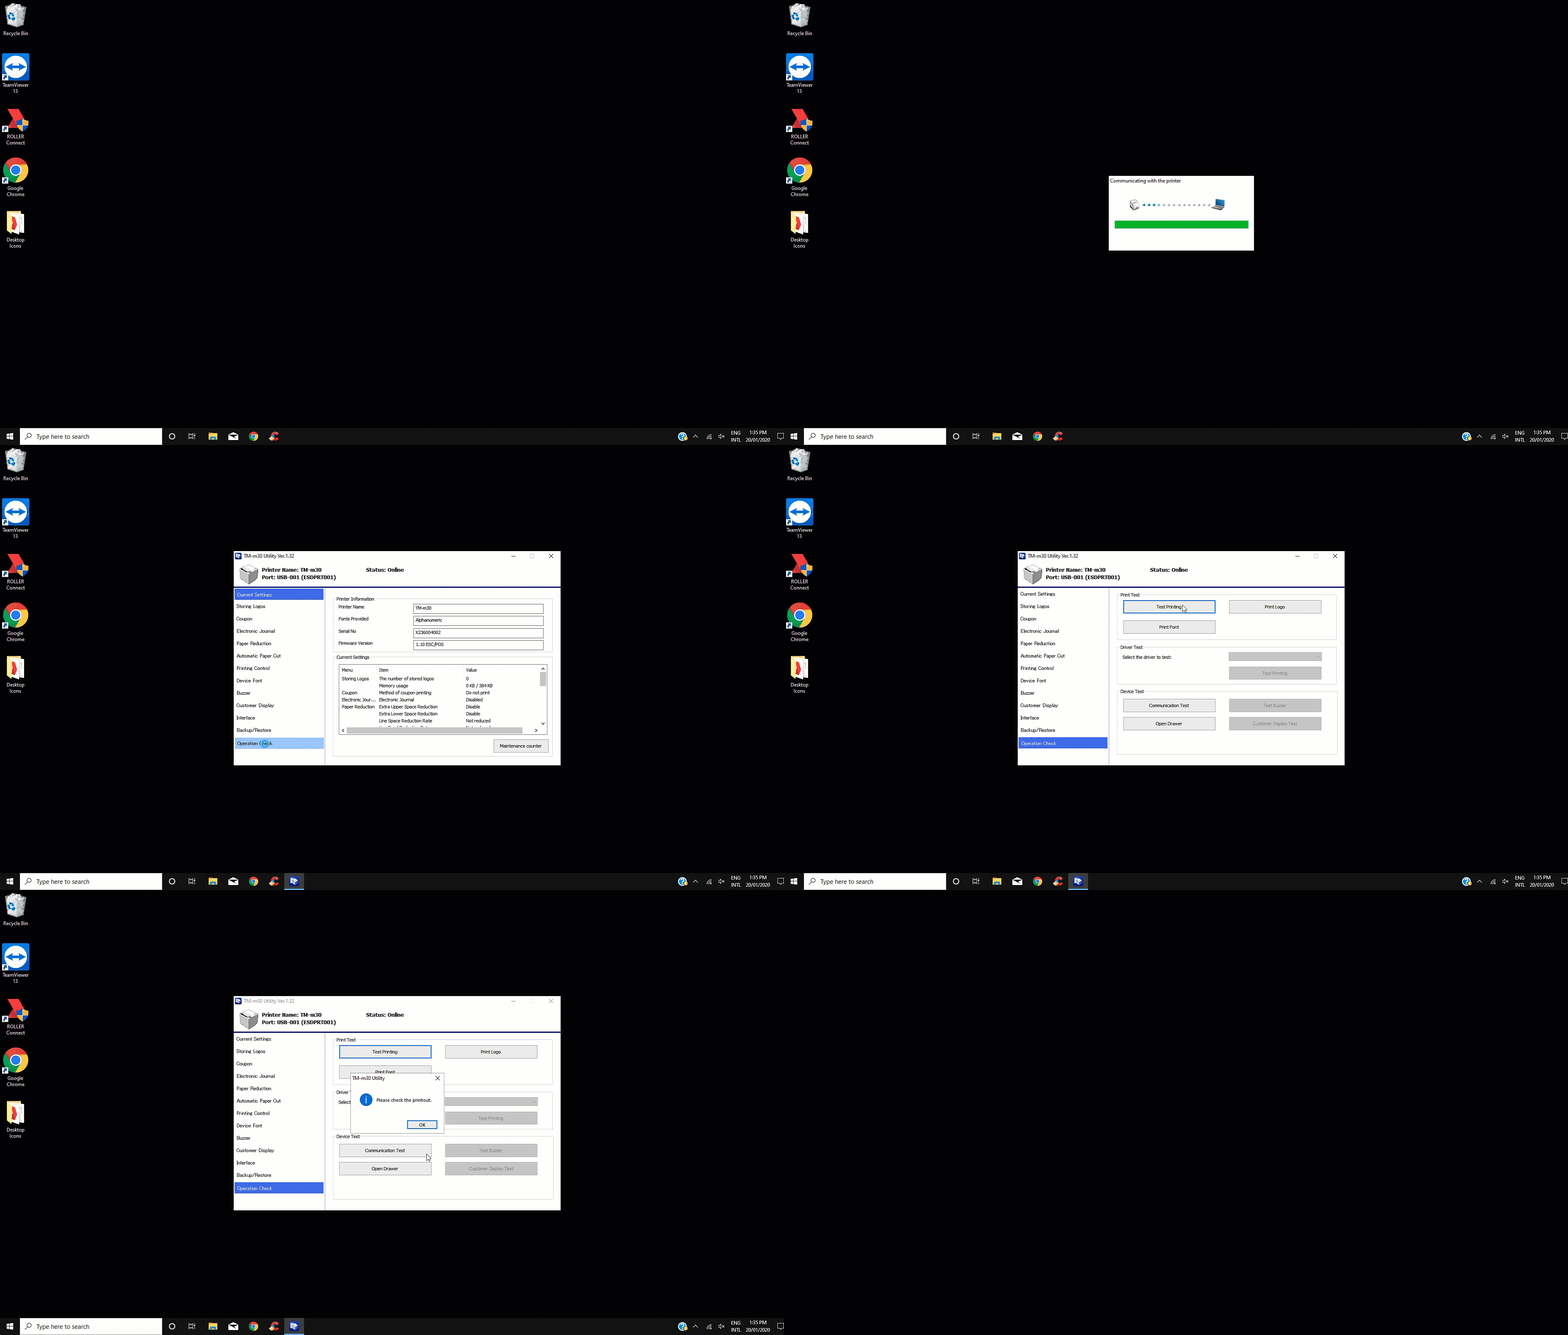
Following a successful communication test (as per section above), the POS Device will connect with the printer & display the configuration utility including a range of printer settings
Click Operation Check and then the Test Printing button
Confirm & check to see if it was successful.
If the test print was successful close the window and proceed to Device Registration
Troubleshooting steps
If the test print failed - confirm the printer:
Is still powered on
Is loaded correctly with paper
Is not showing any error status lights
If none of the above resolves the issue, restart the process by:
Reopening the EPSON utility
Deleting the port
Add the port again
Perform the Communication Test again.
When a test print is successful proceed to the Device Registration section below
Device registration
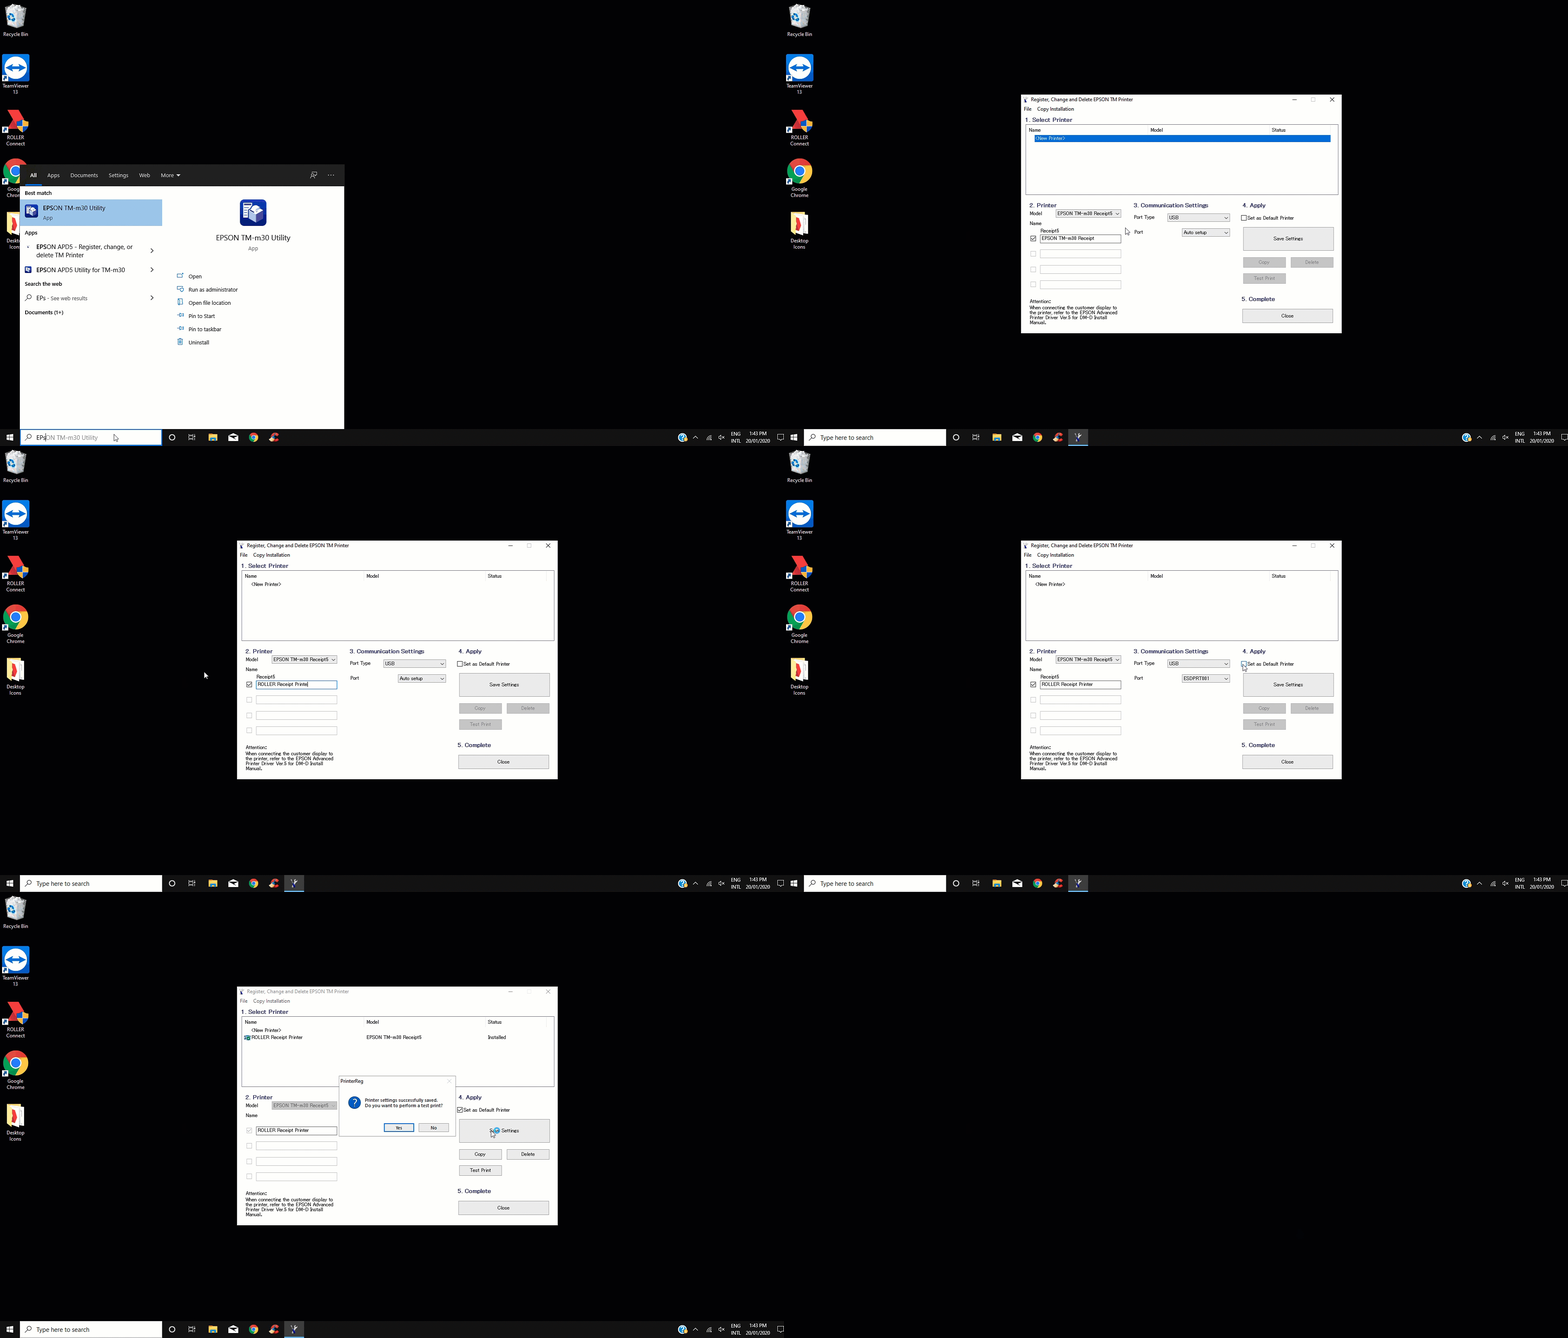
Use the Windows search bar to find the EPSON Advanced Printer Driver by typing Epson APD5 and click the application to open.
In the top section '"Select Printer" click to select "<New Printer>"
In the second section labelled "Printer", type a name for your printer such as POS 1 Receipt Printer
In the third section labelled "Communication settings", select port type as USB or Ethernet and select the port from the dropdown which was configured/noted in the previous steps
In section 4 labelled "Apply", check the Set as Default Printer option if this device will operate as this POS devices receipt printer
Click Save Settings button
When prompted whether to perform a test print, click Yes and confirm correct printing
Click Close in the final section labelled "Complete" to exit the application.
Proceed to the final step, Windows Test Print below.
Windows test print
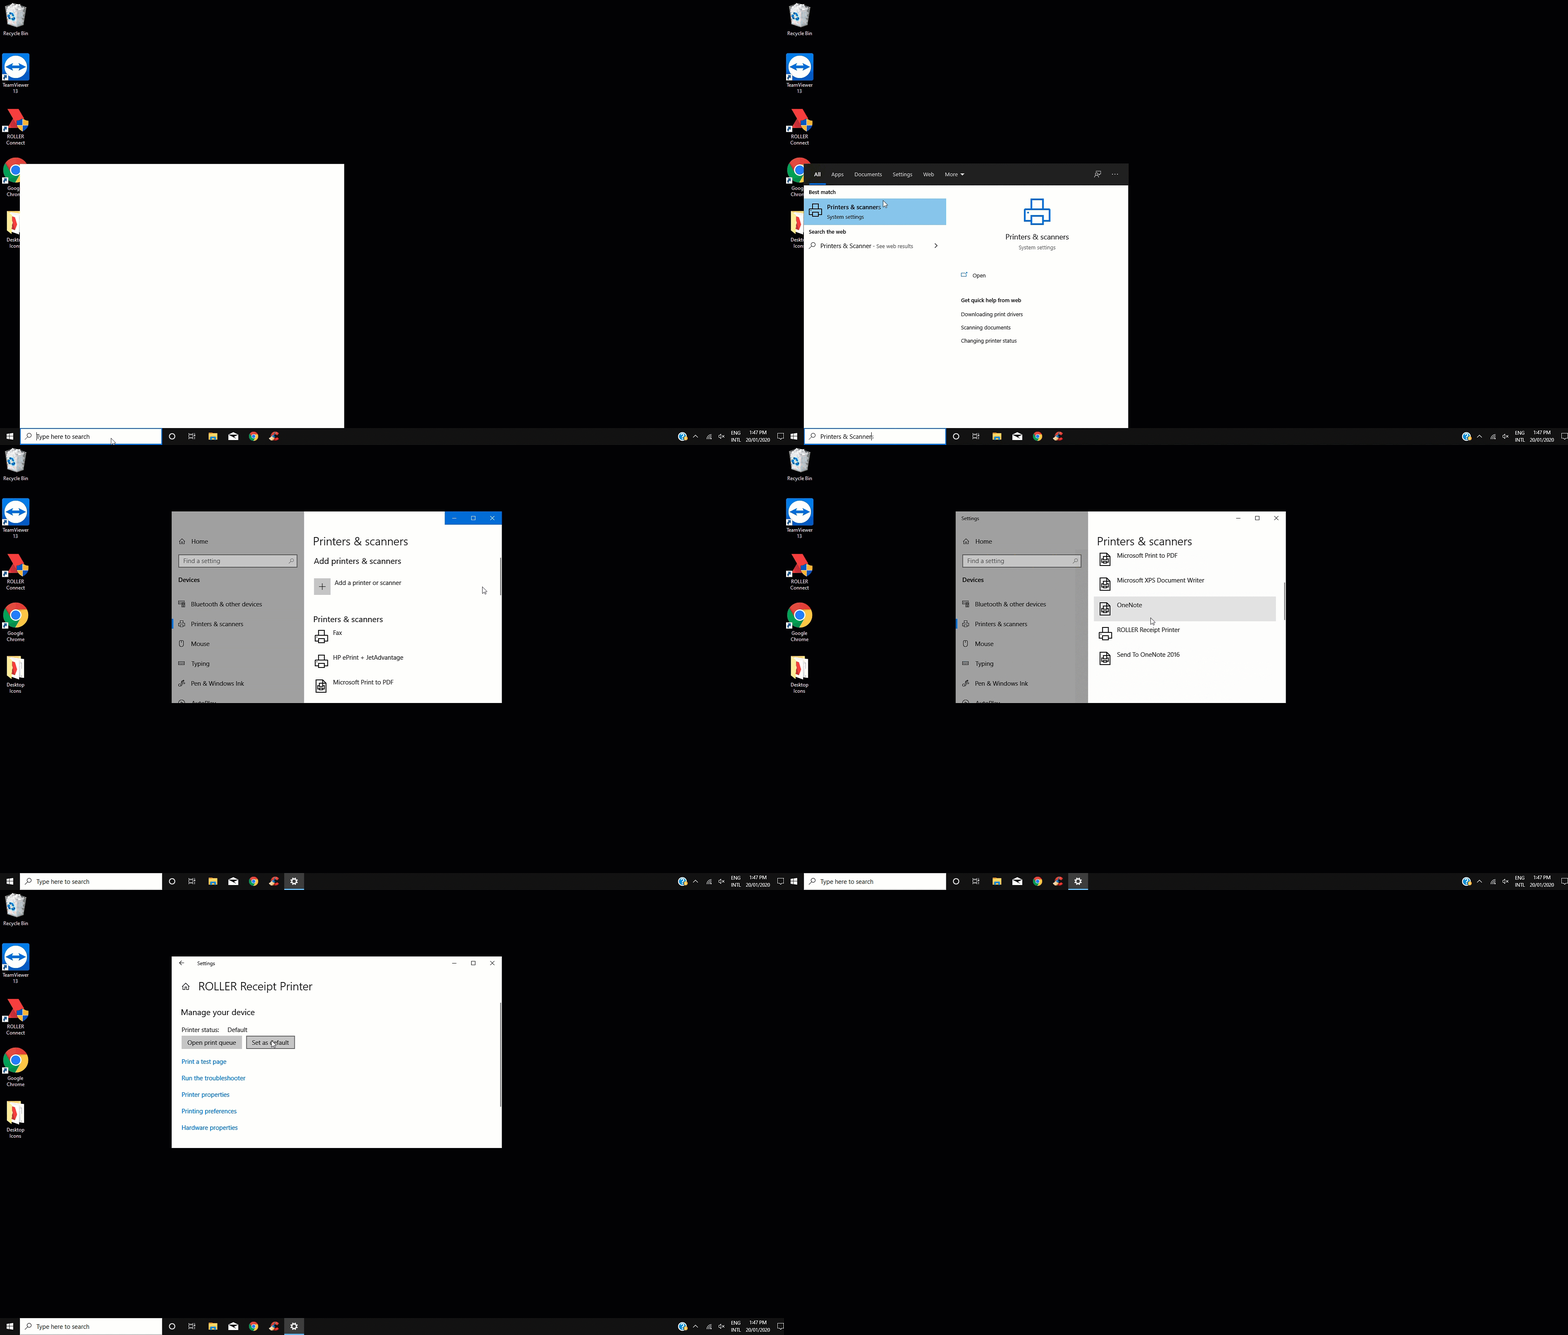
Use the Windows search bar to open Windows Printers & Scanners by typing Printers & Scanners and click to open.
Scroll to the bottom and uncheck the option Let Windows manage my default printer
Locate the name of the printer registered in the previous section (Device Registration), click on it and then click Manage
Click Set as Default
Then click the Print a test page link
Check the printer for the test print.
Troubleshooting steps
If the test print failed - confirm the printer:
Is still powered on
Is loaded correctly with paper
Is not showing any error status lights
If none of the above resolves the issue, restart the process by:
Reopening the EPSON utility
Deleting the port
Add the port again
Perform the Communication Test again.
If the above are resolved and your test print still fails - refer to the receipt printing troubleshooting article.
If test print is successful then your receipt printer is ready to be set up with ROLLER