Send food and beverage orders straight to screens in your kitchen with ROLLER’s Fresh KDS integration. Orders from POS and mobile food & beverage checkouts appear in real time, so your kitchen team can prioritize and prepare them faster without relying on paper dockets or printers.
In this guide, you’ll connect your Fresh KDS account to ROLLER, then set up which orders go to each kitchen display.
What is KDS?
KDS stands for Kitchen Display System and is an alternative to printing out production dockets using paper and printers.
When guests order food & beverages at POS or through the mobile food & beverage checkout, the order details get sent to a screen in your kitchen (rather than a printer that prints a physical docket to your kitchen).
KDS can sometimes also be referred to as Kitchen Video Monitor or KVM.
Who can use KDS?
Any venue with food and beverage operations can take advantage of this integration and configure their KDS devices in ROLLER.
Once integrated you can:
Connect your POS devices to your KDS devices.
Connect your mobile food & beverage checkout to your KDS devices.
To learn more about mobile food & beverage ordering, read the guide Prepare for mobile food & beverage ordering.
Requirements and hardware
ROLLER integrates with Fresh KDS. To connect your Fresh KDS devices with ROLLER, you must first have a Fresh KDS account. To learn more, visit the Fresh KDS website and review their plans and pricing to see which is the best fit for your venue.
You must also be using devices that are compatible with Fresh KDS. To learn more, see the guide Recommended hardware for Fresh KDS.
Visit the Fresh KDS Knowledge Base to learn more about how to set up your account and devices. If you have any issues with Fresh KDS, contact their support team.
How it works
Sign up for a Fresh KDS account (if you don’t already have one) and choose ROLLER as your POS system.
Log into Fresh KDS, and from your dashboard create an integration token.
Copy your integration token and then paste this into ROLLER to connect.
Configure your individual KDS devices in Venue Manager, and connect them to POS and mobile food & beverage checkouts.
Integrate Fresh KDS with ROLLER
To integrate your Fresh KDS account with ROLLER, follow the steps below.
Log in to your Fresh KDS account, and from the dashboard create an integration token.
Copy your integration token and go to Venue Manager.
From Venue Manager, go to Settings > Devices > Add kitchen display.
Paste your integration token into the space provided and select Connect to verify your token.
Then, select the Location of your devices and select Connect again to activate.
Finally, you can select all the KDS devices you want to connect to POS and mobile food & beverage checkouts from the dropdown menu and select Update devices.
ROLLER can only accept one location at a time from Fresh KDS. You should configure all your screens under one location if you want them all to appear in ROLLER.
Edit or remove an integration token
You can edit your integration token at any time. Follow the steps below.
From Venue Manager, go to Settings > Integrations.
Scroll down to Fresh KDS and select Edit.
Make the required changes to your Integration token or device Location and then select Activate.
Generate a webhook URL
You can also generate a webhook URL in ROLLER to add to your Fresh KDS integration and configure other features like order status and SMS order notifications. To generate a webhook URL:
From Venue Manager, go to Settings > Integrations and scroll down to the Fresh KDS section.
Under Webhook URL, select Generate webhook URL.
To learn more, see the guides Set up SMS order notifications for KDS and Sync Fresh KDS order status in POS.
Connect your Fresh KDS devices to ROLLER POS and mobile food & beverage checkouts
Once you’ve integrated your Fresh KDS account with ROLLER and added your devices to Venue Manager, you can connect them to ROLLER POS and mobile food & beverage checkouts. Follow the steps below.
From Venue Manager, stay in Settings > Devices.
Select the KDS device you want to connect from the Devices list.
The Device name is pulled from your Fresh KDS account and can’t be changed in ROLLER. You can log into your Fresh KDS account and change the device name from there.
Select which POS devices will connect to this KDS device, and select Apply.
Then, define which stock products will display on the KDS screen when ordered from these POS devices. For example, if a guest purchases a cold drink at POS, the staff member at POS may give the guest their drink right away without the need for it to display on a KDS device. In this instance, you could choose all stock except cold drinks to display on your KDS. Or, you could configure it so that only hot food ordered from these POS devices display on the KDS screen.
[Optional] If you’re using ROLLER’s mobile food & beverage checkouts, select the checkouts you would like to connect to the KDS device and then select Apply.
As with your POS devices, you can also define which stock products will display on the KDS screen sent from these checkouts. For example, all hot food ordered from these checkouts will display on the KDS screen.Select Save.
Complete this process for each individual KDS device in the Devices list.
You can connect more than one POS device and more than one mobile food & beverage checkout to an individual KDS device.
Once this is done, each time a food and beverage order is made at POS or through a food & beverage checkout, the order will be sent to the designated screen in your kitchen.
What staff see on the KDS screen
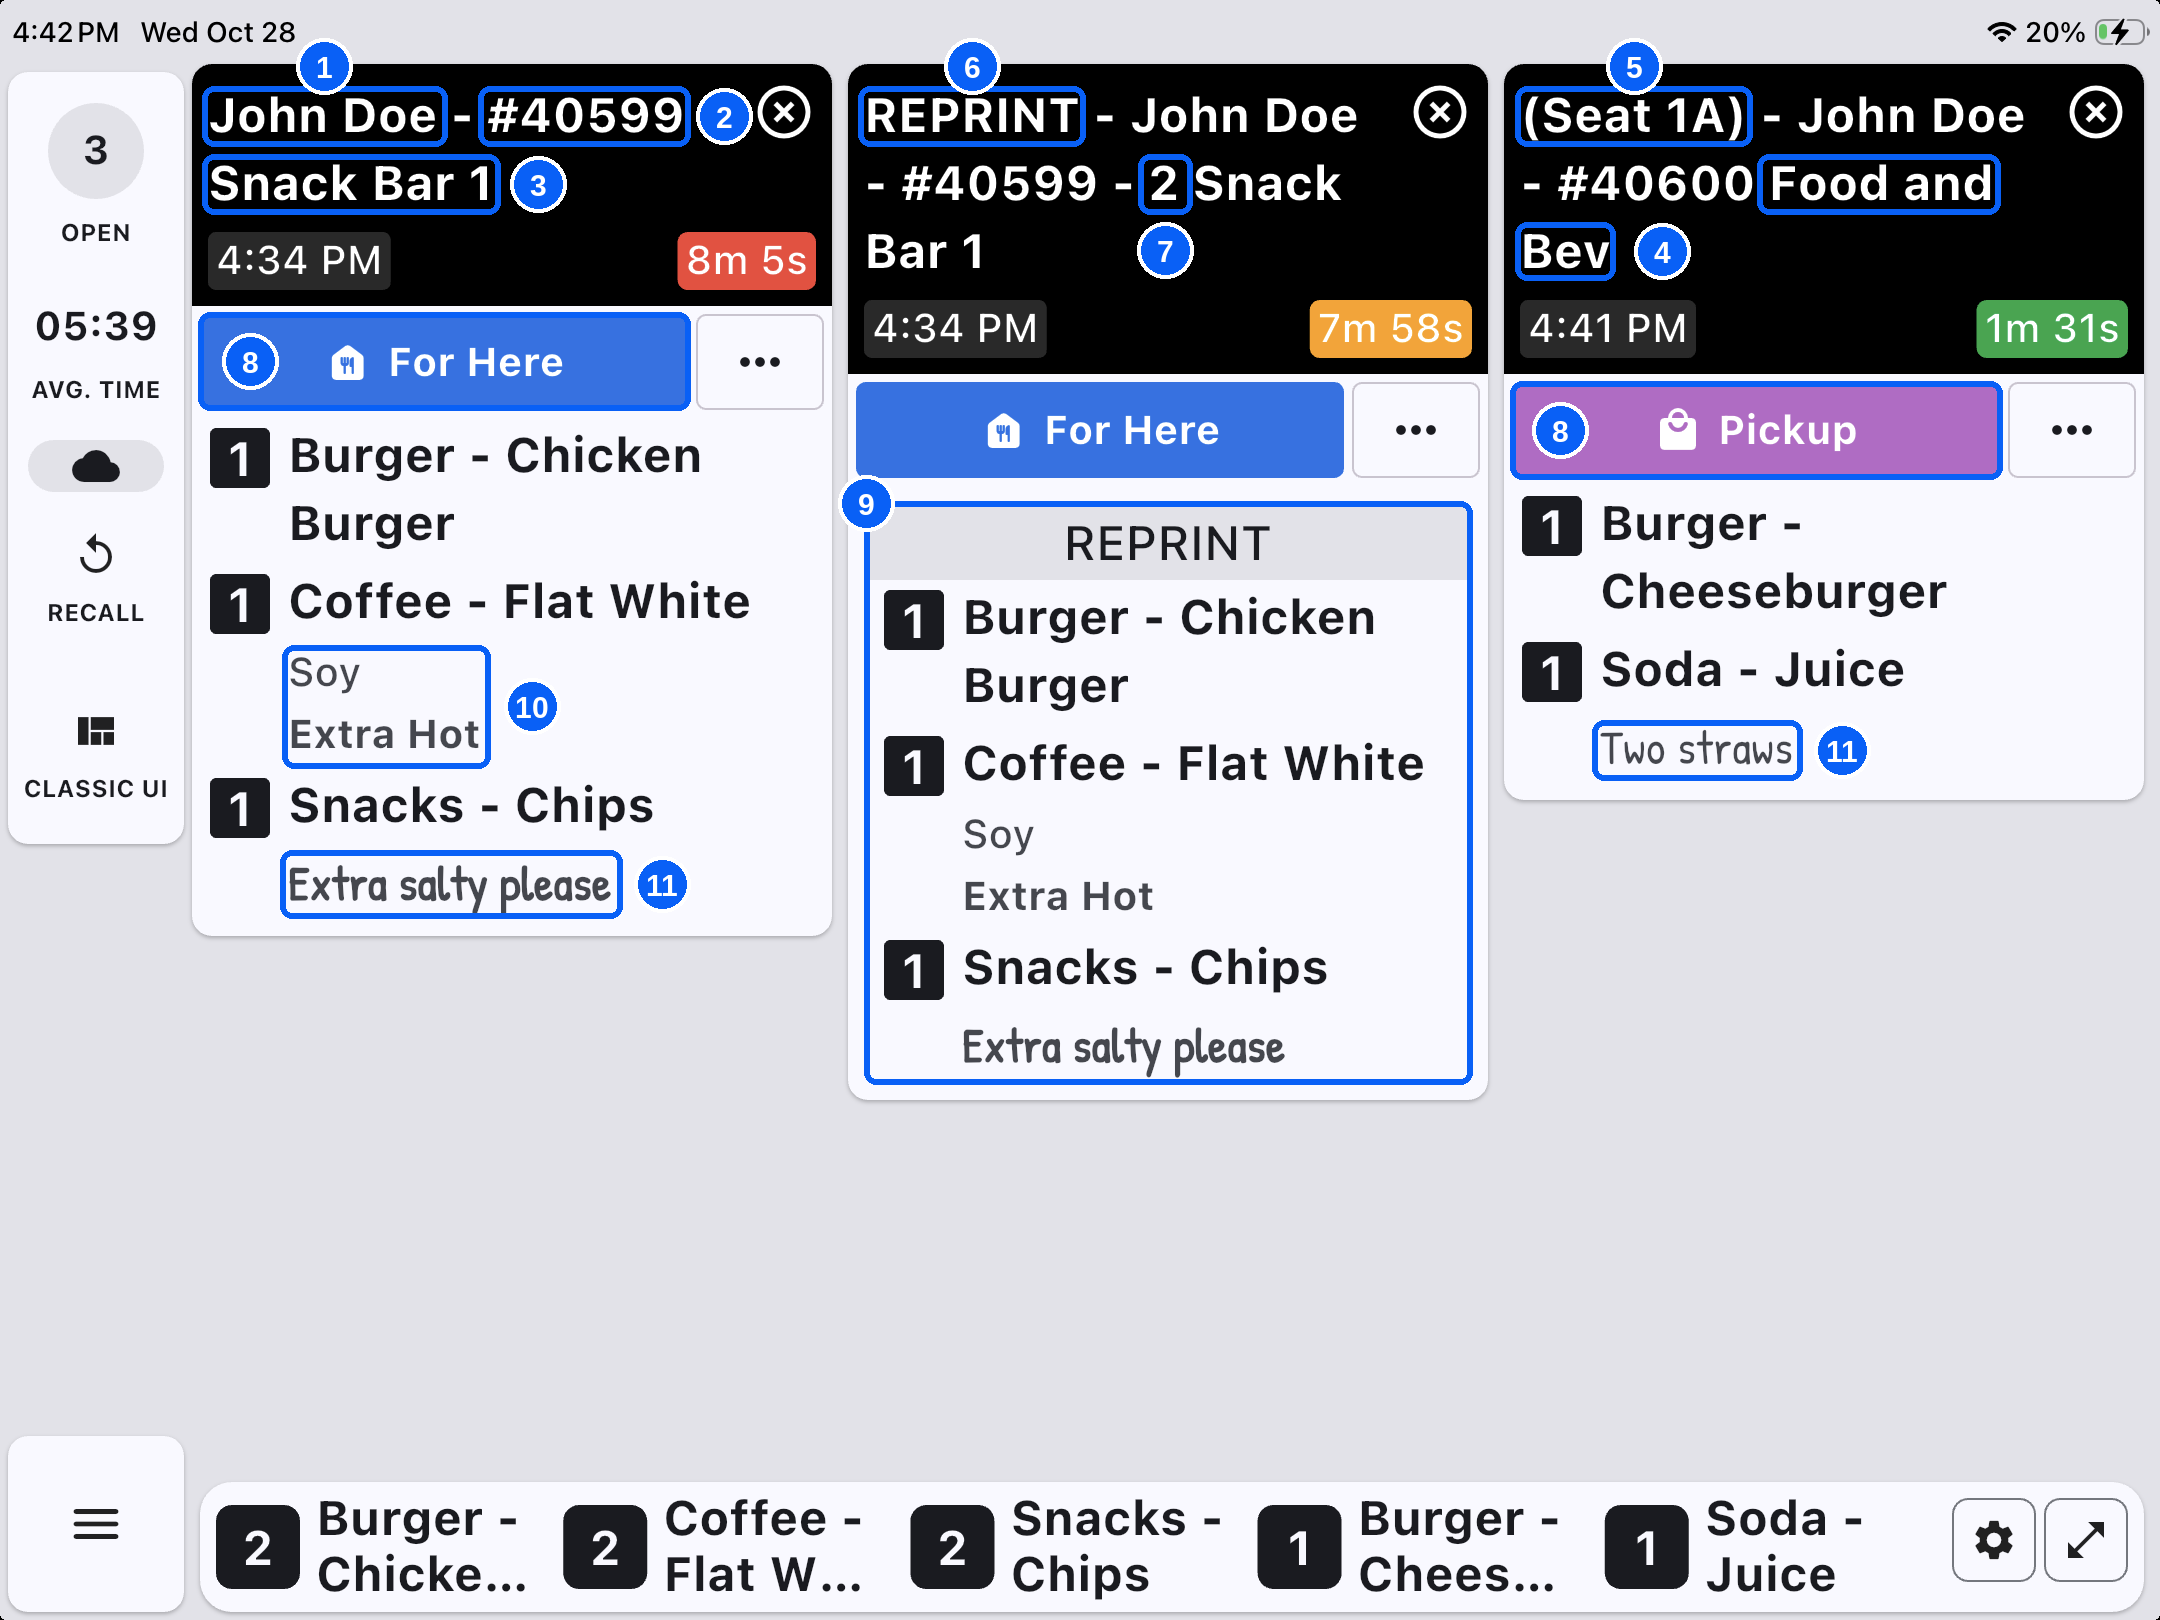
Each docket on the KDS screen shows your team exactly what they need to prepare. Here’s what appears on the screen and how to read it.
Guest name: The name of the guest who placed the order.
Booking ID: The booking number. Use this to find the order in POS.
POS name: The POS device the order was placed on.
Checkout name: The mobile food & beverage checkout the order came from.
Table number: Where the guest is seated, if they entered a table or seat number.
Reprint label: Shows the ticket is a reprint of an earlier order.
Sequence number: Shows how many times new items have been printed/reprinted for the same booking ID.
Sales origin: A color label showing whether the order is For Here (POS) or Pickup (mobile food & beverage checkout).
Reprinted items: The items included in the reprint.
Modifiers: Options selected for an item, such as milk type or temperature.
Notes: Special instructions for the kitchen from the guest or staff member.