Set up Guest Agent so it looks, sounds and sells like your venue. Choose your channels, create your agent's persona and pick the voice guests hear. Then you're ready to build your knowledge base and add the widget to your website.
Register your venue for early access
Guest Agent is in early access for eligible venues, and we're rolling it out in stages. It has usage-based pricing, so you pay based on how much your agent is used.
Watch how to set up your agent and customize your web widget in Venue Manager.
Set up Guest Agent for the first time
The permission required to set up and manage Guest Agent is Can edit Guest Agent configuration. The administrator role has this permission enabled by default.
The first time you open Guest Agent, you accept the terms before you create an agent. You only do this once for your venue.
From Venue Manager, go to Intelligence > Guest Agent.
Select Set up Guest Agent.
Select both checkboxes to agree to the billing terms and the terms and conditions, then select Get started.
Create an agent
Each agent has its own look, voice, products, knowledge base and embed code.
From Venue Manager, go to Intelligence > Guest Agent > All agents.
Select Create agent. A new agent opens with a default name, such as Agent 1.
On the Agent settings tab, work through the settings in the next sections, then select Save.
The agent page
Each agent has two tabs you'll work in:
Agent settings
Knowledge base
Start in the Agent settings tab, where you can design and customize your web widget, then move on to the Knowledge base tab to build out the information your agent will reference when answering guest questions.
This guide covers agent settings in detail. For more information on the knowledge base, see the guide Build your Guest Agent knowledge base.
Customize your web widget
Your web widget is what guests will see and use to interact with your agent. You can customize the widget to complement your brand and give your guests a consistent experience.
You can preview each change you make to your widget in the preview panel on the right side of the page.
Select the hotspots below to see an interactive demo.
Avatar
Start by uploading an avatar for your web widget. This should be something representative of your brand or venue, for example, your logo or mascot.
Theme
Choose a light or dark theme for your widget, then pick a primary color. The color only applies to the background of the guest’s message bubbles.
Agent name, introduction and description
Give your agent a name, an introduction and a description, so guests know who your agent is and what it can do. Make sure the name, introduction and description align with your branding as this is the first thing your guests will see when they start a conversation with the agent.
Suggested prompts
In the space provided, add suggested prompts that display in your widget.
Guests can select any one of these to kick off a conversation. A good rule of thumb is to find three to five common questions your guests ask and then turn these into suggested prompts. You can add up to six prompts.
To add a new prompt, select + Add prompt and then include your button text and prompt. For example:
Button text: Party packages
Prompt: Show me the party packages available at the venue and what they include.
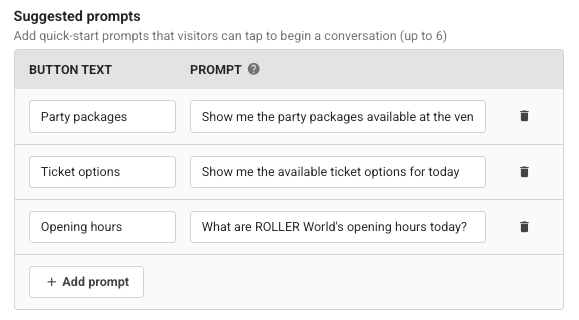
You have the option to make your button text the prompt, so you don’t need to fill in both sections. For example:
Button text: How much does it cost to book a party package?
Channels
Channels are the ways guests can reach and interact with your agent. You can choose from:
Text & Voice: Guests can either type or talk to your agent, whichever they prefer.
Text only: Guests can only type questions to your agent.
With text, guests type their questions and the agent replies in the chat window. With voice, guests talk to the agent and hear its replies out loud, all within the widget.
Guest Agent can also answer calls over the phone. ROLLER sets up phone for you, so it isn't covered in this guide.
Widget position
Select where you want your widget to be positioned on your website:
Bottom left
Bottom right
Customize your agent persona
These settings change how your agent sounds when guests talk to it using voice.
In First message, add the greeting guests hear when they first talk to the agent. Here are some tips to help you get started:
Keep it short. Guests want to get to their question, not sit through a long intro. A greeting should take a few seconds to say.
Say who they've reached. Guests should know immediately they're talking to your venue's agent, not a person. This builds trust from the first second, rather than creating confusion later in the conversation.
Sound like your venue. Match your greeting's tone to your brand and agent persona. Avoid generic language.
Invite the question. End with something that prompts guests to speak.
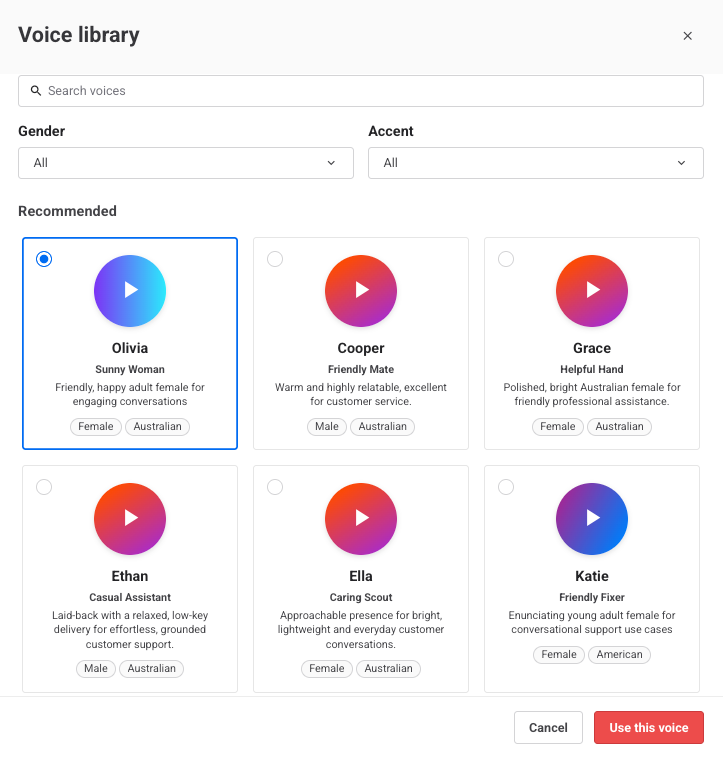
In Voice, choose the voice guests hear when they talk to the agent. To choose a voice:
Select Edit.
Scroll through the list, or narrow it with the filters:
Gender: Male, Female or Neutral
Accent: American, Australian, British, Canadian, Indian, Irish, South African, Southern
Select the play button to hear each voice.
Select the voice you want, then select Use this voice.
Products
Once you’ve customized your web widget and agent persona, you can move on to selecting the products your agent will sell.
You can choose:
Specific checkouts: Every product sold on the selected checkouts can also be sold by the agent.
Specific tags: Every product with the selected tag can be sold by the agent.
Specific products: Choose individual products for the agent to sell.
To learn more about adding products to Guest Agent, see the guide Choose what Guest Agent can sell.
Choose how guests receive payment links
When your agent creates a booking, it sends the guest a payment link to pay for it. You choose whether the link is sent by SMS or email.
On the Agent settings tab, open Payments.
In Send link to guest via, select Email or SMS.
Save your changes.
Additional fees apply to each SMS. If a guest doesn’t provide a mobile number, the link is sent by email. To learn more about SMS fees, see the guide Text and SMS usage fees on your ROLLER invoice.
Once you’ve worked through each of your configuration settings, select Save.
Edit an agent
You can change an agent at any time. From Venue Manager, go to Intelligence > Guest Agent > All agents and select the agent. Make your changes, then select Save.
You can preview your changes instantly in the preview panel on the right side of the page.
Add more agents
Create more than one agent when you want agents for different jobs, such as one that focuses on party bookings. You can have up to 10 agents at your venue. To add one, follow Create an agent earlier in this guide.
If your venues are managed from HQ, see the guide Share Guest Agent with your managed venues.
Delete an agent
When you delete an agent, it stops answering guests, including on any website where its widget is installed.
From Venue Manager, go to Intelligence > Guest Agent > All agents.
Select the options menu (3 dots) for the agent, then select Delete.
Confirm that you want to delete the agent.
You can't delete an agent your HQ shared with your venue.
Next steps
With your Guest Agent configured, you're ready to start shaping the rest of the experience.
Open the Knowledge Base tab next and give your agent the information it needs to answer questions beyond bookings and pricing: things like parking, allergens or your refund policy. See the guide Build your Guest Agent knowledge base, then see the guide Install your Guest Agent web widget.