Your agent is set up and tested. The last step is putting it where your guests are: on your website.
Copy your embed code from Venue Manager, add it to your website, then check that guests can chat and talk to your agent.
Register your venue for early access
Guest Agent is in early access for eligible venues, and we're rolling it out in stages. It has usage-based pricing, so you pay based on how much your agent is used.
Adding the widget means pasting a small piece of code into your website. If someone else looks after your site, such as a web developer, agency or IT team, share this article with them. The sections marked for your web developer cover the technical details they'll need.
You only need to add the embed code once. Changes you make to your agent in Venue Manager, like its colors, avatar or introduction, show on your live widget without any changes to your website.
Before you begin
The permission required to copy your embed code is Can edit Guest Agent configuration. The administrator role has this permission enabled by default.
Check that you have the following ready:
Your agent is configured and tested. On the Agent settings tab, you've set up your web widget, agent persona and products, added documents on the Knowledge Base tab, and tested your agent in the preview on the right of the page. See the guide Set up and customize Guest Agent.
Your agent is live. New agents start in test mode. Until ROLLER makes your agent live, the Embed web widget button is grayed out and the widget won't show on your website.
Your website uses HTTPS. Voice conversations need a secure site so the browser can ask guests for microphone access.
A way to add code to your website. Most website builders let you add custom code to your site footer. If you're not sure, ask whoever manages your website.
Your website's security settings, if it has them. Some websites use a Content Security Policy that blocks outside services. If yours does, your web developer needs to allow the Guest Agent services. See Allow Guest Agent in your Content Security Policy later in this guide.
You've reviewed your local privacy and AI requirements. You're responsible for following the laws that apply where you operate, such as telling guests they're talking to an AI or that conversations are recorded. These requirements differ by region and can change, so check what applies to your venue.
Copy your embed code
Your embed code links your website to one of your agents. Each agent has its own code, so copy the code for the agent you want on that website.
From Venue Manager, go to Intelligence > Guest Agent > All agents.
Select the agent you want on your website.
Select Embed web widget in the top right of the page.
In the Embed web widget on your website window, select the copy icon in the top right of the script.
Select Done.
Paste the code somewhere safe, or send it straight to your web developer along with this guide.
Your embed code looks like this, with your own venue and agent details filled in:
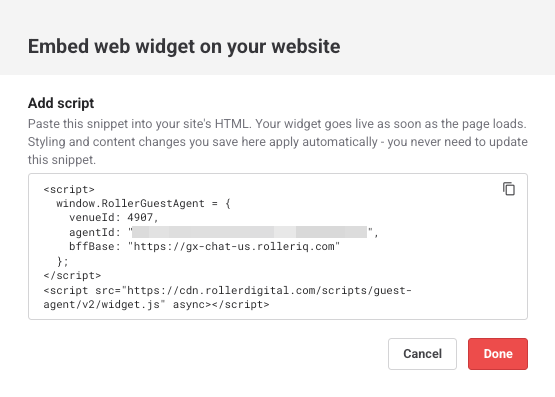
Don't edit the embed code. Your widget's avatar, theme, colors, introduction, suggested prompts, channels and position are all managed on the Agent settings tab, and changes you save there apply to your live widget automatically.
Add the embed code to your website
The embed code goes into your website's HTML. The easiest way to show the widget on every page is to add it once to your site's shared footer or page template.
Open the area of your website where you add custom code. Where this is depends on how your site is built:
Website platform or tool | Where to add the code |
|---|---|
WordPress | Your theme footer, or a code snippet plugin |
Squarespace | Settings > Code Injection (Footer) |
Wix | Custom Code, placed at the end of the body |
Google Tag Manager | A Custom HTML tag |
If you or your web developer edit your site's code directly, open your site template or shared footer instead.
Paste the full embed code exactly as you copied it, keeping both script tags together and in the same order. If you're editing your site's HTML directly, place it just before the closing </body> tag.
Save and publish your changes.
Check the widget is working
Once your changes are published, check the widget from a guest's point of view.
Open your website in a new browser window and reload the page.
Look for the widget in the corner you chose under Widget position (bottom left or bottom right).
Open the widget and check that your avatar, colors, introduction and suggested prompts match what you see in the preview in Venue Manager.
Select a suggested prompt, or type a question such as "What are your opening hours?", and check the agent replies.
If Channels is set to Text & Voice, select the voice button in the widget to start a voice conversation in your browser. Allow microphone access when your browser asks, and check the agent can hear you and responds.
Repeat on a mobile phone.
Venue Manager can't detect whether the widget is live on your website, so this check is the way to confirm your install worked.
Technical details for your web developer
Placement. Paste the embed code just before the closing </body> tag. Adding it to a shared footer or page template shows the widget site-wide from a single paste.
HTTPS is required for voice. Browsers only allow microphone access on secure pages. On a page without HTTPS, text chat can still be used, but voice can't.
Loading. The widget loads asynchronously from ROLLER's CDN, so it doesn't block your page from rendering.
Styling. The widget runs in an isolated Shadow DOM. Your site's styles don't affect the widget, and the widget's styles don't affect your site.
Microphone permission. The browser only asks for microphone access when a guest taps to start a voice conversation, never when the page loads. If your site sends a Permissions-Policy header, make sure it allows microphone access.
Configuration. The embed code only identifies the venue and agent. All display settings are served from Venue Manager when the widget loads, so there's nothing to configure in the code.
Allow Guest Agent in your Content Security Policy
Your web developer only needs this section if your website sends a Content Security Policy (CSP) header. Most sites built on standard website builders don't, and the widget works without any changes.
If your site does use a CSP, add the following sources. Without them, the browser blocks the widget from loading, sending messages or connecting voice calls.
Directive | Sources to add | What they're for |
|---|---|---|
script-src | 'self' https://cdn.rollerdigital.com | Loads the widget from ROLLER |
connect-src | 'self' https://gx-chat-<region>.rolleriq.com | Sends and receives chat messages with your agent |
connect-src | wss://rtc.telnyx.com https://rtc.telnyx.com | Connects voice calls and sends call reports |
connect-src | stun:stun.telnyx.com:3478 stun:stun.l.google.com:19302 turn:turn.telnyx.com:3478 turns:turn.telnyx.com:443 turns:turn2.telnyx.com:443 | Lets voice calls connect through your guests' networks and firewalls |
img-src | 'self' data: https://cdn.rollerdigital.com | Shows your avatar or logo in the widget |
media-src | 'self' blob: mediastream: | Plays and captures audio during voice calls |
Before you add the sources, replace <region> with au, us or eu. The simplest approach is to copy the bffBase address from your embed code and use it exactly as it appears. For example, if your embed code shows https://gx-chat-au.rolleriq.com, add that address.
The first script tag in your embed code is inline. It tells the widget which venue and agent to load. If your CSP blocks inline scripts, the widget doesn't appear and nothing on the page says why. To allow the inline script, do one of these:
Add your CSP nonce to the inline script tag.
Add the inline script's SHA-256 hash to script-src.
Move the inline script's contents into a .js file on your site, and load that file before the widget script.
If you previously allowed api.vapi.ai, *.daily.co or api.roller.app for an earlier version of the widget, replace them with the sources above.
Troubleshooting
The Embed web widget button is grayed out
Your agent is still in test mode. The button stays grayed out until ROLLER makes your agent live.
The widget doesn't appear
Check the embed code is on the page you're viewing and was published, not just saved as a draft.
Check the full code was pasted, with nothing added or removed.
Clear your browser cache or open the page in a private window, then reload.
If your site uses a Content Security Policy, check it includes the sources in the section above and allows the inline script.
Chat works, but voice doesn't connect
Check your website address starts with https://.
Check the browser hasn't blocked the microphone for your site. Guests can allow it from the site settings in their browser's address bar.
If your site sends a Permissions-Policy header, check it allows microphone access.
If your site uses a Content Security Policy, check it includes the voice sources listed above.
The widget doesn't match my latest changes
Changes you save in Venue Manager can take up to a minute to show on the live widget. Wait a minute, then reload the page or open it in a private window.
If you've checked these and the widget still isn't working, contact the support team for assistance.
FAQs
Do I need a web developer to install the widget?
Not always. If you are comfortable adding custom code to your site's footer, for example through your website builder's settings or Google Tag Manager, you can install it yourself. If your site uses a Content Security Policy, involve your web developer.
Do I need to update the code when I change my agent?
No. Your agent's look, introduction, suggested prompts, products and knowledge base are all managed in Venue Manager. You add the embed code once, and your changes show on your live widget without touching your website again.
Can I show the widget on some pages only?
Yes. Add the embed code only to the pages you want it on, instead of your site's shared footer.
Will the widget slow down my website or clash with its design?
No. The widget loads in the background after the rest of your page, and its styles are kept separate from your website's. See Technical details for your web developer earlier in this guide.
Can I turn voice off?
Yes. On the Agent settings tab, set Channels to Text only. Guests can still chat with your agent by text.
Where do I change the side of the page the widget appears on?
On the Agent settings tab, under Widget position, choose Bottom left or Bottom right. You don't need to change your embed code.