Set up an agent once at HQ and share it with your managed venues, so guests get the same branding, voice and product rules on every venue's website. Each venue then adds what's local to it, such as extra products to sell or a knowledge base file about parking and directions. When you save a change at HQ, it reaches every venue using the agent, so you don't repeat the setup venue by venue.
Register your venue for early access
Guest Agent is in early access for eligible venues, and we're rolling it out in stages. It has usage-based pricing, so you pay based on how much your agent is used.
How sharing works
HQ owns the agent's setup, and each managed venue gets its own copy to put on its website.
At HQ: You create the agent, set it up and choose which managed venues it's linked to.
At each managed venue: Staff add the HQ agent, then copy its embed code for the venue's website. Each venue's copy has its own embed code.
What the venue can't change: The web widget, the agent persona and the way products are selected stay as HQ set them.
What the venue can add: More products, tags or checkouts for the agent to sell, on top of the ones HQ chose, and its own knowledge base files.
At the venue, the settings HQ controls are grayed out, and HQ's products and knowledge base files show an HQ label. Venue staff can't remove an HQ item, and they can't remove the agent from their venue.
Create an agent at HQ
The permission required to set up and share Guest Agent is Can edit Guest Agent configuration. The administrator role has this permission enabled by default.
Every venue starts from the agent you build in your HQ account. You can have up to 10 agents at HQ, for example one built around party bookings or one for each region your venues are in.
From Venue Manager, in your HQ account, go to Intelligence > Guest Agent > All agents.
Select Create agent. A new agent opens with a default name.
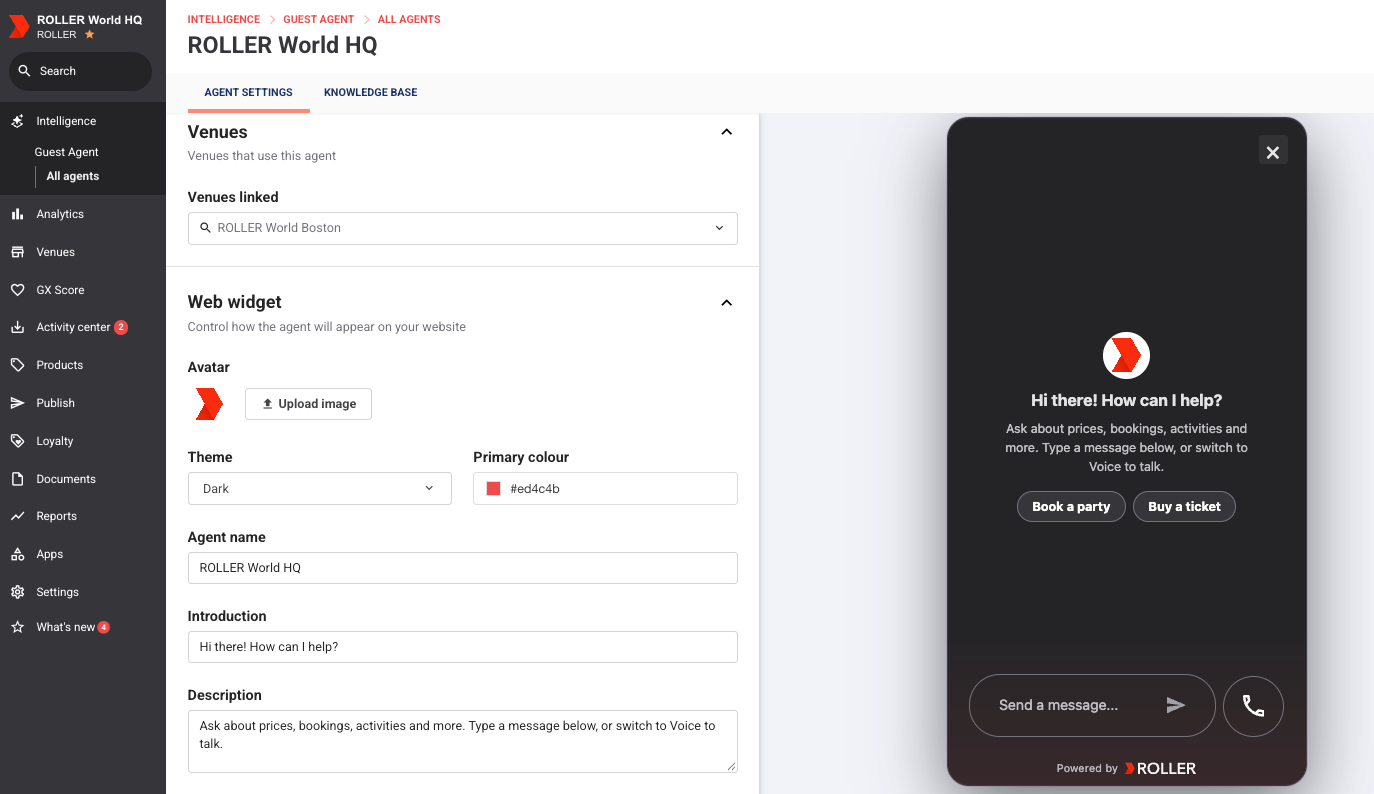
On the Agent settings tab, set up the web widget, agent persona and products, then select Save. For each setting, see the guide Set up and customize Guest Agent.
On the Knowledge Base tab, upload the files every venue should share, such as your group's refund policy. See the guide Build your Guest Agent knowledge base.
At each venue, the agent sells the venue's copies of the HQ products, tags and checkouts you choose. For how each option works, see the guide Choose what Guest Agent can sell.
An agent in your HQ account has no Embed web widget button. Each venue copies the embed code from its own copy, as described in Add the HQ agent at a managed venue later in this guide.
Link the agent to your managed venues
Linking an agent to a venue makes it available for that venue to add, so you decide which venues use which agent.
From Venue Manager, in your HQ account, go to Intelligence > Guest Agent > All agents, then select the agent.
On the Agent settings tab, under Venues, select each venue in Venues linked. To link every managed venue, select Select all.
Select Save.
On All agents, the Venues linked column shows how many venues each agent is linked to.
Add the HQ agent at a managed venue
With the HQ agent added, a venue starts with HQ's branding and products, and staff only add what's local. Share these steps with the person who manages Guest Agent at each venue.
The permission required to add an HQ agent at a venue is Can edit Guest Agent configuration. The administrator role has this permission enabled by default.
Each venue accepts the Guest Agent terms itself. If the venue hasn’t used Guest Agent before, staff accept the terms the first time they open it.
From Venue Manager, at the managed venue, go to Intelligence > Guest Agent > All agents. When a new HQ agent is ready to add, a blue dot shows on Add HQ agent.
Select Add HQ agent.
Select the HQ agent from the list, then select Add agent. Venue Manager shows HQ agent added, and the agent opens at the venue with HQ's settings grayed out.

If the venue already has an agent with the same name, Venue Manager asks you to rename the venue's agent first. Rename it, then add the HQ agent again.
Add local products and knowledge
Local products and files let the agent answer for this venue as well as for the group.
Products: On the Agent settings tab, under Products, add the venue's own products, tags or checkouts in addition to the ones HQ chose, then select Save. HQ's choices show the HQ label and cannot be removed.
Knowledge base: On the Knowledge Base tab, select Upload file and add the venue's own files (eg parking, directions or local opening times). HQ's files show the HQ label. A venue can't upload a file with the same name as an HQ file.
Put the agent on the venue's website
Each venue's copy of the agent has its own embed code, so guests on that venue's website talk to that venue's agent. On the Agent settings tab, select Embed web widget and copy the code. See the guide Install your Guest Agent web widget.
Update a shared agent
One save at HQ keeps every venue's copy in line. Open the agent in your HQ account, make your changes, then select Save. Venue Manager shows Agent settings saved. Your changes reach each linked venue that has added the agent, and venues don't need to change their embed code.
If you see "The change was saved, but your venues weren't updated", save the agent again to send the change to your venues.
Stop sharing an agent with a venue
When a venue needs a different agent, or should stop using an HQ agent, unlink it from HQ. Only HQ can do this. Venue staff can't remove an HQ agent from their venue.
From Venue Manager, in your HQ account, go to Intelligence > Guest Agent > All agents, then select the agent.
Under Venues, remove the venue from Venues linked.
Select Save.
Let managed venues create their own agents
Some venues need an agent of their own, such as a franchisee running a local event. The HQ venue permission Can create agents decides whether managed venues can create agents separate from the ones HQ shares. Without it, venues can only add the agents you share with them.
From Venue Manager, in your HQ account, go to Venues > Permissions.
Select the permission group.
Under Guest Agent, select Can create agents to let venues in that group create their own agents, or clear it to keep them to HQ agents.
Select Save.
Can create agents is on in the All permissions group. In a new permission group, it's off until you select it. The Guest Agent group only shows when your HQ account has Guest Agent.
To learn more about permission groups, see the guide Create and manage HQ venue permissions.
FAQs
Can a managed venue change how the HQ agent looks or sounds?
No. The web widget and the agent persona stay as HQ set them. Venues can add products and their own knowledge base files. To give a venue its own look or voice, turn on Can create agents for its permission group so it can create a separate agent.
Does each venue need its own embed code?
Yes. Each venue's copy of the agent has its own embed code. Copy it at the venue, not at HQ.
Do I need to update venue websites when I change the agent at HQ?
No. Changes you save at HQ reach each linked venue's copy, and the embed code stays the same.
Can a venue remove an HQ agent?
No. Only HQ can stop sharing an agent with a venue, by removing the venue from Venues linked.
How many agents can I have?
Up to 10 at HQ and up to 10 at each venue.
Can managed venues still create their own agents?
Yes, if Can create agents is on for their permission group. It's on in the All permissions group.