POS capacity view gives your staff a real‑time schedule of bookings across your venue’s resources directly in POS. It helps your team spot availability, place guests faster and keep operations smooth during busy periods.
POS capacity view is available to all user roles except Dashboard‑only.
POS capacity view is designed to display and manage single-booking resources (eg. bowling lanes). You can also decide to display multi-booking, shared resources (eg. trampoline area) in your venue to see venue capacity at a glance (optional).
Access POS capacity view
From the POS home screen, select Capacity from the menu on the left. The view opens to the current day’s schedule.
What you see in POS capacity view
The view shows your venue's daily schedule for single-booking resources (and multi-booking resources, if configured) organized by:
Time (across the top)
Resources (along the left)
Bookings (as tiles in the grid)
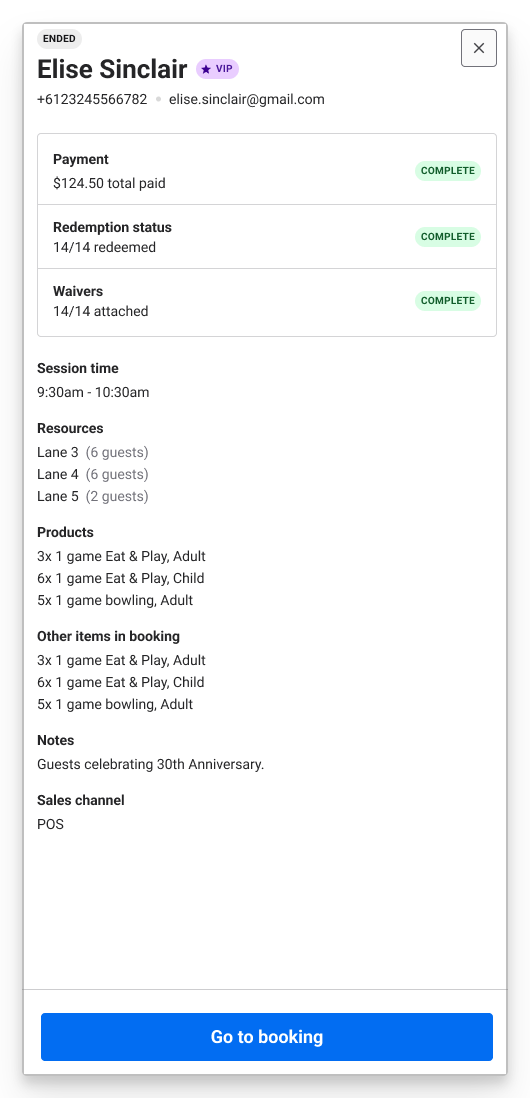
Booking information panel (pops out from the right side when a booking is selected)
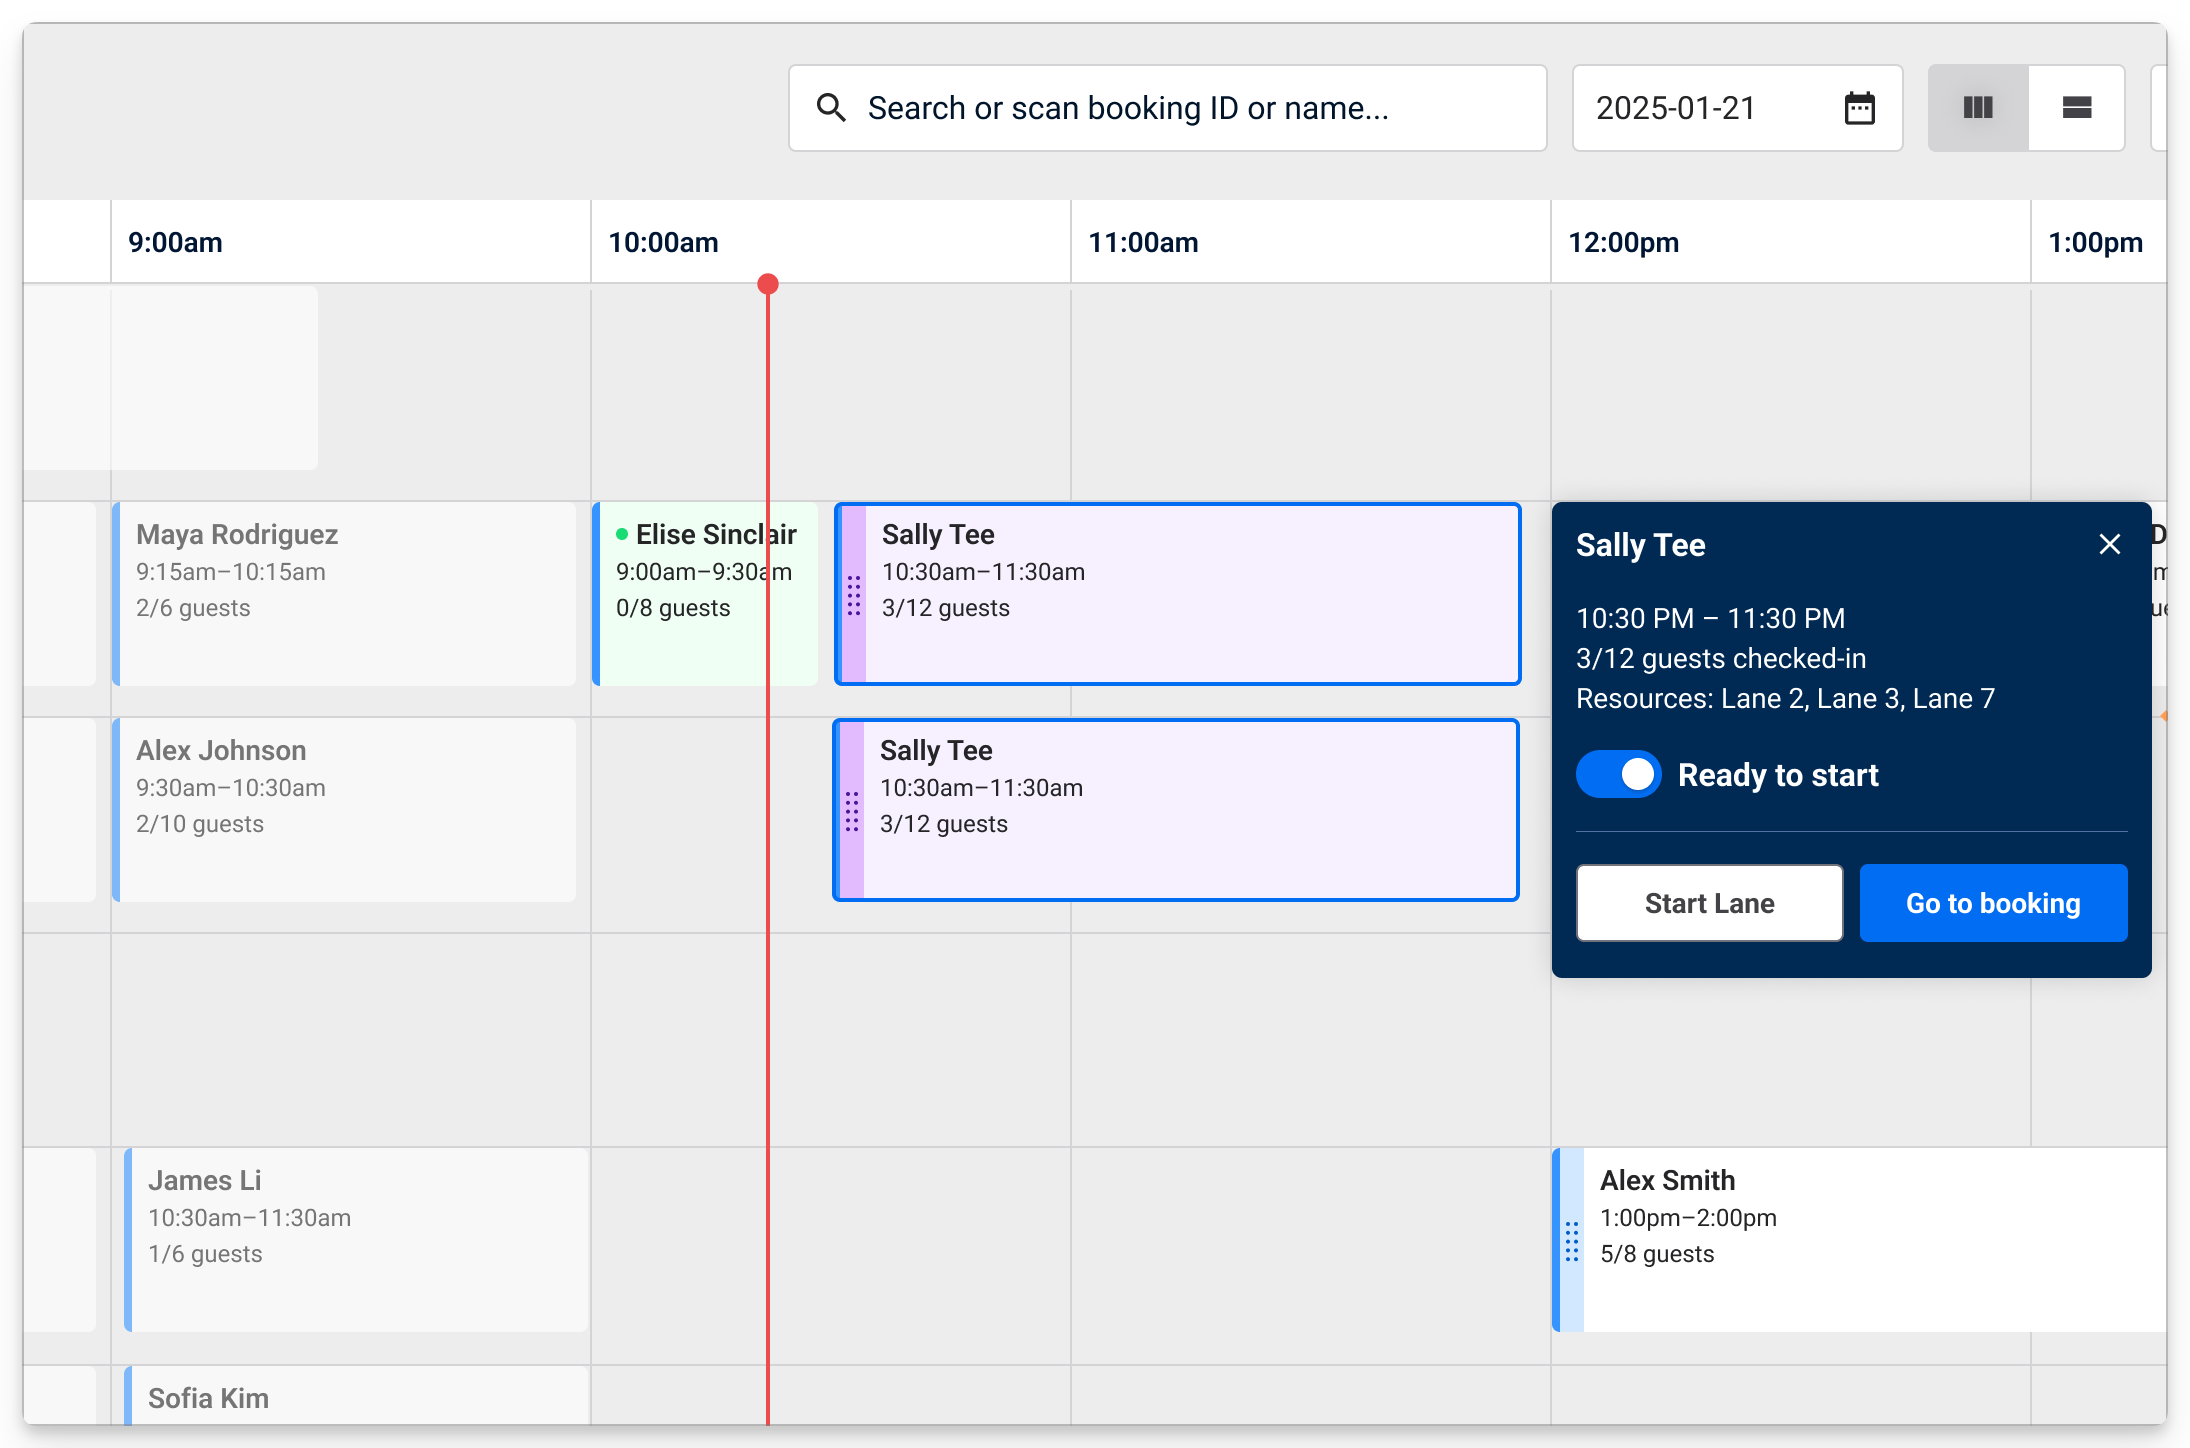
A red line marks the current time. Sticky headers keep resource names in view as you scroll. Any statuses applied to the booking (eg 'Ready') show the tile as a different color (see the heading Set ready status on bookings to learn more).
The day's view can show bookings until 3 a.m. the following day, ideal for venues operating after midnight. Any bookings after midnight also appear on the next day’s schedule.
The ability to select a spot and create a booking directly from POS capacity view is a feature that’s currently available by request. If your venue uses POS capacity view frequently to serve guests, this might be a helpful feature to switch on. If you wish to use this feature in your venue, talk to your customer success manager or the support team.
Tile colors and status indicators
Capacity view has helpful visual indicators to get a read on bookings status at a glance:
Booking state | Color / indicator |
|---|---|
Upcoming / default booking | Blue |
Party booking | Pink + icon |
Purple + icon | |
Past booking | Grey |
In progress (for Conqueror-integrated bowling only) | Green |
Slow play (for Conqueror-integrated bowling only) | Yellow |
Open a booking from POS capacity view
To see a booking's details and tickets, select the booking tile. This pops out the booking panel to the side which shows timely information relevant to POS staff serving guests. To go to the full booking details in POS, select Go to booking.
Compact and expanded view
Adjust your view based on how many single-booking resources are displayed.
Expanded view displays more detail and is the default when 10 or fewer resources are shown.
Compact view shows more resources on screen, up to about 40 at once.
You can toggle between views using the expand/minimize icon.
.gif)
Zoom and gridline controls
Zoom in and out buttons (+, -) adjusts how much of the day is on screen horizontally.
Vertical gridlines set the time spacing shown on the grid (eg 5, 10, 15, 30 or 60 minutes) and can be turned off entirely if your venue's sessions are hourly.
Reschedule a booking with drag and drop
Use drag and drop to reschedule bookings across eligible resources and times in POS.
You can only reschedule a booking that meets all of these conditions:
It’s a single-resource booking.
The booking appears as one tile in capacity view (not split across multiple tiles).
It is not part of a party or package.
The session hasn’t started yet.
The new time and resource are both available.
The move doesn’t overlap with other bookings or cross into another day.
Select and drag the booking to its new time and/or resource. As you move the tile around the view, the new booking time will appear in a blue header.
.gif)
If a booking doesn’t meet all of the conditions above, POS shows an error and won’t move the tile. Check the booking’s details and try another time or resource.
End a session early
When a session finishes before its scheduled end time, you can end the booking early from capacity view to free up capacity. The resource(s) will become available for the next booking straight away, meaning you can sell the next session sooner to maximize capacity utilization.
The End session button appears 10 minutes after a session starts and this action ends the whole booking, not individual resources within it. So if a booking is split over multiple resources, ending the session ends all active resources for that booking.
To end a session early:
Select an active session that's been running for at least 10 minutes
Select End session and Confirm. This ends all resources allocated in the booking.
Flag booking status as ready to start
When guests are ready to start their booking, they're often sent to the resource (eg. bowling lane) ahead of time to wait for the active guests to finish.
To flag the booking as ready, use the Ready to start toggle which changes the tile color to purple and syncs across all POS terminals. This flags to staff that this booking shouldn't be changed.
To set a guest or group of guests as ready to start:
From POS, go to Capacity View.
Hover over the booking and select the toggle to switch the booking to Ready to start. This changes the tile color to purple to show the status change at a glance.
Add a guest to the booking waitlist
Add a guest to the waitlist and convert them to a booking when there’s space available. This list syncs across all POS devices at the venue.
Learn more in the guide Keep a booking waitlist for guests.
Customize how resources show in POS capacity view
To help your staff find bookings faster, edit the POS template in Venue Manager to choose which resources to show and arrange them in the order that works best for your operations. While capacity view is designed for the display and management of single-booking resources, you can also choose to display multi-booking, shared resources from your venue. This gives you an idea of capacity for the whole venue.
Changes you make to the template sync to all POS devices using that template.
Go to Apps > Point of Sale > Templates in Venue Manager.
Select the relevant POS template.
Select Unlock to edit, then Yes, edit template.
Select the Capacity view section.
Use the dropdown menu to select which resources to show in capacity view.
If you want to, under the Multi-booking resources heading use the drop-down to select any multi-booking resources you want to see in capacity view.
Drag and drop to reorder them.
Click Save to apply your changes.
Switch POS capacity view off on devices
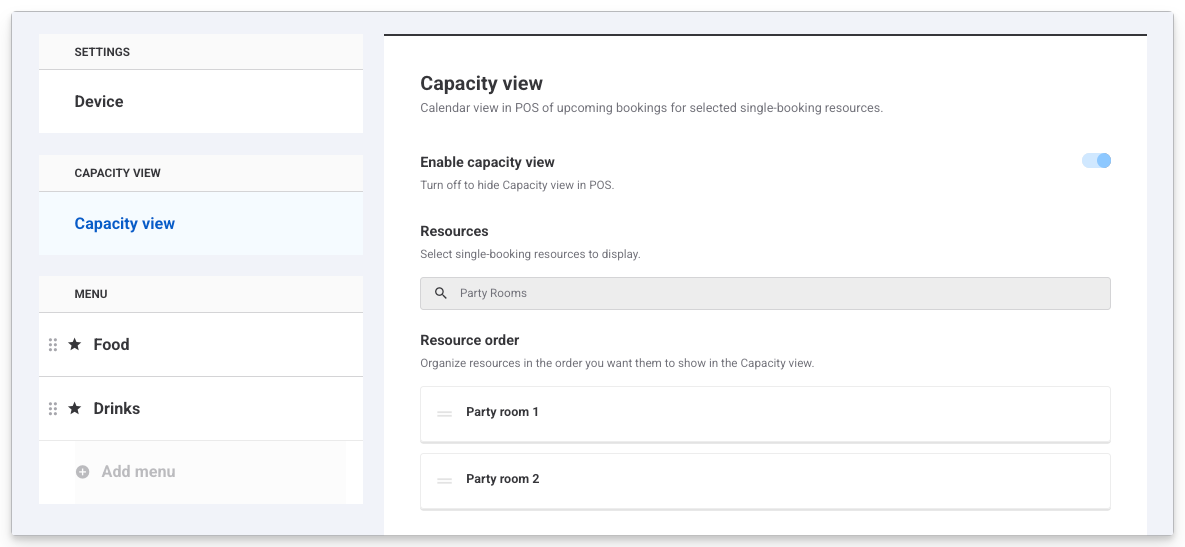
If your venue prefers not to have POS capacity view displayed on POS devices, you have the option to switch it off. To do this:
Go to Apps > Point of Sale. Next to the device you want to switch off capacity view for, select the options menu (3 dots).
Select Edit.
Select the capacity view tab along the left.
Toggle off Enable capacity view.
FAQs
Does capacity view update automatically?
Yes. The schedule updates in real time as bookings change and guests check in.
Can I change which resources appear and their order?
Yes. In Venue Manager, update your POS template to choose which resources show in capacity view and reorder them. Changes sync to all POS devices using that template.
Why can’t I drag a tile?
The booking may be multi‑resource, part of a party/package, already started or the destination time/resource isn’t available.
Can I create a booking from the capacity view screen?
The ability to select a spot and create a booking directly from POS capacity view is a feature that’s currently available by request. If your venue uses POS capacity view frequently to serve guests, this might be a helpful feature to switch on. If you wish to use this feature in your venue, talk to your customer success manager or the support team.