Redeeming a ticket marks it as used so the guest can enter your venue. That's the check-in, and it's what your attendance figures count.
At POS you find the booking, redeem each ticket, assign any waiver the ticket needs and take anything still owing. For large groups you can redeem in bulk or in batches.
This guide covers ticket redemption at POS. To apply a member's discount, see Redeem memberships at POS.
Search for bookings at POS
You can search for existing bookings, gift cards, memberships, guest tabs, cashless cards or wallets.
Select the search icon in the left-side POS menu.
By default, the Bookings tab is selected above the search box.
Select a tab to search for gift cards, memberships, guest tabs, cashless cards or wallets.
Enter a name, email, phone number, or booking ID.
Optional: scan the QR code in the guest’s order confirmation email to find the booking faster.
Select the booking to view its details.
Booking details
After you select a booking, the left panel shows summary details like guest flags or alerts, items, agreements, forms, booking holder details and resources.
Details | Description |
|---|---|
Flags | Any guest flags assigned. Flags that can appear include Ban, VIP, Medical, Alert, and Competency. |
Items | Any tickets, memberships and other products on the booking. |
Booking agreements | The booking agreement a member signs when they buy a recurring payment membership. Different from a waiver, which is signed per ticket and covers participation. |
Forms | Extra questions the guest answered during online checkout (eg dietary requirements). Not a waiver and not a booking agreement. Select a form title to preview it, then scroll to view the submitted details. Learn more about creating forms to capture additional guest data |
Booking holder | Name, phone number and email of the booking owner if completed during the purchasing process. You can also add and edit these details. |
Resources | Any resources for the booking (for example, areas in your venue). This can help you direct guests to the right place. |
From the summary panel, you can also add items, upgrade items, flag guests or add notes.
Details | Description |
|---|---|
Add items | Select to add more items to the booking (eg ticket, food and beverage or another product). |
Upgrade items | Select to upgrade or downgrade a membership or upgrade a ticket to a membership. Learn more about how to: |
Flag guests | Select to ban or flag a guest so staff can see special instructions. |
Add notes | View, add or edit a note in POS. |
Redeem tickets and assign waivers
In the main panel, you’ll see a list of tickets and any other items on the booking.
To redeem tickets and assign any required waivers:
From POS, select the tick icon next to a ticket to redeem it. The tick turns green once the ticket is redeemed.
If a waiver is required, select the pencil icon, then search for and select the waiver to assign to the ticket.
To remove a waiver, select the ticket, select the options menu (3 dots) in the top-right corner, then select Remove waiver.
To redeem multiple tickets at once:
Select the Select all checkbox.
Select the blue tick in the top-right corner to redeem every selected ticket.
Optional device settings for redemption and printing
If Automatic check-in when waivers are attached is turned on in POS device settings, assigning a waiver also redeems the ticket. The guest is checked in without a separate step.
To print tickets at POS, turn on Print tickets in POS device settings. Then, in the booking:
Select the print icon next to a ticket. To print several tickets, select them or select Select all, then select the print icon at the top.
If Print master tickets is also on in device settings, choose Itemized or Master in the Select ticket type to print pop-up. Itemized prints one ticket for each pass. Master prints one ticket that covers the tickets you selected.
If Print master tickets is off in individual POS device settings, POS prints itemized tickets as soon as you select the print icon. To set up master tickets, automatic printing or what printed tickets show, see Set up printed tickets.
Resolve wrong-day arrivals and price changes
If a guest arrives with a standard pass or session pass dated for another day, POS offers to reschedule the booking to today rather than redeem the ticket as it stands. Rescheduling is what applies any price difference between the two days.
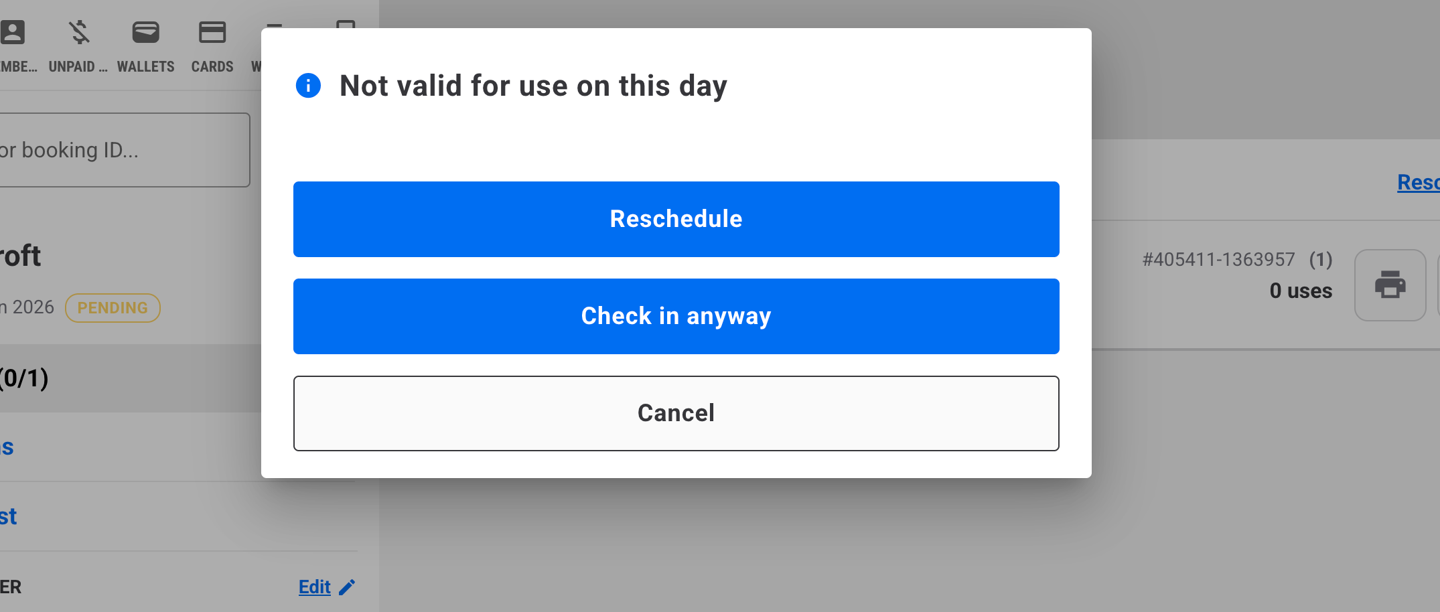
When the booking is moved to a different day, any price change is shown in POS before you confirm, based on your existing price rules (for example, moving from an off-peak day to a peak day).
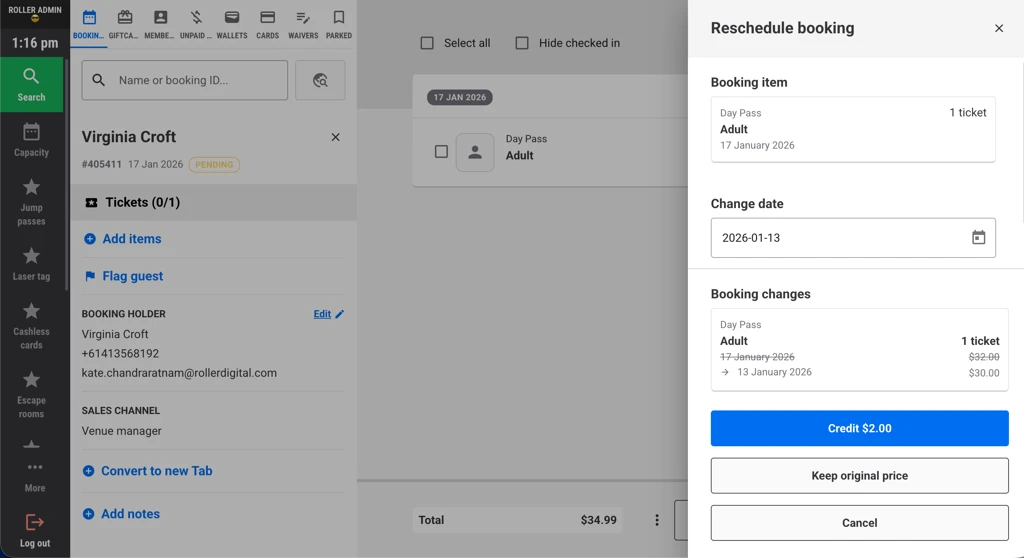
If needed, you can issue a credit, charge the difference or keep the original price.
This makes it easy to explain pricing differences to guests, keep the original price when appropriate and resolve wrong-day arrivals quickly and fairly.
Rescheduling also moves the booking to the correct day so capacity and ticket redemptions apply to the updated date and time.
Require approval to redeem invalid tickets (optional)
You can enable a global POS setting that requires approval before staff redeem an expired, wrong-date or inactive ticket, including any ticket being redeemed at a lower price than it was sold for.
From Venue Manager, go to Apps > Point of Sale > Settings.
Select Approval needed to redeem ticket.
Select Save.
Once enabled, POS asks for an approving POS PIN before the redemption completes. Staff need the POS Admin permission to approve. Administrator and manager system roles have it by default.
To learn more, see Reschedule bookings at POS.
Perform bulk actions
You can perform actions on multiple tickets instead of doing them one by one.
Select multiple tickets, or select the Select all checkbox.
Do one of the following:
Select the options menu (3 dots) to remove waivers, reprint tickets or undo check-ins.
Select the print icon to print tickets in bulk.
Select the redemption icon (blue tick) to redeem all selected tickets.
Redeem tickets for large groups
Use mass ticket redemption to redeem tickets in batches for large groups, instead of one at a time. It bypasses the requirement for a waiver to be assigned to a ticket, so a group can be checked in with waivers still outstanding.
Configure mass ticket redemption settings
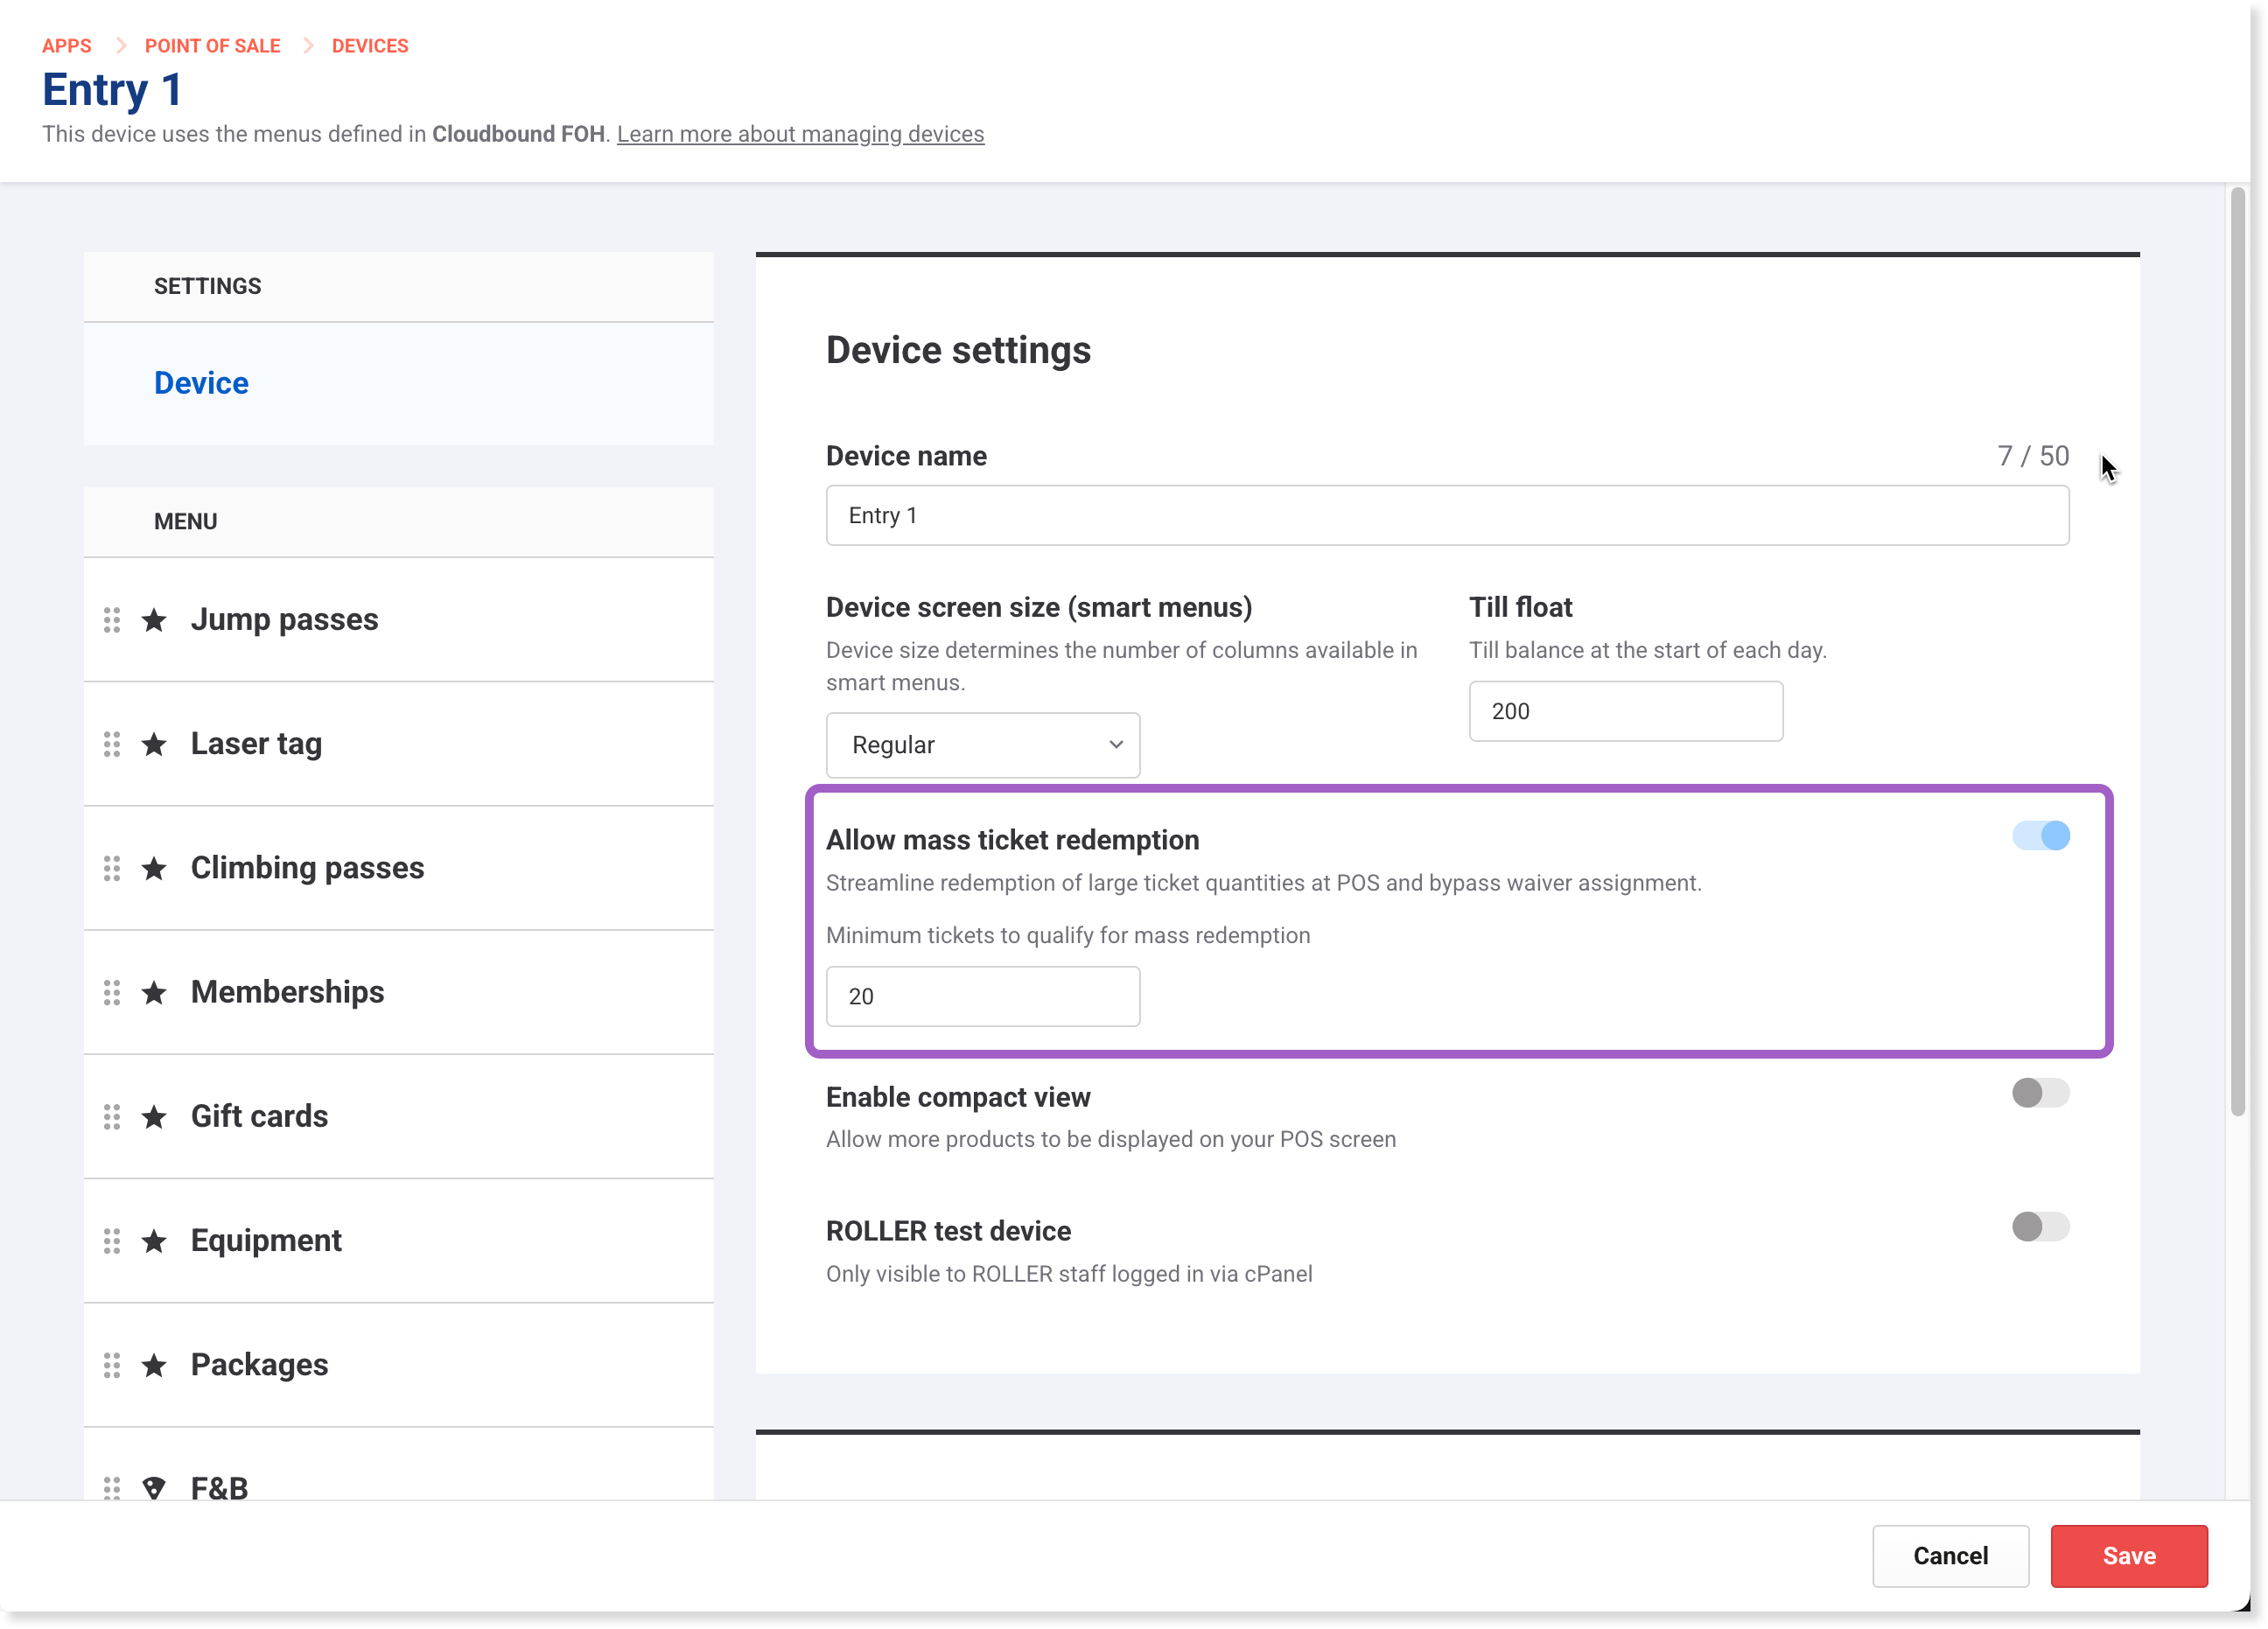
The mass redemption setting can be configured per POS device or POS template.
From Venue Manager, go to Apps > Point of Sale > Devices.
Select the POS device.
Turn on Allow mass ticket redemption in device settings.
Enter a value for Minimum tickets to qualify for mass redemption.
Select Save.
Use mass ticket redemption
From POS, open a booking that meets the minimum quantity of tickets for mass redemption.
Select the Manage redemptions button at the top right.
Enter the number of tickets you are redeeming.
Select Confirm redemptions.