Grow your reseller revenue without the spreadsheets, keep a waitlist for walk-in guests, get ahead of membership cancellations, and edit products from HQ on your own schedule. September also brings capacity-based pricing, instant cashout and more accurate stock and margin reporting.
Try out new features in your playground venue about a week before they go live. See below for what's available. Not sure how to access playground? The ROLLER Playground guide shows you how.
This page covers new and improved features with setup guidance, and goes live about a week before the full release. For the complete picture, every change, fix and behind-the-scenes improvement this month, see the release notes, published shortly after release day.
We're always learning from venues like yours. Join our research panel to get early insights into new features and share your feedback to guide future improvements.
POS
Keep a booking waitlist for walk-in guests
Plan: All
Preview release (Playground): Yes
Target release: Tuesday, 22 September 2026 (AET)
Now, you can add walk-in guests to a waitlist, and when there's space, convert it into a booking. This avoids the use of manual lists outside of ROLLER to manage waitlists, and makes use of any space that comes up to slot guests in.
A new waitlist button is available from POS capacity view and a badge icon shows how many guests are queued. This list syncs across all POS devices at the venue.
To add a guest to a booking waitlist, it's similar to creating a booking at POS. Here's how it works:
From POS, select Capacity from the menu on the left.
Along the top select the new Waitlist button (hourglass icon).
Select Add to waitlist.
Either search for, and select an existing guest in the search bar or add their First name (required), Last name (required), Email and Phone number (required) to the form. Add optional notes if needed (eg preferred session time, number of guests in the group, whether phone or email is preferred contact method).
Select Add to waitlist.
Alternatively, you can add to waitlist by directly selecting a time slot on the POS capacity view grid and selecting Add to waitlist.
Once added they're automatically placed at the bottom of the waitlist if there's more than one entry on it. When they're on the waitlist, they show as a tile in the list. The order of the list can be adjusted by dragging and dropping the tiles.
When a space frees up, the venue can contact the guest using the details provided and let them know there's a space available. Here's what happens next:
When the guest is ready to book, go back to the Waitlist button and select Convert to booking on the guest's tile.
This starts a booking, and carries the guest details over from the waitlist. Select an available product and add to cart, and then take payment and proceed with the purchase as normal.
Once the booking has been converted, the entry on the waitlist is removed.
The waitlist feature does not automatically contact guests by phone or email as part of the process. This is scheduled for a future release.
POS capacity view visual updates
Plan: All
Preview release (Playground): Yes
Target release: Tuesday, 22 September 2026 (AET)
POS capacity view has had some helpful visual updates to get a read on where bookings are at, even faster. Now, you can see the status of bookings at a glance rather than clicking into the booking. Free resources stand out better against occupied ones, party bookings are now quickly identifiable, and payment and redemption status can now be seen on the tile itself. These changes are communicated by both tile colors, and other helpful visual indicators.
New tile colors and what they indicate:
Booking state | Colors |
Upcoming/default booking | Blue |
In progress (for Conqueror-integrated booking only) | Green |
Slow play (for Conqueror-integrated booking only) | Yellow |
Party booking | Pink |
Past booking | Gray |
Other indicators:
Booking name now shows on the tile (or the receipt number if no name added).
Ready to start icon shows a booking is ready to start.
Party icon shows on a booking tile associated with a party.
A second row shows payment status, number of guests redeemed (eg 0/3) and which sales channel the booking came from.
In compact view, the icons are always visually available but long names may be shortened. To drill down into further booking details, select the booking tile and the booking information panel pops out to the right.
Separate zoom and gridline controls:
Previously, one setting changed both how far ahead you could see and how finely the grid was divided, so you couldn't have a three-hour view and fine grid spacing at the same time.
These are now two separate controls to manage the vertical and horizontal in increments. Zoom in and out buttons (+, -) adjusts how much of the day is on screen horizontally. Vertical gridlines set the time spacing shown on the grid (eg 5, 10, 15, 30 or 60 minutes) and can be turned off entirely if your venue's sessions are hourly.
Show multi-booking resources on POS capacity view
Plan: All
Preview release (Playground): No
Target release: Tuesday, 22 September 2026 (AET)
Capacity view shows single-booking resources like bowling lanes and party rooms. Now you can configure capacity view to also show some or all of a venue's multi-booking or shared resources alongside single-booking resources, so the whole venue is visible in one place. This enables front-of-house staff to view everything from one place while serving a guest.
Once set up, capacity view shows two horizontal sections for single-booking and shared resources. Either can be expanded and collapsed to show just one or the other, or both.
To add multi-booking resources to capacity view for a POS device, or POS device template:
In Venue Manager, select Apps and Point of Sale.
In the Devices list, next to the device you want to adjust select the overflow menu (3 dots) and select Edit. Alternatively, select Templates and the device template you wish to update for multiple devices.
Select Unlock to edit at the top right.
Select the Capacity view tab in the menu on the right.
Under the Multi-booking resources heading use the drop-down to select any multi-booking resources you want to see in capacity view.
Now, when you go to capacity view you will see two separate panels showing the two resource groups. You can collapse or expand either group using the arrow next to the heading. Multi-booking resource blocks also use visual indicators to show availability. Darker shading means less availability. White and blue blocks indicate sessions with no bookings yet, so they're still open to book, while gray blocks indicate past slots.
In Display Settings, operators can also switch the multi-booking resource visualization to a bar chart by turning on Show multi-booking resources as bar chart.
Online accounts
Online accounts improvements
Plan: Pro+
Preview release (Playground): Yes
Target release: Tuesday, 22 September 2026 (AET)
Guests using online checkouts now have access to more helpful information in their online accounts. You can now find the waivers and agreements you've signed, look back at visit history, and read a venue's policies and product terms. The ability to self-serve this information helps avoid queries to venue staff.
View waivers and booking agreement history
A new Documents tab lists the waivers and booking agreements a guest has signed, kept as separate types so they're easy to tell apart. Guests can open a document and read the exact terms they agreed to on the date they signed, including older versions they signed previously.
Go to the venue's online checkout and login into your online account (select the account icon and enter login email and password).
Select the Documents tab.
On the right you'll see a list of waivers and booking agreements signed. There's a label for current documents, and for those that have expired.
Selecting one of the documents opens, and shows the contents in the right panel. It shows who's signed and the date of signing.
View booking history
A new Past tab sits alongside upcoming tickets and lists visits already made, with ticket details retained. Check when you last came in and what was booked, instead of asking the venue.
Go to the venue's online checkout and login into your online account (select the account icon and enter login email and password).
Select the My tickets option at the top, and under bookings select the Past tab.
You'll see the list of previous visits. Select View details on a ticket to view the details of the past booking.
View venue policies and product terms
Guests can open a venue's privacy policy and terms and conditions from their online account, and view the terms for a product when looking at a booking. The policies are set in Venue Manager and are now readily accessible by guests any time.
Go to the venue's online checkout and login into your online account (select the account icon and enter login email and password).
To view a booking's terms and conditions, select the My tickets option and select a booking.
Inside the booking, there's a link for View terms & conditions. Selecting this link pops out a modal to view the document.
Memberships
Capture and report on reasons for membership cancellations
Plan: All
Preview release (Playground): Yes
Target release: Tuesday, 22 September 2026 (AET)
Improve your membership program and retain more members by discovering why members are leaving. Having access to this data helps your team develop a plan to retain members from preventable cancellations. Ask members why they're cancelling and track the answers in two new reports. One report tracks every voluntary cancellation with reasons, and another shows which of your membership retention offers are working.
Set up your cancellation reasons
Switch on and configure a list of reasons for cancellations that shows when a member cancels online, or when a staff member actions through in Venue Manager. Here's how:
In Venue Manager, go to Settings and Memberships.
Select the checkbox Ask members for a cancellation reason.
Select Add reason and select from one of the predefined reasons from the drop-down.
Enter the reason text. This is the text the guest sees when they select their cancellation reason. While the reason code is predefined, the reason text is custom (eg Membership is too expensive).
Select Save.
Now, when a membership is cancelled either in an online account or in Venue Manager a list of reasons will appear and prompt the guest or staff member to select the appropriate reason.
To do this task, you require the Can access membership settings permission.
Report on membership cancellations to discover trends
The Membership Cancellations report shows all of the voluntary membership cancellations that have occurred over a set period. It shows purchase dates, cancellation dates, redemption counts, tenure and cancellation reasons.
Go to Reports and All reports.
Select the Membership Cancellations report.
Use the date selector to select which period to view, and select Apply.
Report on which of your membership retention offers are working
The Membership Cancellation Rescue report shows what happens when guests opt to cancel through their online account. It shows what they were offered (eg switch, pause or discount) and what was selected. It also shows a cancellation reason.
Go to Reports and All reports.
Select the Membership Cancellation Rescue report.
Use the date selector to select which period to view, and select Apply.
To learn more, see the guides Capture reasons for membership cancellations, Membership Cancellations report and Membership Cancellation Rescue report.
Prompt for photo ID capture of members at POS
Plan: All
Preview release (Playground): Yes
Target release: Tuesday, 22 September 2026 (AET)
Having a member photo attached to a membership is important to ensure memberships are used correctly. Membership photo capture can now trigger at POS for members without a photo at every key point in the membership journey. This ensures that there are plenty of opportunities for venue staff to capture ID photos for members that don't have a photo attached to their record.
To enable this:
In Venue Manager go to Apps and Point of Sale. Select Settings.
Scroll to the Guest management section. Select Show member photos at POS (if not currently selected).
Select Require photos.
Select Save.
Once set up, a photo is prompted for at these points when a member interacts with your venue:
When going to the booking, straight after a membership purchase (for both standard and group memberships).
When a membership is redeemed.
After a membership upgrade is made.
When a member checks in.
The prompt can be skipped each time and redemption, purchase or check-in still proceeds whether or not a photo is taken.
Delivery of booking agreement to guest by QR code at POS
Plan: All
Preview release (Playground): Yes
Target release: Tuesday, 15 September 2026 (AET)
Now when a guest is either upgrading, downgrading or signing up for a new membership at POS they can scan a QR code with their device to review and sign the booking agreement. There's still the option to send the booking agreement to the guest's phone by SMS or email, but this provides an efficient and direct option. If your venue uses booking agreements, this is an efficient membership sign-up process upgrade and keeps the process moving while serving the guest at the venue.
Add a membership product to the cart and add guest details. Or, select Upgrade items on an existing membership record if upgrading or downgrading and select the membership plan.
A QR code appears on the POS screen. Prompt the guest to scan the code with their mobile to read and sign the booking agreement. On the mobile device select I have read and understood the booking agreement terms. Draw a signature in the space provided (if a signature field is required by your booking agreement setup).
On the mobile device select the CAPTCHA checkbox and select Submit.
In POS, once the guest has signed, refresh the cart using the link. You should see confirmation that the guest has signed with an Agreement signed on screen. You won't be able to proceed to the next page unless the agreement is signed.
Select Continue. Finalize the booking at POS and take payment if necessary.
This is available for all venues using booking agreements now, and doesn't require any setup to enable. If you would prefer to deliver all your booking agreements directly to the guest by SMS, email, or QR code, we now have a POS setting to configure the ability to open booking agreement in a new tab.
Food and beverage
Kitchen display system (KDS) printing improvements
Plan: Premium+
Preview release (Playground): No
Target release: Tuesday, 22 September 2026 (AET)
We've updated how kitchen printing works to match how physical dockets are printed. New venues have been using this new workflow for the last few months, and now we're switching over to this behavior for all venues using KDS this month.
The key changes are:
You're able to control when orders are sent to the kitchen by "printing" the item to the KDS screen.
Reprints are now treated as new orders with a clear "reprint" label displayed.
If you use KDS in your venue, be aware of this change in workflow which is coming in this month's release.
What problem is the new workflow solving?
Venues using Fresh KDS display screens to manage their kitchens are currently running into a few gaps with how orders are printed and updated:
Online checkout and Venue Manager orders are not sent to Fresh KDS. For example, if a customer books a party package two weeks in advance that includes five pizzas, there's no way to send these to the kitchen on the day of the party.
Order changes were automatically synced to KDS without indication the item changed. If an operator updates an item that requires kitchen action, such as changing a chicken burger to a beef burger, there is no notification it's been already updated in Fresh KDS.
Irrelevant updates create noise: Non-kitchen updates are pushed to the display, which can create confusion. For example, adding a note that a customer is running late may appear on the kitchen screen even though no action is required.
These changes unlock a key use case for venues where they will have the ability to send items to the kitchen later at a time they choose (eg for future bookings). This update also removes issues in the current workflow where booking edits are updated in the kitchen display without being flagged as changed.
From POS or Venue Manager, printing (or reprinting) to KDS will now be the single way to send items to the kitchen display.
To learn more, see the guide Order fulfilment with KDS.
Sync order status to POS from the kitchen using Fresh KDS
Plan: Premium+
Preview release (Playground): No
Target release: Tuesday, 22 September 2026 (AET)
Serve guests faster by having their food and beverage order status available to share at POS. Venues using cloud versions of Fresh KDS in their venues can now customize their KDS settings to sync the order status from the kitchen to POS devices throughout the venue. When guests enquire about their order, POS staff can update them without needing to check with the kitchen.
The order status shows per order (which may contain multiple food and beverage items) rather than per item.
Some initial setup is required in Fresh KDS to enable the POS order status sync. After the initial setup steps are complete, this is how it works during service:
A guest places an order, venue staff "print" the order to Fresh KDS and it's sent to the kitchen.
The kitchen staff update the order status from Fresh KDS once the order moves status.
The updated order status is synced to POS and shows as a pill next to the order. The statuses show:
Not printed (gray): item has not been printed and sent to KDS yet.
Pending (yellow): has been sent to the kitchen, but order has not been started yet.
In progress (blue): order is currently underway and being prepared by the kitchen.
Ready (green): all items in an order are ready to deliver to the guest, or to be collected.
Complete (gray): order has been handed over to the guest.
Add reason codes for voided or refunded stock items at POS
Plan: Premium+
Preview release (Playground): Yes
Target release: Tuesday, 22 September 2026 (AET)
When you void or refund items from a booking or tab this action now requires a reason code, giving you an accurate, auditable record of why stock has been removed from a booking, whether that's a service issue, an order mistake or a guest refund.
Reason codes work alongside voiding and refunds. Voiding is for cases where an item's already been added to a booking or tab but never actually goes to the guest. Operators can write it off with a reason, rather than just cancelling the sale or letting it silently return to inventory.
When operators void or refund a stock item, they select a reason for the action, then choose whether to return the item to inventory (the default) or void it. Voided stock items are tracked in your stock movement report (formerly the wastage overview report) as a new line item.
To set up reason codes:
From Venue Manager, go to Settings > Account > Venue settings.
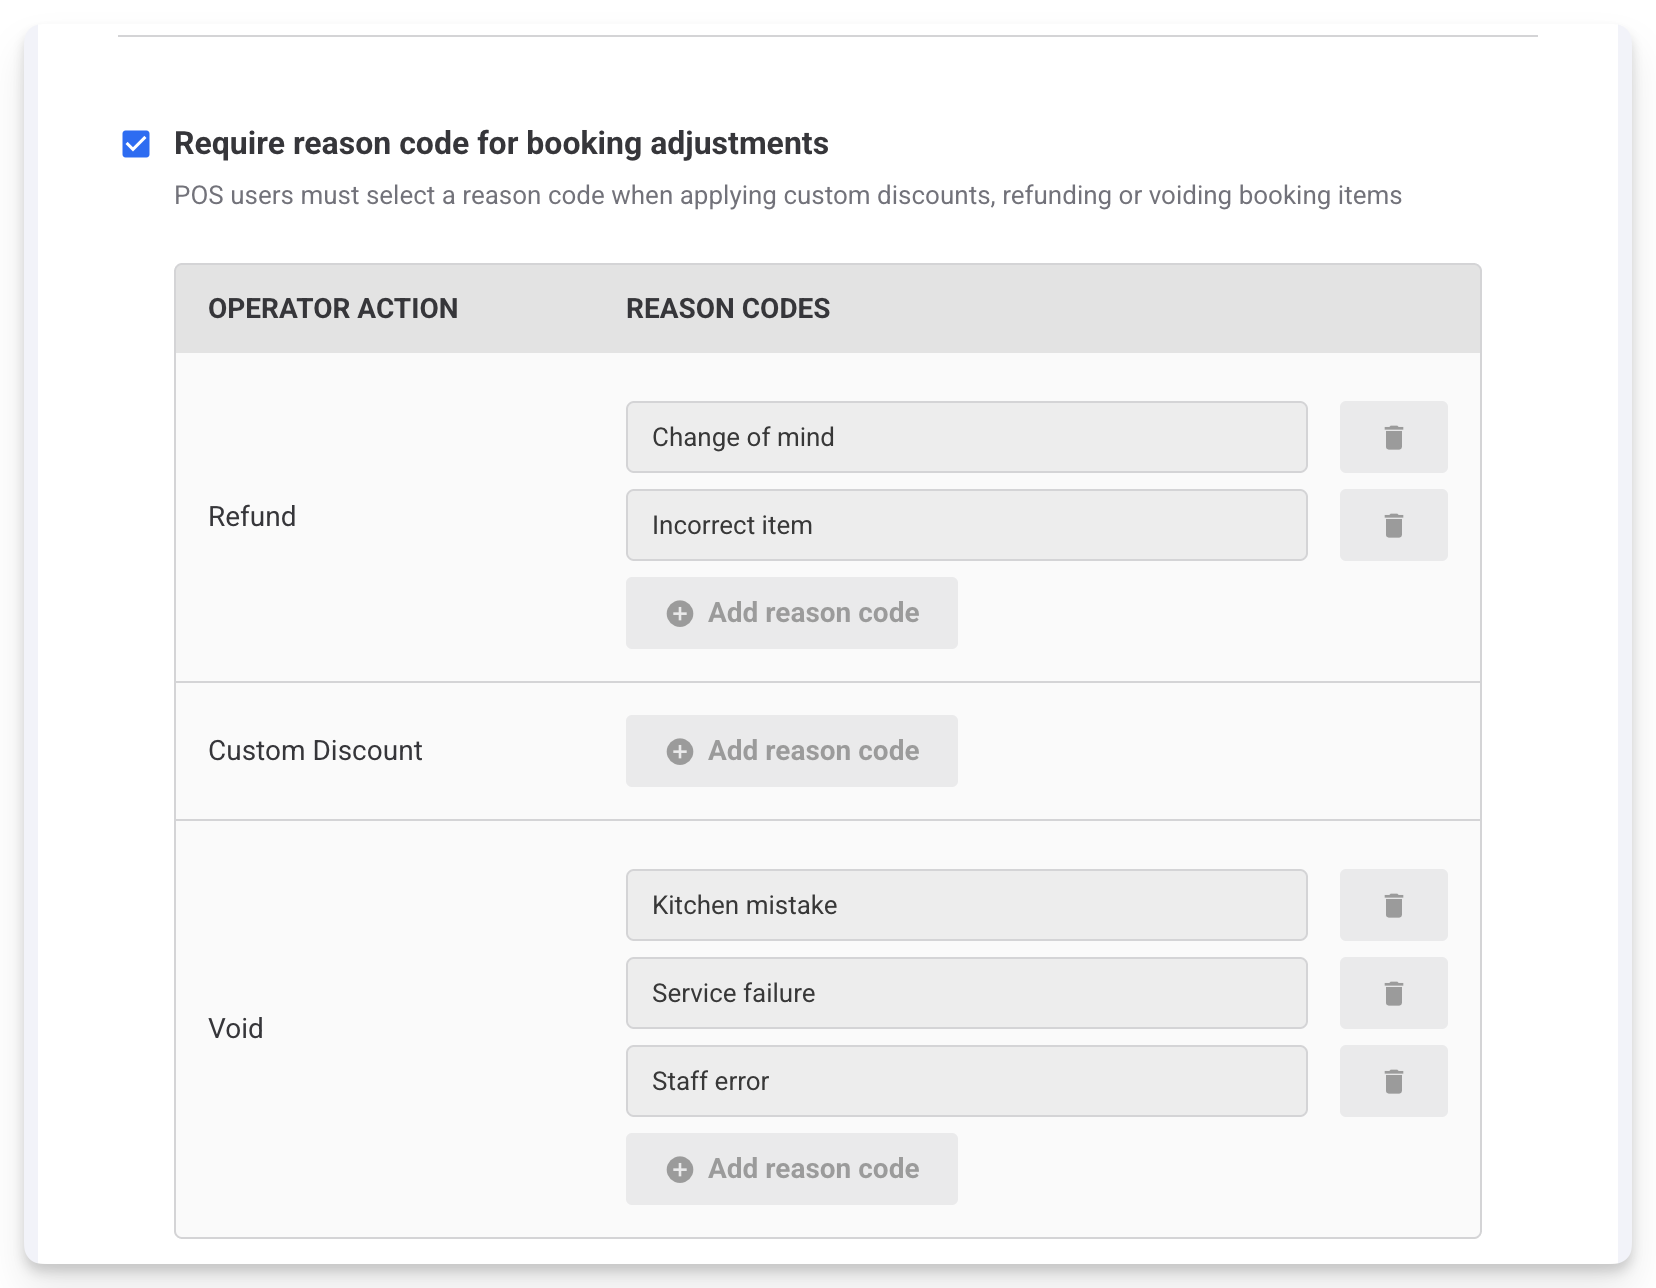
Under Bookings & enquiries, check the box Require reason code for booking adjustments.
Create your reason codes by selecting + Add reason code next to Refund, Custom discount and Void.
Select Save.
To void items at POS and add a reason code:
Search for the booking by booking name or booking ID, then select it from the results.
Select the checkbox next to the item/s you want to void.
Then, select the options menu (3 dots) at the top of the booking screen and select Remove item.
Deselect Return stock items to inventory if you don't want to return the selected item to your inventory. Otherwise, this stays selected by default.
Select a Void reason from the drop-down.
Select Void to complete the action.
You can also void an item during the refund process by selecting a refund reason code from the drop-down and deselecting Return stock items to inventory before processing the refund.
All voided items are captured in the stock movement report as a new line item (formerly the wastage overview report).
To learn more, see the guides Adjust items in existing bookings at POS and Refund bookings from POS.
Wastage overview report renamed to stock movement report
Plan: Premium+
Preview release (Playground): Yes
Target release: Tuesday, 22 September 2026 (AET)
The wastage overview report has been renamed to the stock movement report. It's the same report you're familiar with, just with a few new enhancements. The report now includes wastage, plus voids made via the refund process at POS.
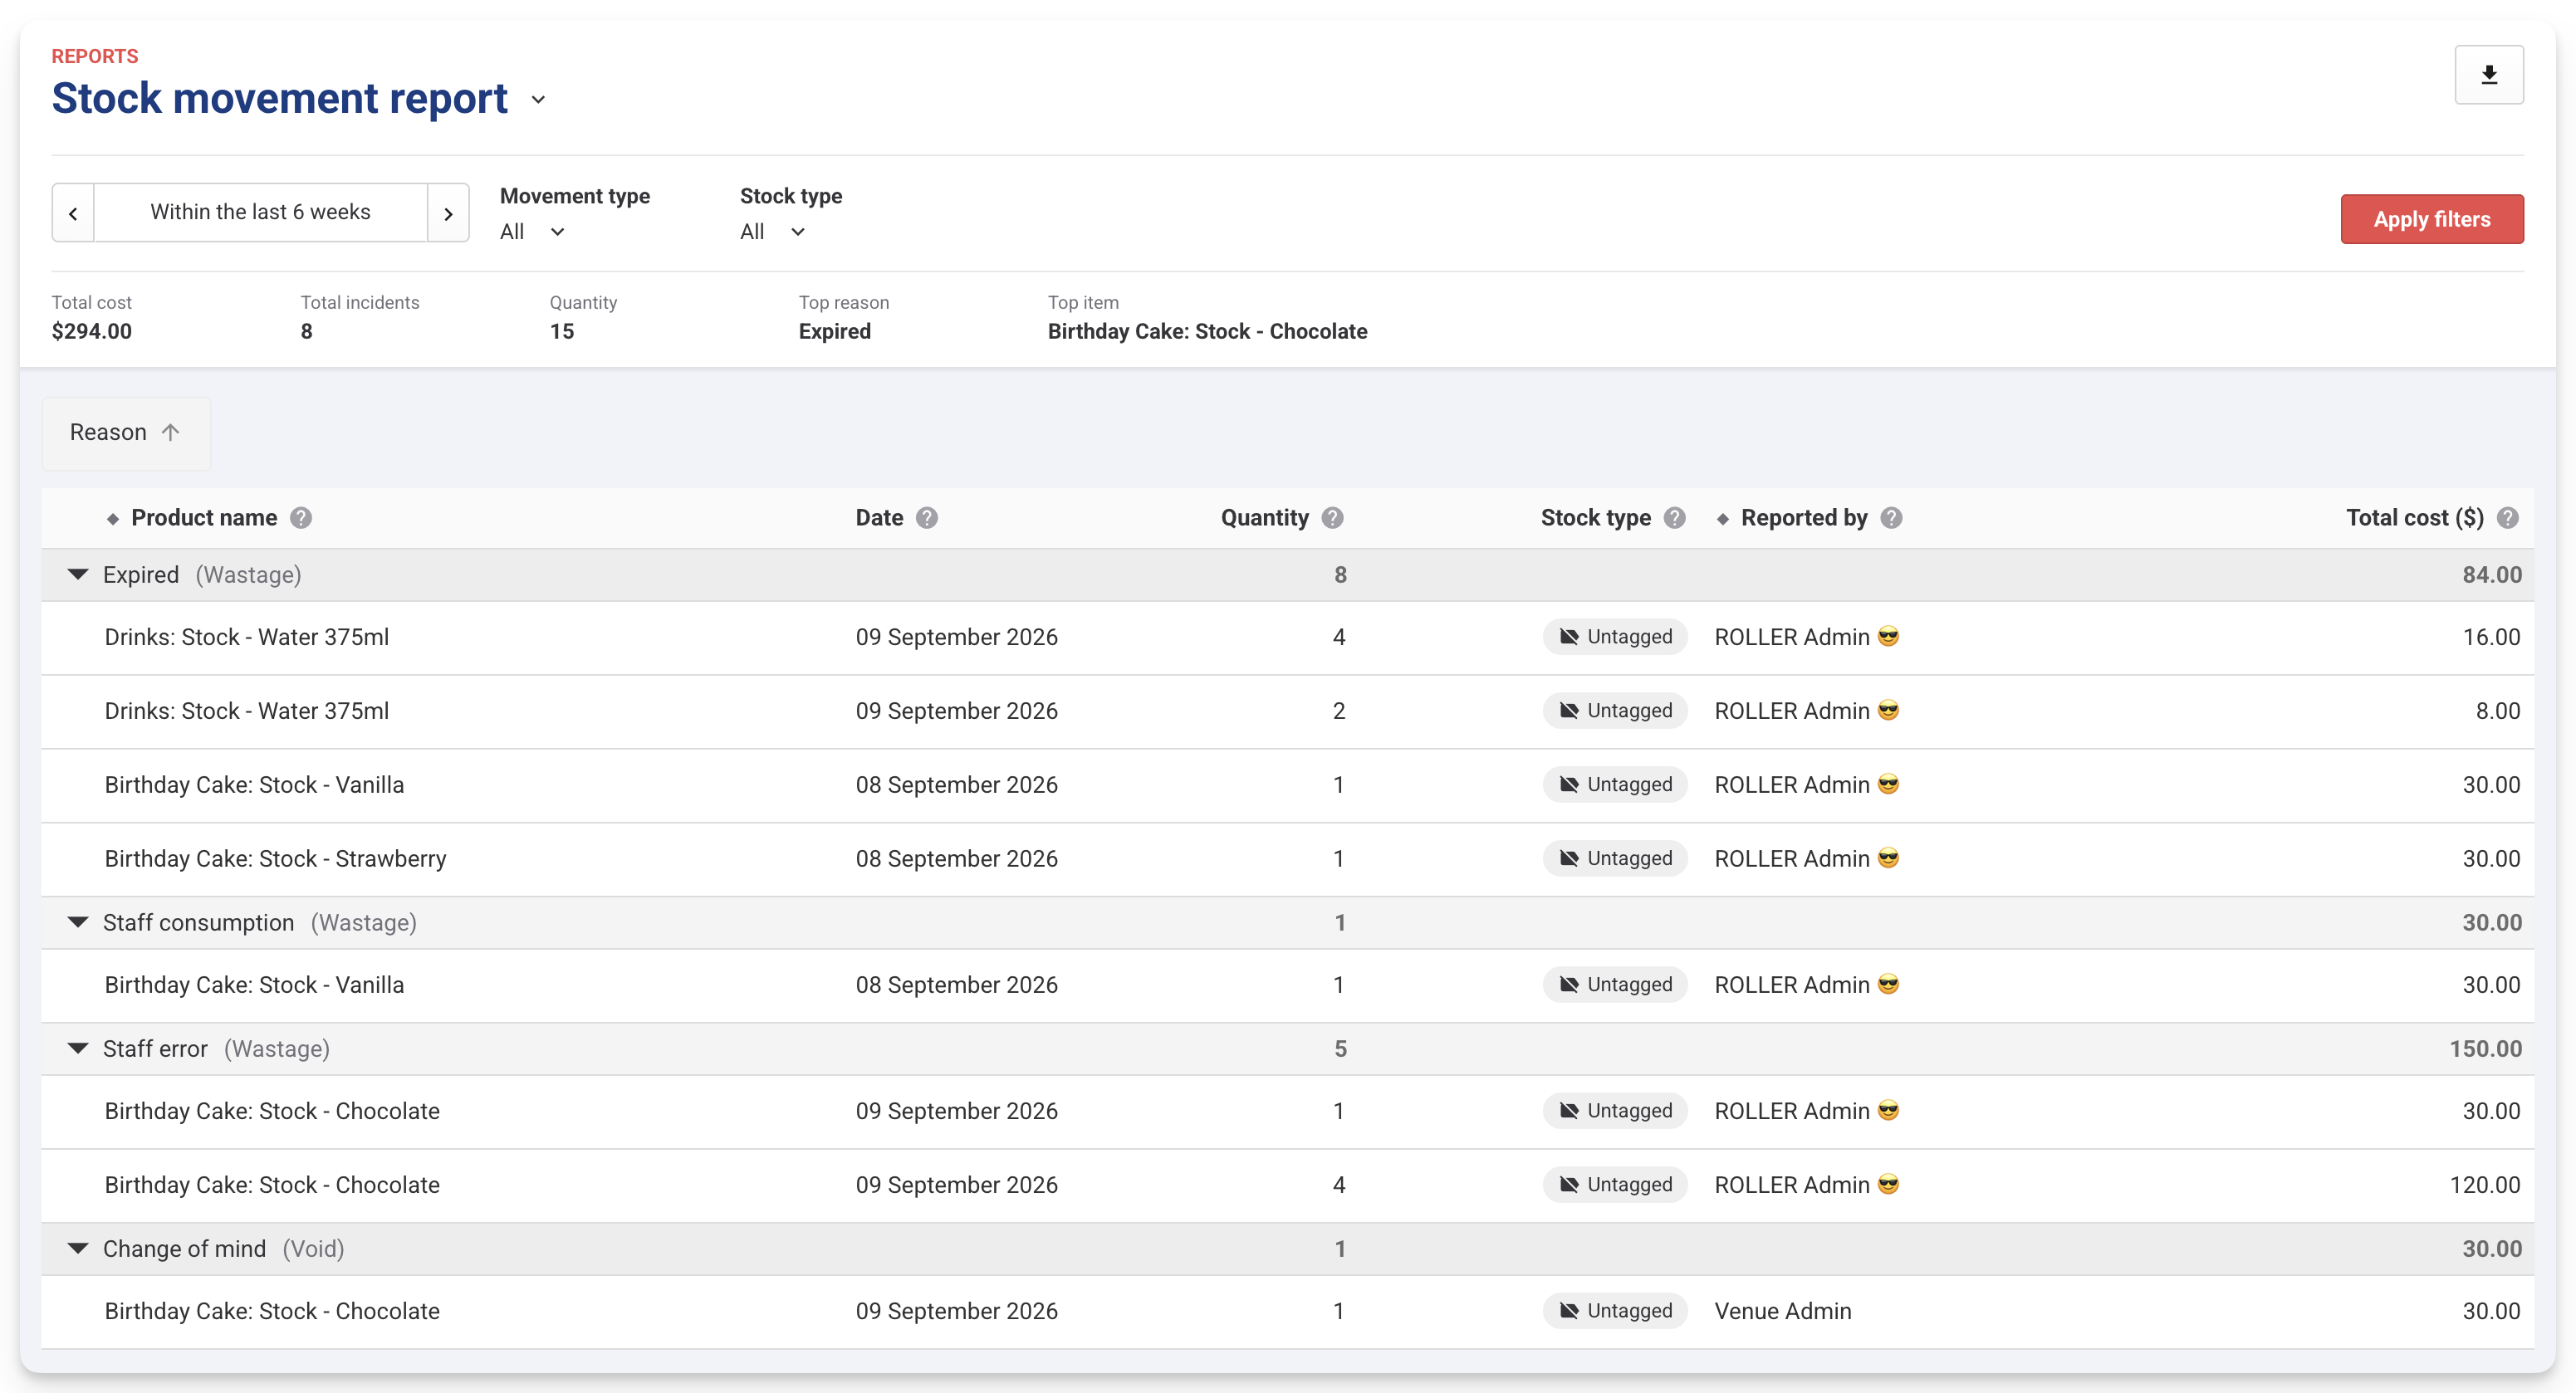
The stock movement report gives you a dedicated view of stock lost to spoilage, breakage, staff comps and expiry, so you can see what's being wasted, why, and how much it's costing your venue.
This is an operations report, not a financial report. It's designed to support day-to-day decisions about your stock. It is not a financial report for accounting or tax reporting.
To learn more, see the guide Wastage overview report.
See accurate margin and profit on stock items for tax-inclusive venues
Plan: All
Preview release (Playground): Yes
Target release: Tuesday, 22 September 2026 (AET)
If your venue uses tax-inclusive pricing, the profit margin shown in the all stock view and stock sales report in Venue Manager now reflects your net revenue (what you keep after tax) instead of the tax-inclusive profit margin.
Previously, the tax portion of the price was counted as revenue, which meant these figures could read higher than your true margin.
To access the all stock view from Venue Manager, go to Products > Stock > All stock. The Margin column will display your profit margin of each stock item.
To access the stock sales report from Venue Manager, go to Reports > All reports and search for stock sales. The Margin column will display your profit margin of each stock item.
This only affects tax-inclusive venues and stock items. If your pricing is tax-exclusive, your margin and profit figures don't change, because the entered price is already your net figure.
Pricing and promotions
Adjust ticket prices automatically based on remaining capacity (beta)
Plan: All
Preview release (Playground): No
Target release: Tuesday, 22 September 2026 (AET)
Now you can set ticket prices that follow how full a session is, so a busy session can earn more and a quiet one can offer a reason to book. Set your capacity tiers in a capacity-based price rule, then apply it to your products and price each tier there. ROLLER applies those prices as bookings come in, so your team can focus on guests instead of the price list.
You choose which sales channels the tiers apply to: progressive online checkout (and API), POS and Venue Manager. A channel you leave out charges the product's base price whatever the capacity is, so you can run capacity pricing online and keep front counter prices flat.
It works on session passes, party packages and packages that include a session pass. For package products, the tiers price the session pass only, and inclusions like food, drinks and merchandise stay the same across every tier. Once a booking is purchased, guests added to it later pay the price it was originally sold at, on any channel.
Capacity-based price rules are in beta. To join the beta, contact your customer success manager or the support team.
Once you have access, to set up a rule:
From Venue Manager, go to Products > Price rules > Create price rule.
Select Capacity-based and enter a name.
Add up to five tiers, entering the upper capacity percentage for each. 0% is empty and 100% is fully booked.
Under Sales channels, select the channels the tiers apply to.
.png)
Open a supported product, select the rule from the Price rule drop-down, then set the base price and a price for each tier.
.png)
Channel management
Grow reseller revenue without the spreadsheets (early access)
Plan: Channel management add-on
Preview release (Playground): No
Target release: Thursday, 1 October 2026 (AET)
Hotels, tour operators, travel agents and concierges can be a big slice of your ticket sales, but until now that channel ran outside ROLLER. Every booking meant an email thread, a spreadsheet and a manual entry. Capacity you set aside by hand went stale the moment someone else booked, so sessions oversold, and your reseller bookings lived in two systems that never quite matched.
The Reseller Portal brings that channel into ROLLER and lets resellers make the booking themselves. Resellers sign in to your reseller checkout, see only the products you've chosen for them at their agreed rate and book against your live availability. No emails, no overselling and every booking is recorded in Venue Manager against the reseller, with the rest of your bookings.
Your commercial terms take care of themselves. Each reseller's pricing tier and payment options (pay at booking, charge to account, bank transfer or pay on arrival) apply at checkout, and they can add their own booking reference so your records match theirs.
Resellers can see what they've booked and what's still to pay, add tickets or reschedule when their guests' plans change, attach their own booking ID and export their bookings, without contacting your team. You can see every reseller booking in Venue Manager and export by period to invoice resellers on credit account terms.
You must have the channel management add-on as part of your ROLLER subscription to use the Reseller Portal. This add-on also gives you access to OTA connections. To express your interest in joining the early access program, contact your customer success manager or the support team.
How it works
Set up your reseller program. Configure your global reseller settings, terms and payment options, reseller price rules by tier (eg Bronze, Silver, Gold) and your tagged reseller products. Then add each reseller with their contacts, products they sell, tier and payment terms they use.
Create your reseller checkout. Add a reseller checkout from Apps > Progressive checkouts, add your reseller products by tag and send the checkout URL to your resellers.
Your resellers book. Resellers sign in to the reseller checkout with their email or phone number, see only their products at their tier's rate and book against your live availability. Your team can also still book for resellers in Venue Manager if they call the venue.
.png)
Products
Charge extra for premium options within a package or party package inclusion (on request)
Plan: All
Preview release (Playground): No
Target release: Tuesday, 22 September 2026 (AET)
Packages and party packages are made up of inclusions. Some are fixed, and some let the guest choose, like the pizza size or the type of drink. Until now, every option in that choice had to cost the same, even when one costs your venue more. The only way to offer a premium option was to build a separate variation of the whole package.
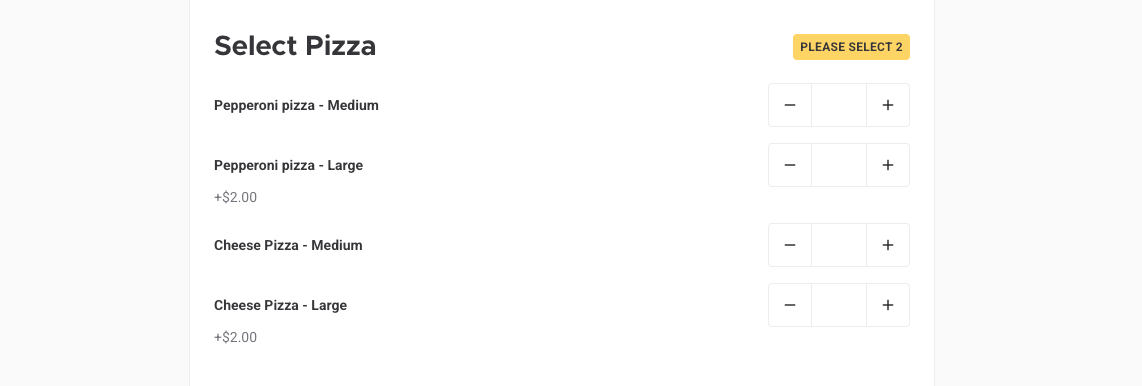
Instead of creating separate variations, you can now set a base price for each inclusion and add an extra charge to premium options. Guests can still pick any option, and pay extra only if they choose a premium one.
To charge extra for a premium option
From Venue Manager, open the package or party package and edit the variation.
Under Inclusions, select Add item and choose the products that make up the option set — for example the four pizzas you offer, or soft drink and pitcher.
Under Price per item, set the base price for the inclusion. This is what every guest pays regardless of which option they pick.
For any option that should cost more, select Charge extra and enter the Extra price. Toggle it back off to remove the charge.
Save.
The extra is added to the base, so if a party package includes a medium pizza for $9 and you charge $2 extra for large, choosing a large pizza costs $11.
.png)
What guests and staff see
Online checkout: premium options are flagged with their extra cost next to them, and choosing one adds the difference to the subtotal immediately.
Venue Manager: when taking a booking, each option shows its extra charge, so the person on the phone can see what they're quoting.
POS: staff can open an existing booking and select or change options there, which is useful for guests who decide when they arrive.
Available on request. To enable it, contact your customer success manager or the support team.
Capacity management
Block capacity across multiple dates at once
Plan: All plans
Preview release (Playground): Yes
Target release: Tuesday, 22 September 2026 (AET)
Blocking capacity for a multi-day closure — a party room out for renovations, a section shut for maintenance — used to mean creating a separate blocked capacity entry for every date.
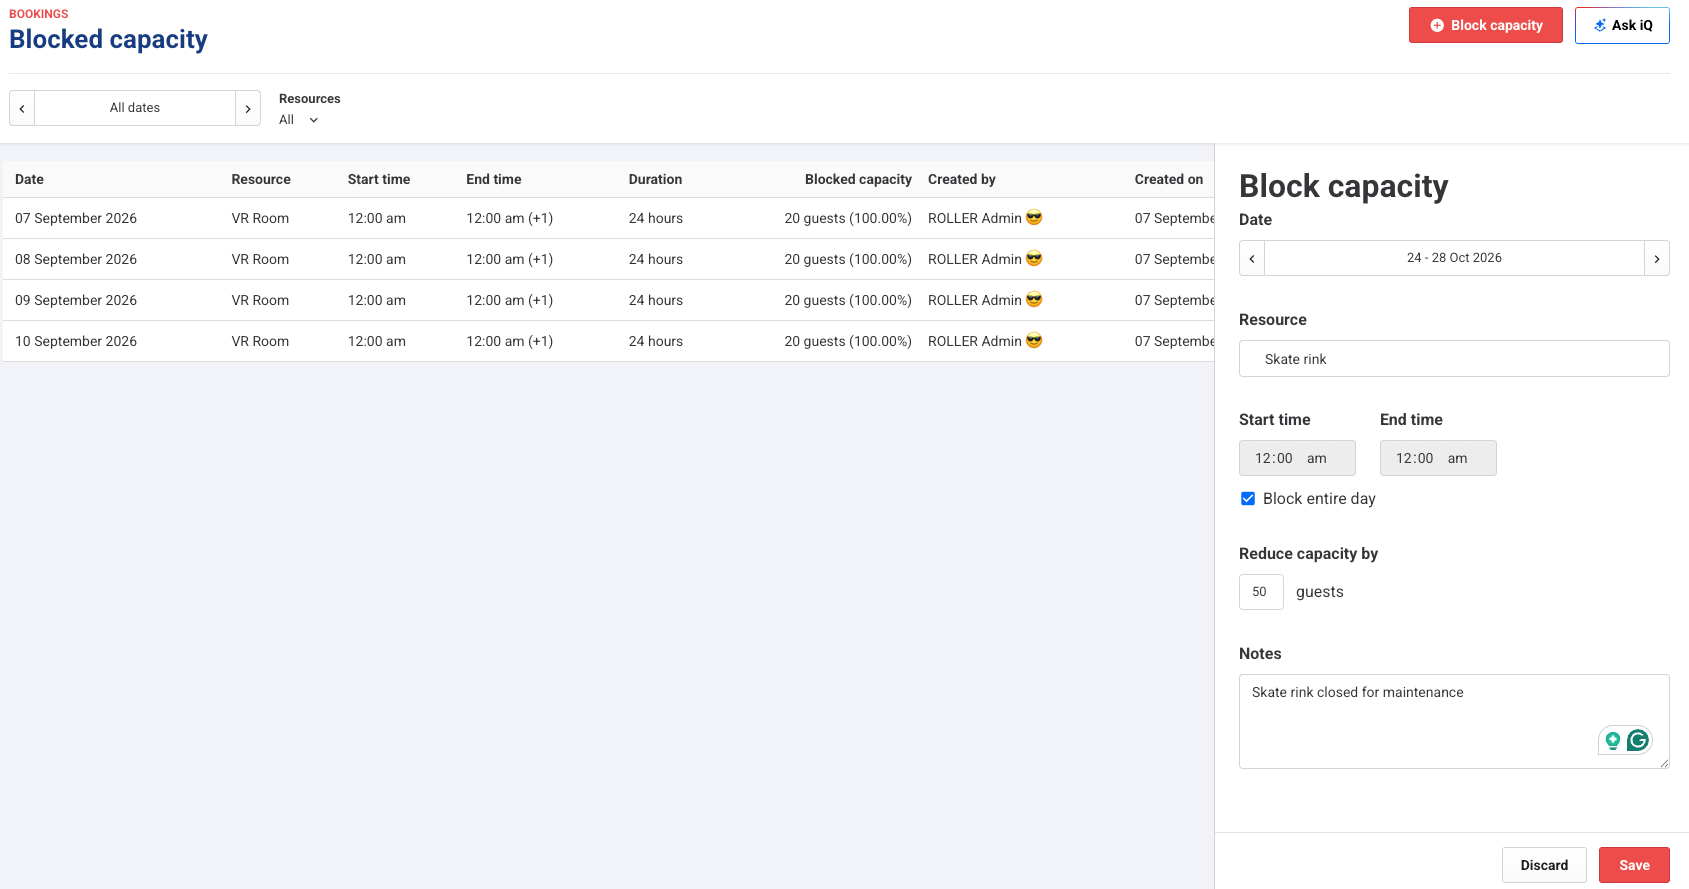
The Block capacity panel, accessed via Venue Manager > Bookings > Blocked Capacity, now lets you block a date range in one entry instead of one per day. Choose Between instead of On in the Date field, select a start and end date, then complete the rest of the block as usual. Select resources, a partial guest count if you're reducing rather than fully blocking capacity, and notes. Whatever you set applies to every date in the range.
Multi-venue
Edit any product field from HQ and schedule updates to your venues
Plan: HQ
Preview release (Playground): No
Target release: Tuesday, 22 September 2026 (AET)
Updating products across your venues used to mean working within a narrow set of fields, one product at a time, with every change going live the moment you published it. That last part is why so many HQ operators ended up running price updates at 2am — publishing during trading hours risked changing a product while a guest was mid-checkout.
HQ Product Management replaces Bulk Edit. You now edit products in HQ the same way you edit them in a venue, and you decide when those changes reach your venues.
Edit any field: every field on a product or variation can be edited directly in HQ, with the exception of a small number of venue-specific fields. There's no separate Bulk Edit screen — you make changes on the product itself.
Group changes into a collection: a collection is a set of changes that release together, so your seasonal changeover — new packages, updated prices, revised terms — lands as one release instead of multiple separate pushes.
Schedule the release: choose the date and time your changes reach your venues, in either the Venue time zone or the HQ time zone. Plan the update during your working day and let it land at 5am. Nothing reaches a venue until the scheduled time arrives.
Choose which venues: target venue by venue, or by venue tag.
See what happened: every publish is recorded, with the venues it went to and a log of exactly which fields changed.
Publish a product update
From HQ, open the product and make your changes.
Select Select Venues. If you want to edit the template without publishing the change to any managed venues, select Save to HQ instead.
Choose either Create a new collection, Add to existing collection, or Publish now.
For a collection, enter a Collection name and Description, then set the date and time for the change to publish. Choose whether that time should reflect the Venue time zone or the HQ time zone.
Select Next: Choose venues and choose the venues to apply the update to. If you check Save to HQ, the HQ template will update with these changes, too.
Select Next: Review changes. You will see each field that's changing and you can add a Change description to make it easier to find the change again at a later stage. If everything looks good, select Publish later to schedule it.
To see the process in action, select the hotspots on the interactive demo below.
Track and reuse your updates
Publish > Collections in the HQ Venue Manager navigation lists everything you've published or scheduled. Open a collection to see the products in it, the venues each change was sent to, and use View logs for the exact fields that changed.
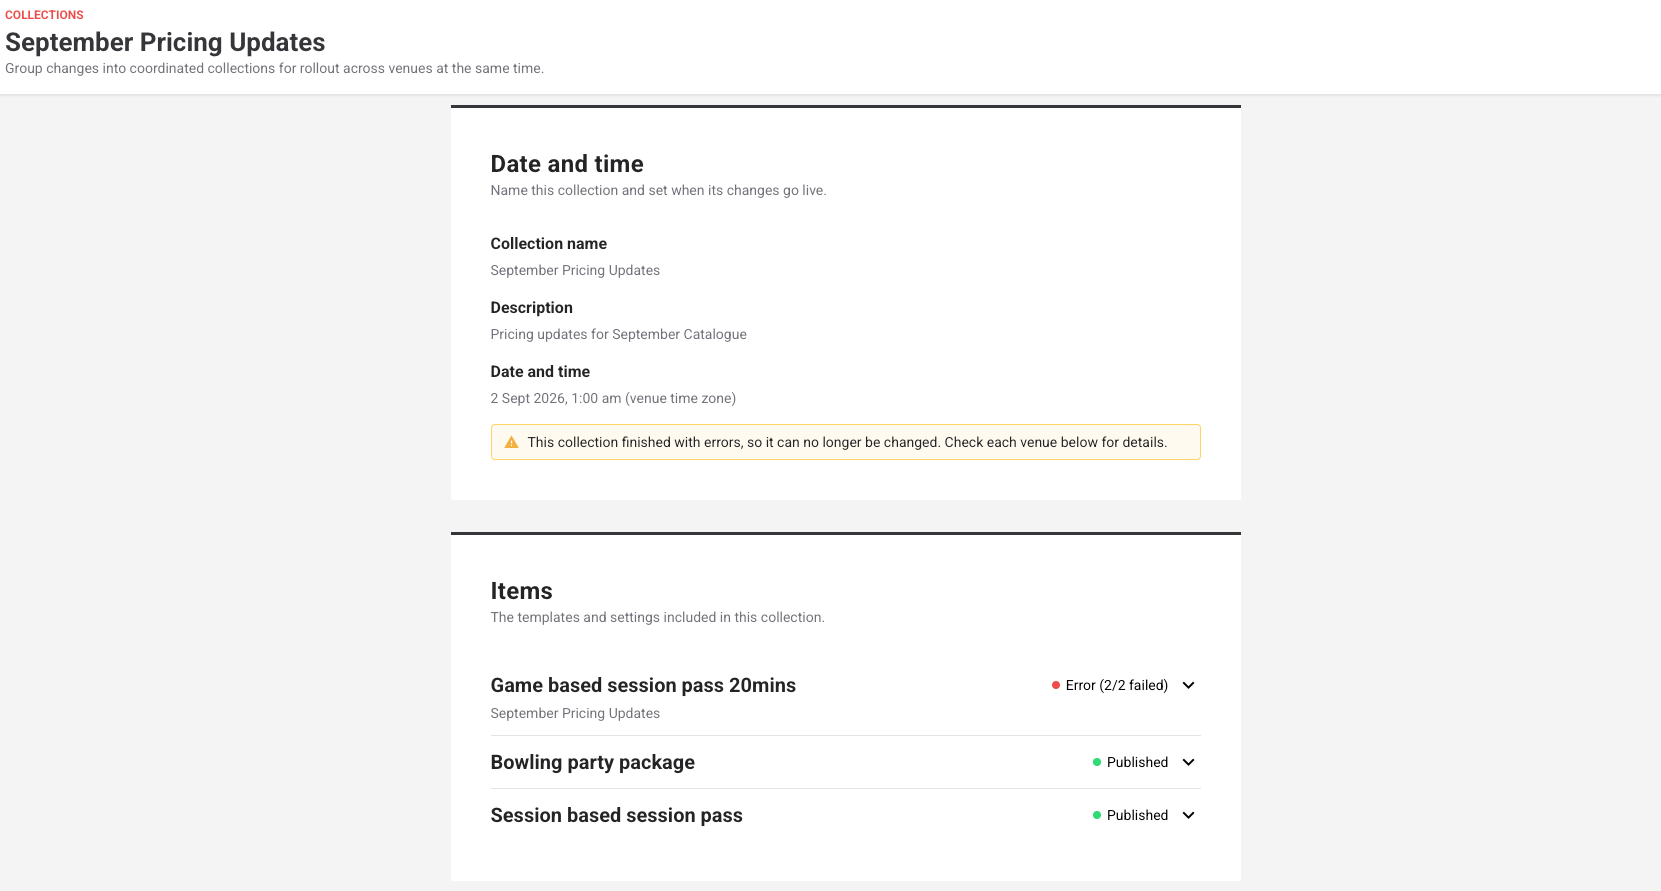
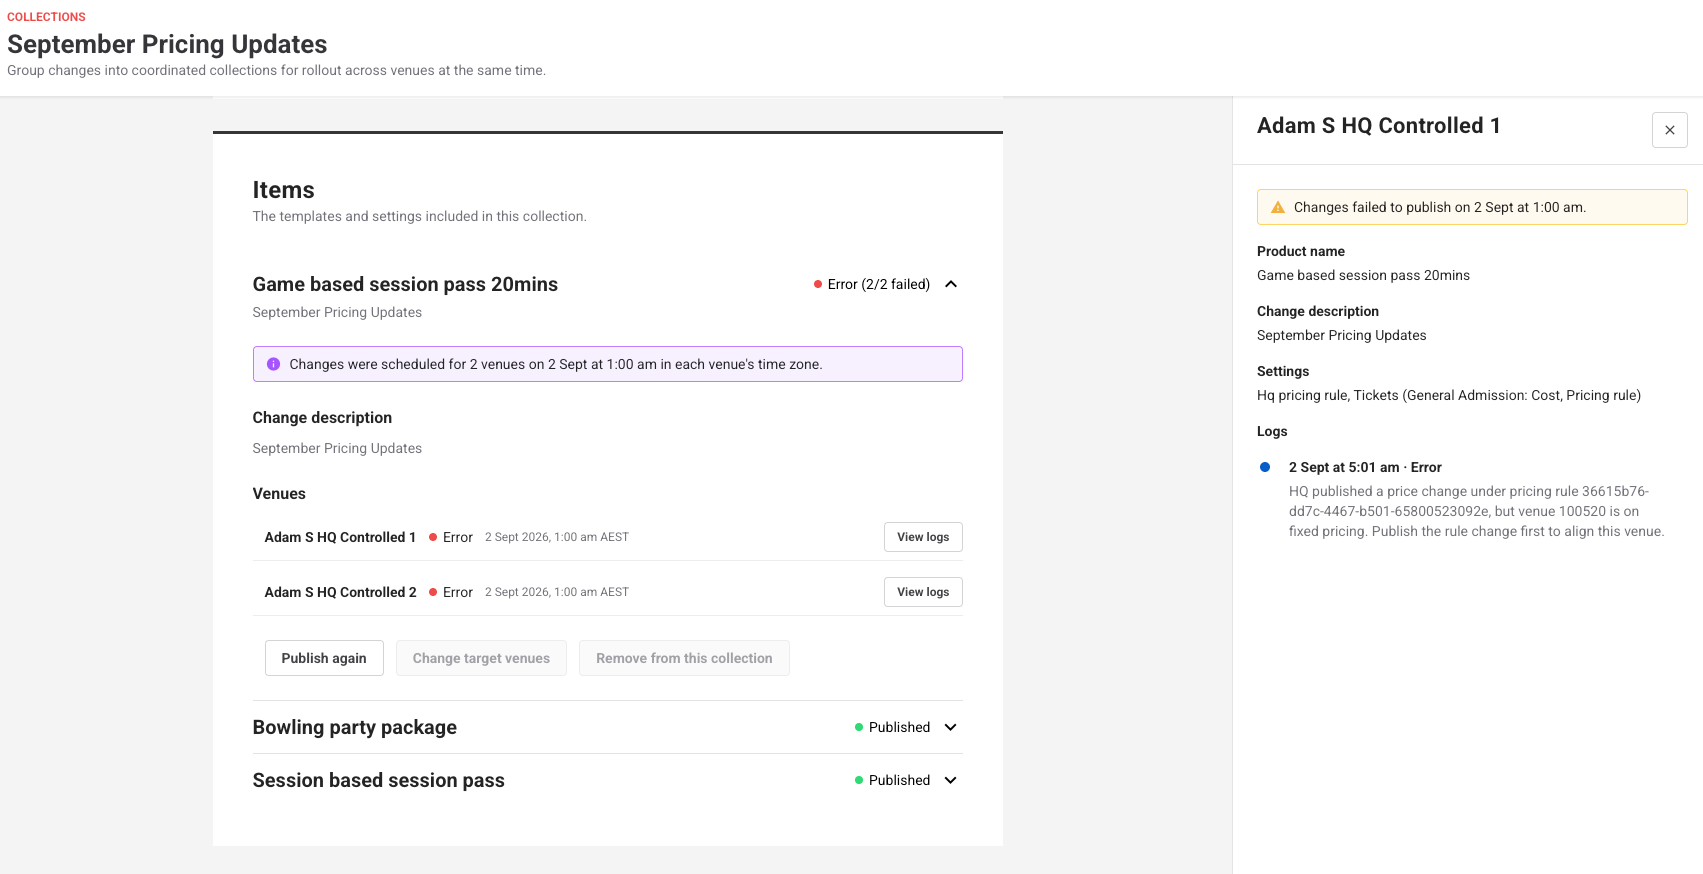
Each change shows its status — scheduled, in progress, published, or an error state. If a publish fails at a venue, that venue shows in red, the collection shows a warning, and the log explains what went wrong so you know exactly what did and didn't reach your venues.
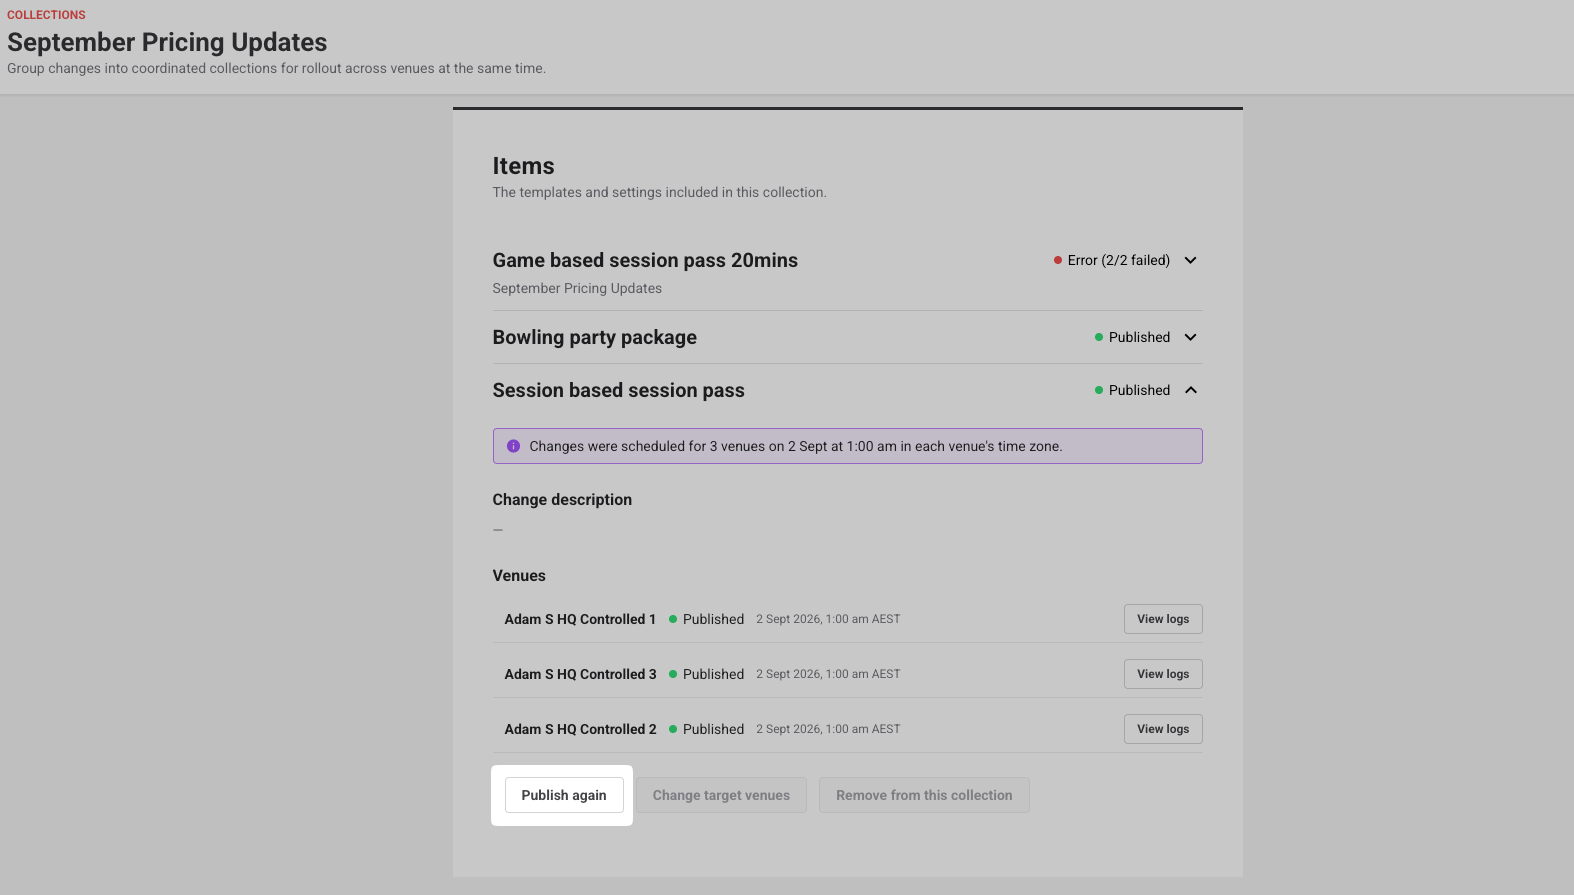
You can also publish a change again without rebuilding it. Send an update to one venue first, check it looks right, then republish the same change to the rest of your group. This works for an individual change or a whole collection.
Integrations
Manage group bookings and guest marketing without leaving Salesforce (on request)
Plan: All
Preview release (Playground): No
Target release: Tuesday, 22 September 2026 (AET)
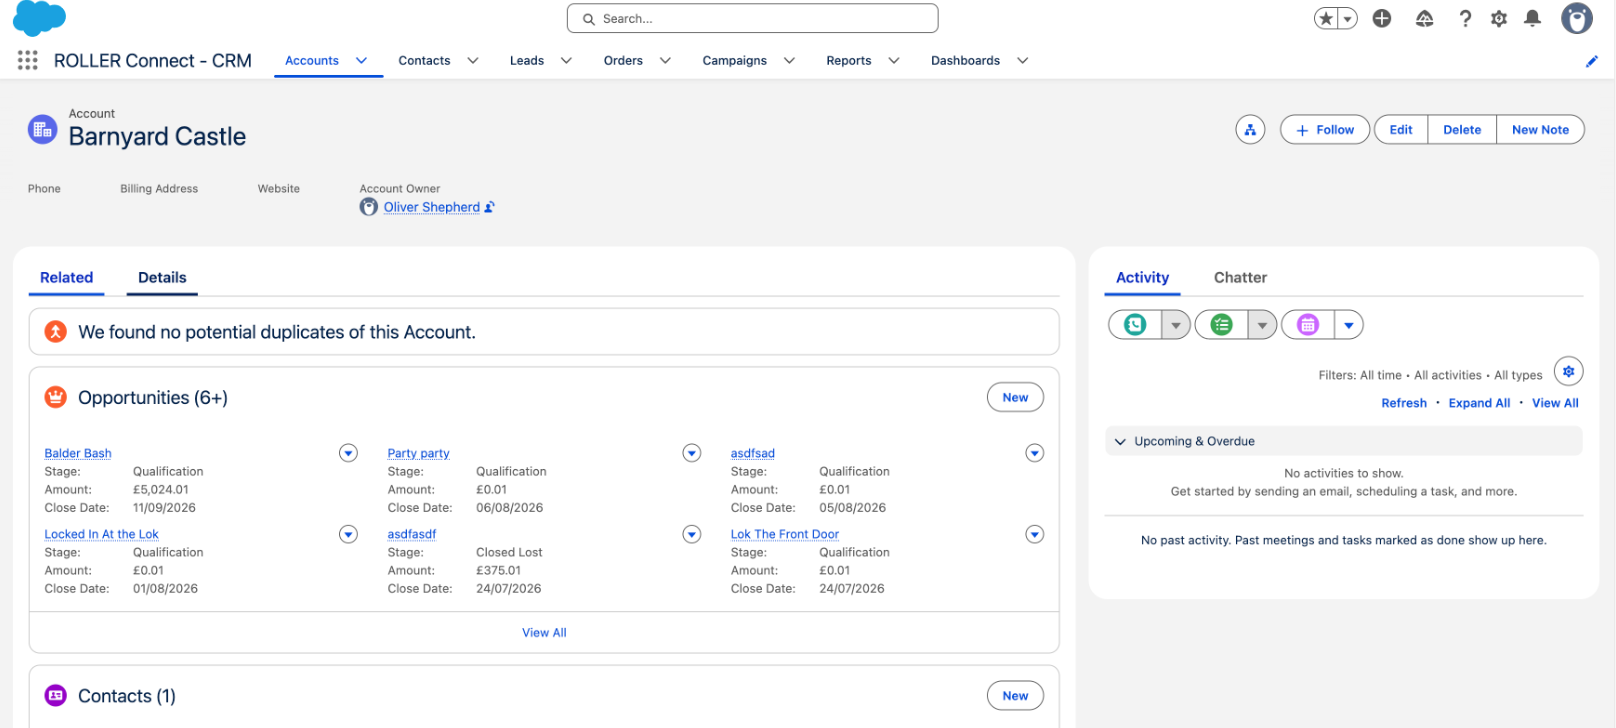
ROLLER Connect for Salesforce is coming out of beta. It syncs guest and booking data from ROLLER into Salesforce, and lets your event sales team manage the full group booking pipeline without switching platforms.
Two modules are available:
ROLLER Connect – CRM gives teams a complete cross-venue view of every guest in Salesforce. Guest profiles, bookings, waivers, products, and payments sync from ROLLER in near real time, so marketing teams can build segments, trigger lifecycle campaigns, and run re-engagement journeys — all from Salesforce.
ROLLER Connect – Groups & Events embeds live ROLLER resource availability into Salesforce Opportunities. Event sales teams can check capacity, place provisional holds, build quotes, and collect payment without leaving Salesforce. When a deal closes, the booking is automatically confirmed in ROLLER, a Banquet Event Order is distributed to kitchen and operations teams, and an inventory order list is built from recipe ingredients.
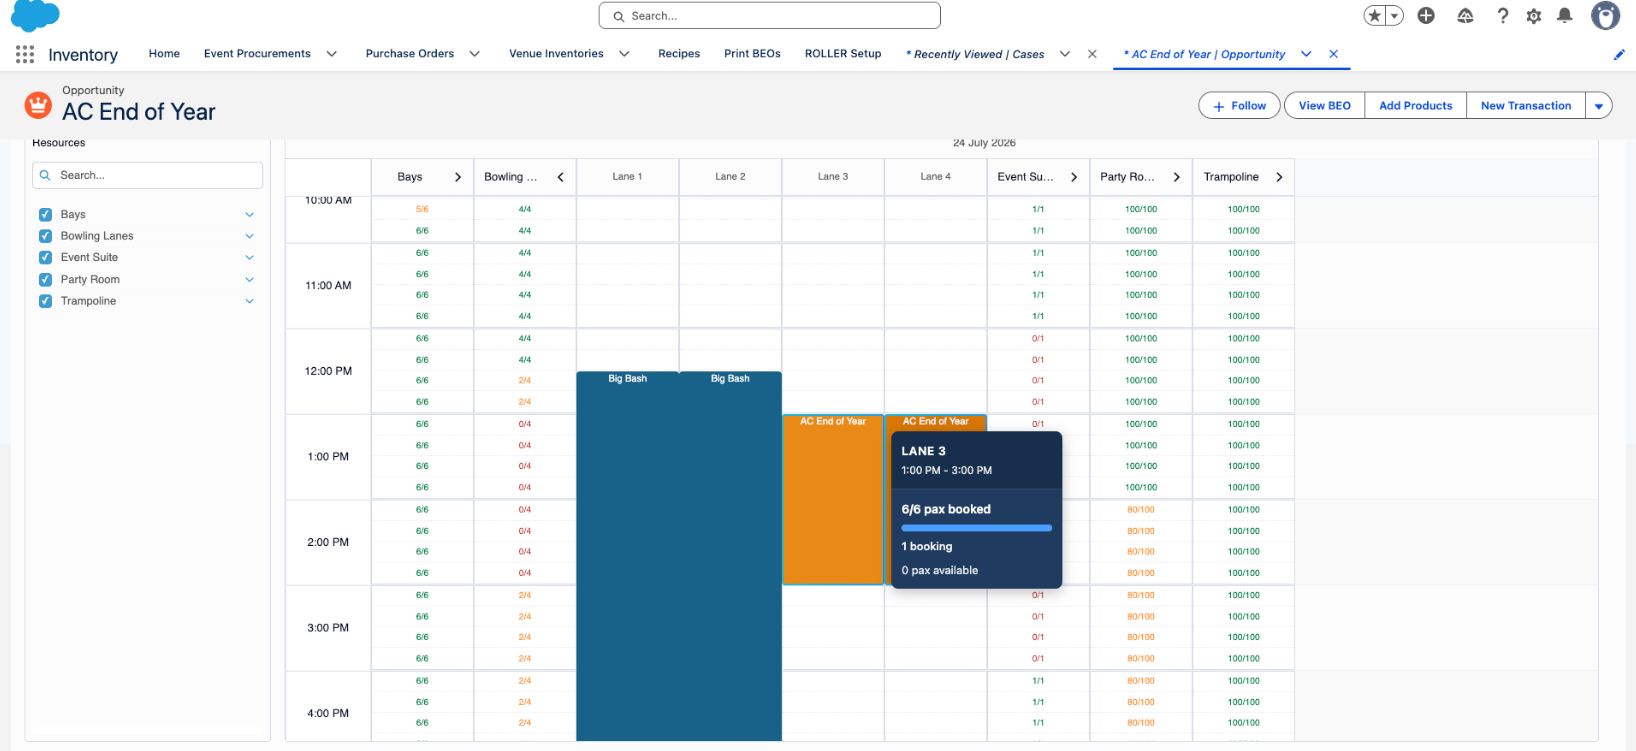
Available to customers using Salesforce, on request. To enable it, contact your customer success manager or the support team. To learn more, see the guide Get started with ROLLER Connect for Salesforce.
Payments
Access your funds with instant cashout (beta)
Plan: All, for customers using ROLLER Payments
Preview release (Playground): No
Target release: Tuesday, 15 September 2026 (AET)
This feature is currently in beta with a select group of customers. To join the waitlist, contact your customer success manager or the support team.
You can now turn funds pending settlement into cash flow on demand, without waiting for the standard settlement cycle, with instant cashout.
Eligible ROLLER Payments customers can cash out funds pending settlement early from Venue Manager, and the money is in your account in minutes. You can cash out any or all funds you have pending settlement, up to a daily limit of AUD$5000. Each request incurs a 1.75% fee (tax inclusive for some regions).
Only the ROLLER admin, account owner or billing contact is able to access instant cashout. You'll need to agree to the terms and conditions before you can make a request.
From Venue Manager go to Dashboard > Payments.
Select Cashout now.
Verify your identity with a one-time password (OTP) sent to the email address linked to the account owner.
Select the amount you want to cash out from your pending settlement funds (up to a daily limit of AUD$5000).
Review the cash out total and fees, and then accept the terms and conditions. You will only have to accept the T&Cs the first time you request an instant cashout.
Then Confirm cashout.
.png)
Funds land in your nominated bank account within minutes (less the 1.75% fee).
To learn more, read the guide Get started with instant cashout.
API
API enhancements: September 2026
Plan: All plans with API access
Preview release (Playground): No
Target release: Tuesday, 22 September 2026 (AET)
To see the latest API updates, view the ROLLER API changelog.