Close a till session without counting cash and reconcile later, sell multi-passes for repeat visits, apply price rules to packages and target discounts with product tags. August also brings split tabs and card pre-authorization out of beta, plus loyalty promotion campaigns, AI-generated product images and descriptions and an important card surcharge compliance change for Australian venues.
Preview these features in your Playground venue about a week before they go live. New to Playground? The ROLLER Playground guide shows you how to access it.
This page highlights new and improved features with setup guidance. For every change, fix and behind-the-scenes improvement this month, see the release notes, published shortly after release day.
We’re always learning from venues like yours. Join our research panel to get early insights into new features and share your feedback to guide future improvements.
POS
Close a POS till session without counting cash
Plan: All
Preview release (Playground): Yes
Target release: Tuesday, 25 August 2026 (AET)
Venues that handle cash often split the day into multiple till sessions (eg AM / PM sessions) so cash can be counted and the drawer reset to float value between staff shifts. While this happens one of the devices is out of action at a time that might be impractical for service at the venue.
Now, your venue can allow POS operators with the right permissions to close a till session without entering a cash count to start the next session straight away. The closed session is marked unreconciled, and the cash count is completed later from Venue Manager, whenever it suits venue staff.
.png)
A new Till sessions page in Venue Manager gives a quick view of which sessions are open, closed, reconciled and unreconciled, and links straight through to reconcile any sessions that are still outstanding.
The following reports have been updated to show if cash for a session has not been counted:
On a printed till report, an unreconciled session shows the actual cash total as not counted, with no difference calculated until a count is entered.
Unreconciled sessions are held out of the Till Discrepancy by Staff Export report, so an uncounted till doesn't show up as a variance. Sessions appear once the cash count is entered.
The Till Reconciliation report now shows status labels for sessions.
Some setup is required to enable your POS devices to allow staff to close a session without a cash count:
POS settings: From Venue Manager, go to Apps > POS > Settings. Scroll to Till management, then deselect the Force cash count when closing a till session in POS (see screenshot below). Save to update the settings.
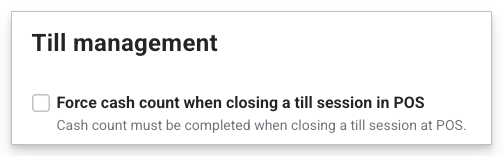
Staff permissions: The permissions Can access POS till sessions and Can close till session in POS without submitting cash count must be enabled for roles where staff need to close a till session without counting cash.
To learn more, see the guide Open, close and edit till sessions.
Booking information panel in POS capacity view
Plan: All
Preview release (Playground): Yes
Target release: Tuesday, 25 August 2026 (AET)
POS capacity view now opens a full booking information panel when an operator taps a session from the grid. Released in June as an on-request opt-in, this is now live for all venues.
The panel shows everything staff need for a pre-booking readiness check without leaving the screen. This includes:
Booking payment status
Redemption status
Session time
Resources and guest counts per resource
Associated products
Other items in the same booking
It also displays waivers (complete or incomplete) where applicable. Staff can mark the session as Ready to start, navigate to the full booking, or redeem tickets directly from the panel.
To access the panel:
From POS, select Capacity in the left-side menu.
Select any booking on the grid. The panel will pop out from the right.
Select Go to booking to see the full booking, or X at the top right to go back to capacity view.
.png)
To learn more, see the guide Get started with POS capacity view.
Create a booking directly from POS capacity view (on request)
Plan: All
Preview release (Playground): No
Target release: Tuesday, 25 August 2026 (AET)
Find a free time slot, pick a resource and create the booking without leaving POS capacity view. For venues that book by resource (eg bowling lanes, axe throwing bays, escape rooms, karting), it's a faster path from guest request to confirmed booking.
This feature is on request only. If you would like to switch this on for your venue, contact your customer success manager or the support team.
Select a spot on the capacity view grid, or drag across an area when the booking spans multiple resources or time slots.
The selection follows the product rules the resource covers, so it won’t extend to resources or times outside how they’re set up.
For example, dragging along a row of bowling lanes snaps to each lane’s bookable increments, or dragging across a party room selects only the one-hour blocks that room is sold in. Once the selection is made, a booking panel opens with the resources locked to what was chosen and prompts you to complete the booking.
From there it follows the standard POS flow: choose tickets, configure and add packages, then take payment. Minimize the cart at any point to keep capacity view visible while other selections are made.
Watch the process in action in the interactive demo below.
Food and beverage
Split tabs and card pre-authorization move out of beta
Plan: Premium+
Preview release (Playground): Yes
Target release: Tuesday, 25 August 2026 (AET)
Two features for venues with busy food and beverage areas or group bookings are now out of beta:
Card pre-authorization: lets you hold a card against a booking up front, so the group can keep ordering through the session.
Split tabs: lets you divide the bill across multiple tabs, each paid separately, without creating separate bookings so your reporting stays clean.
These features help keep your staff and guests happy during service by allowing for quick ordering of items when adding to tabs, the ability to move items between guests and flexibility around paying separately within a group.
Pre-authorization also provides assurance that each booking’s revenue is fully captured every time.
Tipping is also handled at the card terminal, so guests can select their tip amount while paying with their pre-authorized card.
To learn more, see the guides Take card pre-authorization for tabs at POS and Use split tabs in POS for managing group orders.
Kitchen display system (KDS) printing improvements coming next month
Plan: Premium+
Preview release (Playground): No
Target release: Tuesday, 22 September 2026 (AET)
We’ve updated how kitchen printing works to match how physical dockets print. Pilot and new venues have used this workflow for the last few months, and all venues using Fresh KDS switch over next month.
The key changes are:
You’re able to control when orders are sent to the kitchen by “printing” the item to the KDS screen.
Reprints are now treated as new orders with a clear “reprint” label displayed.
If you use Fresh KDS at your venue, take note of the kitchen printing changes coming in the September release.
What problem does the new workflow solve?
Venues using Fresh KDS display screens to manage their kitchens are running into a few gaps with how orders are printed and updated:
Online checkout and Venue Manager orders are not sent to FreshKDS.
For example, if a guest books a party package two weeks in advance that includes five pizzas, there’s no way to send these to the kitchen on the day of the party.Order changes were automatically synced to KDS without indication the item changed.
If a staff member updates an item that requires kitchen action, such as changing a chicken burger to a beef burger, there is no notification it’s been already updated in Fresh KDS.Irrelevant updates create noise.
Non-kitchen updates are pushed to the display, which can create confusion. For example, adding a note that a customer is running late may appear on the kitchen screen even though no action is required.
The new workflow lets you send items to the kitchen later at a time you choose (eg for future bookings). This update will also remove issues in the current workflow where booking edits are updated in the kitchen display without being flagged as changed.
Other enhancements include being able to sync the order status from the kitchen to POS devices throughout the venue. When guests ask about their order, POS staff can update them without needing to check with the kitchen.
From POS or Venue Manager, printing (or reprinting) to KDS will be the single way to send items to the kitchen display.
To learn more, see the guide Order fulfilment with KDS.
Pricing and promotions
Apply price rules to packages
Plan: All
Preview release: Yes
Target release: Tuesday, 25 August 2026 (AET)
Packages now support price rules — including early bird, time-based and quantity-based rules — giving you the same pricing flexibility already available across session passes, standard passes and party packages.
To get started:
From Venue Manager, go to Products > Price rules and create an early bird, time-based or quantity-based rule.
Open your package product, scroll to the Price rule section, and select your rule from the drop-down.
Price rules are available when the package product includes a single standard or session pass at a quantity of one.
Price rules apply to the session or standard pass in the package only — inclusion prices (food, drinks, merch) stay the same across all tiers.
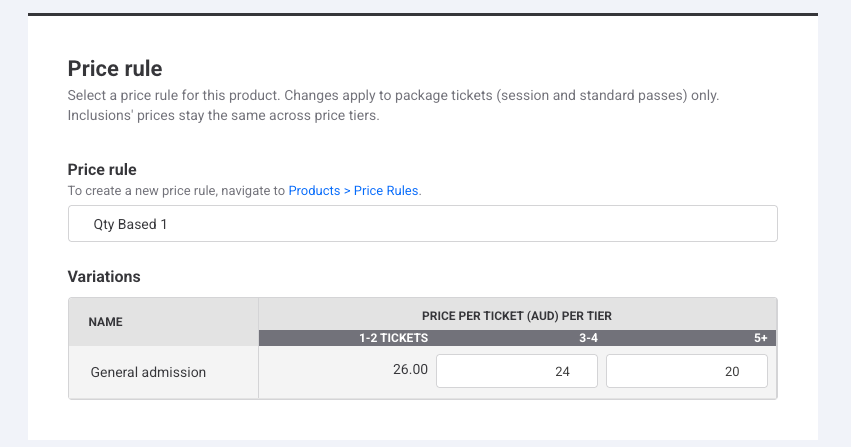
To learn more, see Get started with price rules.
Control who can change price rules on HQ products
Plan: HQ
Preview release: No
Target release: 25 August 2026 (AET)
You can now stop managed venues from changing or removing any price rule applied to an HQ product. Previously, a venue could take the HQ rule off a product or swap it for a different one, which left that product sitting outside your group’s pricing structure.
The split is by ownership. HQ owns the pricing structure on the products it creates, meaning the rule and the fact it’s attached. Venues still own their local price points within that structure.
This is managed through HQ permissions rather than a setting on the product. To restrict it:
From HQ, go to Venues > Permissions and open the permission group assigned to the relevant venues.
Under Products, clear Can change price rules on HQ products.
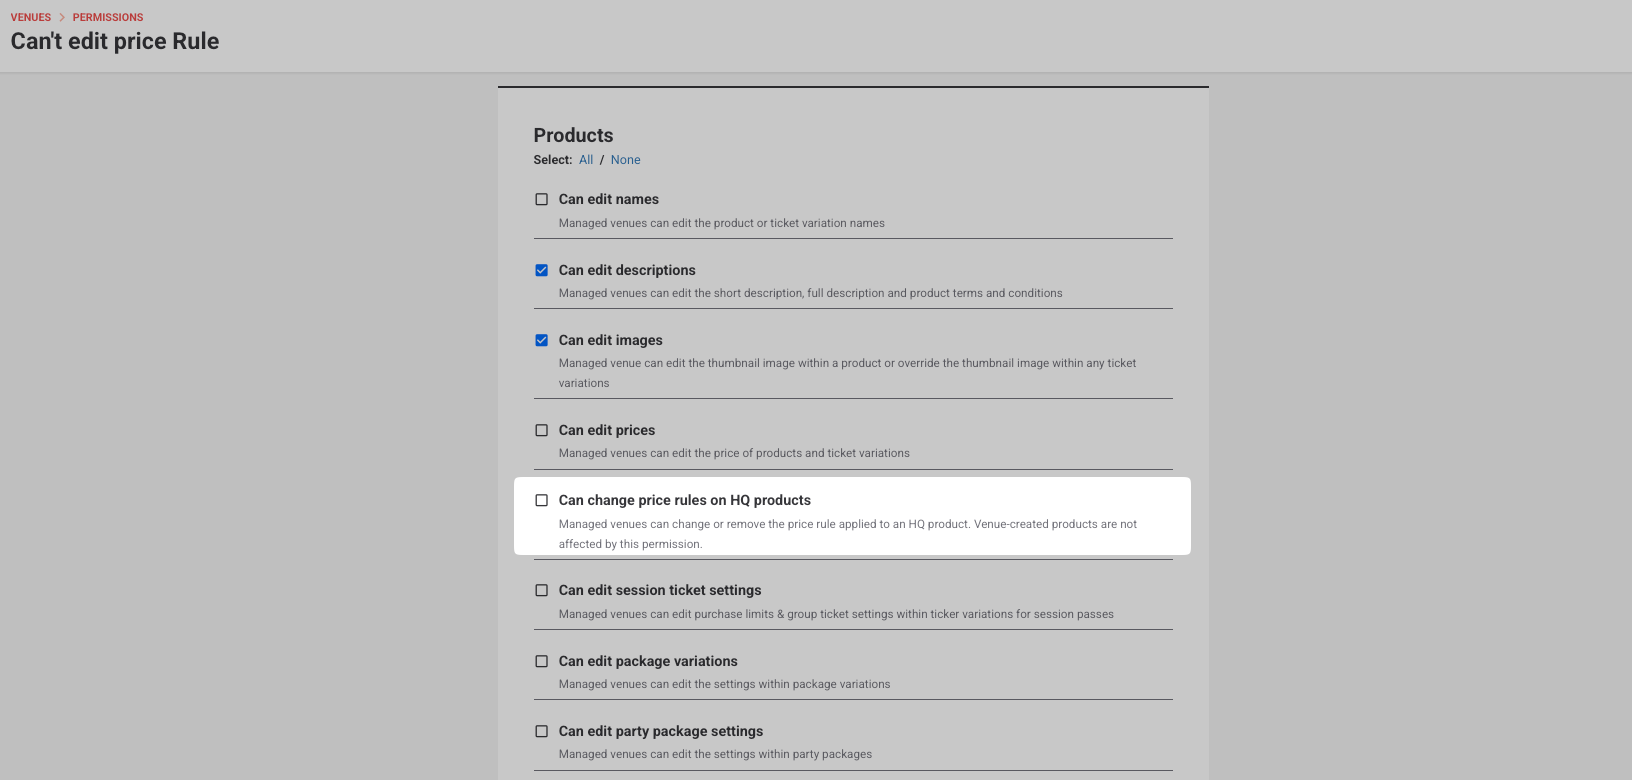
At the managed venue, the price rule drop-down on the product is then no longer available.
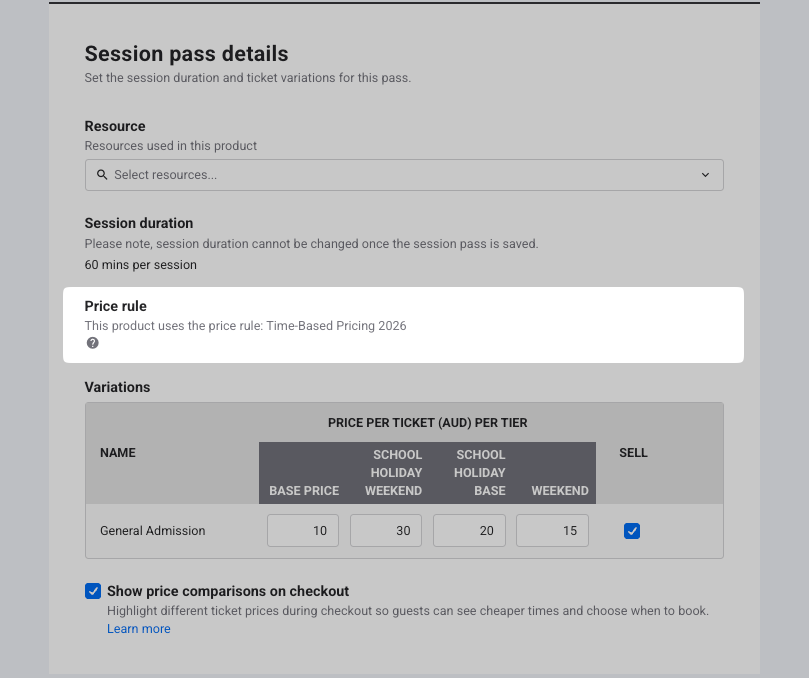
To learn more, see Get started with price rules.
New products start with a weekday and weekend price rule
Plan: All
Preview release: No
Target release: 25 August 2026 (AET)
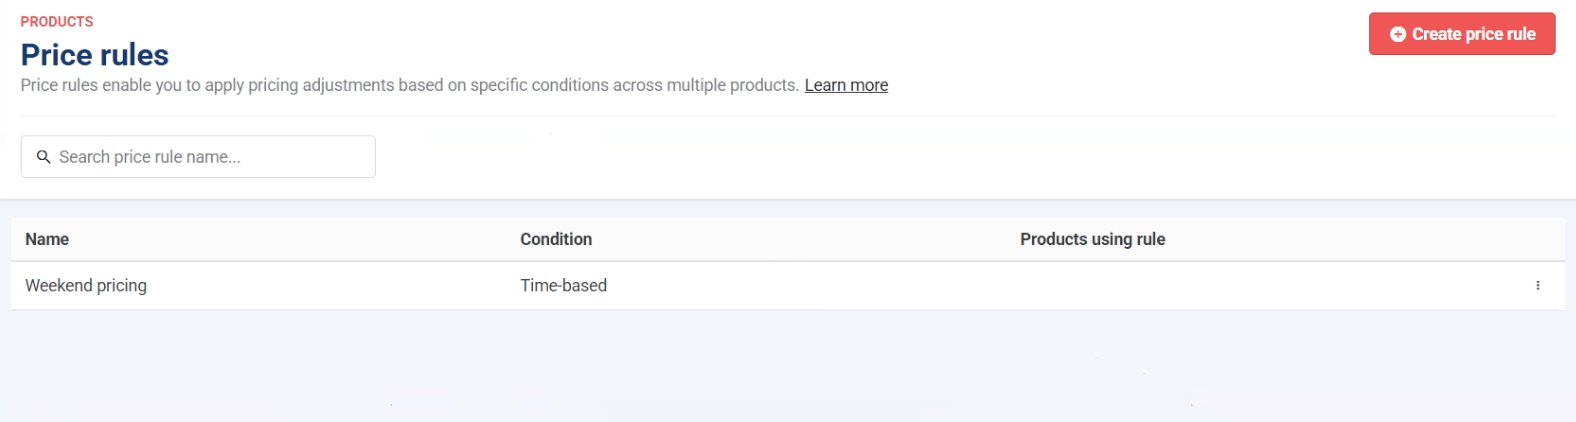
If your venue doesn’t have any price rules set up, you now get one created for you, called Weekend pricing. Every day sits at base price except Saturday and Sunday, which you price separately.
It’s there as a starting point. When you set up a product and reach the pricing section, you can select it, adjust the days and prices to suit your venue, or leave it unused.
The rule is created for you, but it isn’t applied to your products automatically. You choose it from the Price rule drop-down when setting up a product. Available in English-speaking locales only.
To learn more, see our guide Get started with price rules.
Use product tags to apply discounts to products and memberships
Plan: All
Preview release (Playground): Yes
Target release: Tuesday, 25 August 2026 (AET)
For venues running memberships or large F&B and retail ranges, updating discounts product by product is time-consuming, and it’s easy to miss a product or variation. If you already use tags to manage products across POS or online checkouts, this will feel familiar. You can now target a discount to a product tag instead of selecting products individually, on both discount codes and membership discounts. Because tags sit at the parent product level, any new variations are picked up automatically. This feature is HQ supported, including cross-venue memberships.
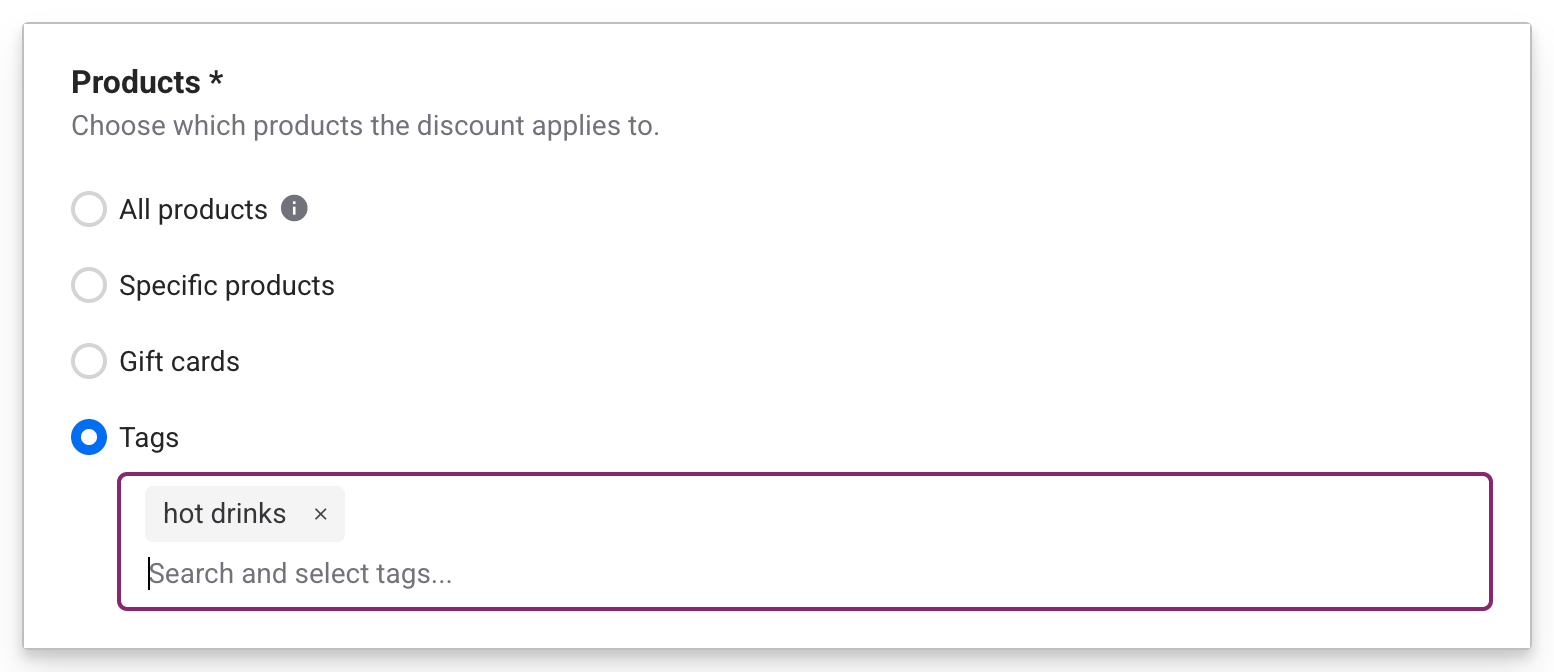
This works in two places: discount codes, from the discount setup page, and membership discounts, from the product configuration page. Both let you combine specific products and tags in the same discount, and tags can be created on the fly from either screen.
To get started:
From Venue Manager, check your product tags and adjust the way they group products the way you want to discount them.
For a discount code, open the discount and choose tags instead of, or alongside, specific products.
For a membership discount, open the membership product’s discount section and add tags there.
Select Save. Now, any product carrying that tag, including variations added in future has the discount code applied.
To learn more, see the guide Use product tags to apply discounts.
Multi-pass
Sell multi-passes for repeat visits
Plan: All
Preview release (Playground): Yes
Target release: 25 August 2026 (AET)
Multi-passes let you sell a bundle of session passes that guests redeem over several visits. It gives you an option between a single visit and a membership, so you can encourage guests to come back without asking them to commit to a recurring plan. For example, a family buys a five-visit jump pack once, then redeems a visit each time they come in.
Multi-passes are now available to all venues.
To get started:
From Venue Manager, go to Products > Create product and select Multi-pass.
In Multi-pass details, set the Quantity. This is how many sessions a guest can redeem with the pass, and it can’t be changed once the pass is saved.
Under Variations, add a variation for each option you want to sell, such as an adult pack and a child pack. Choose a session pass via the Product search, then set the Price per pass. This is the price of the whole pass, not the price of a single session.
.png)
In Availability, set when the pass is on sale, then set a Valid period for how long guests can use it after they buy it.
.png)
Add the multi-pass to your online checkout and POS templates so it’s ready to sell.
Guests can buy a multi-pass online, at POS or through Venue Manager, and the pass links to the booking holder’s email address. When they book a session covered by the pass, the visit is deducted automatically and the balance updates. Guests can check their remaining visits and expiry date in their online account.
To learn more, see Create multi-pass products.
Track multi-pass sales and redemptions
Plan: All
Preview release (Playground): No
Target release: 25 August 2026 (AET)
A multipass is sold once but used across several visits, so sales figures alone don’t show whether guests are coming back to redeem what they bought. The new Multipass activity dashboard puts the data side by side.
From Venue Manager, go to Analytics > Dashboards and select Multipass activity.
Choose a date range and you’ll see two views:
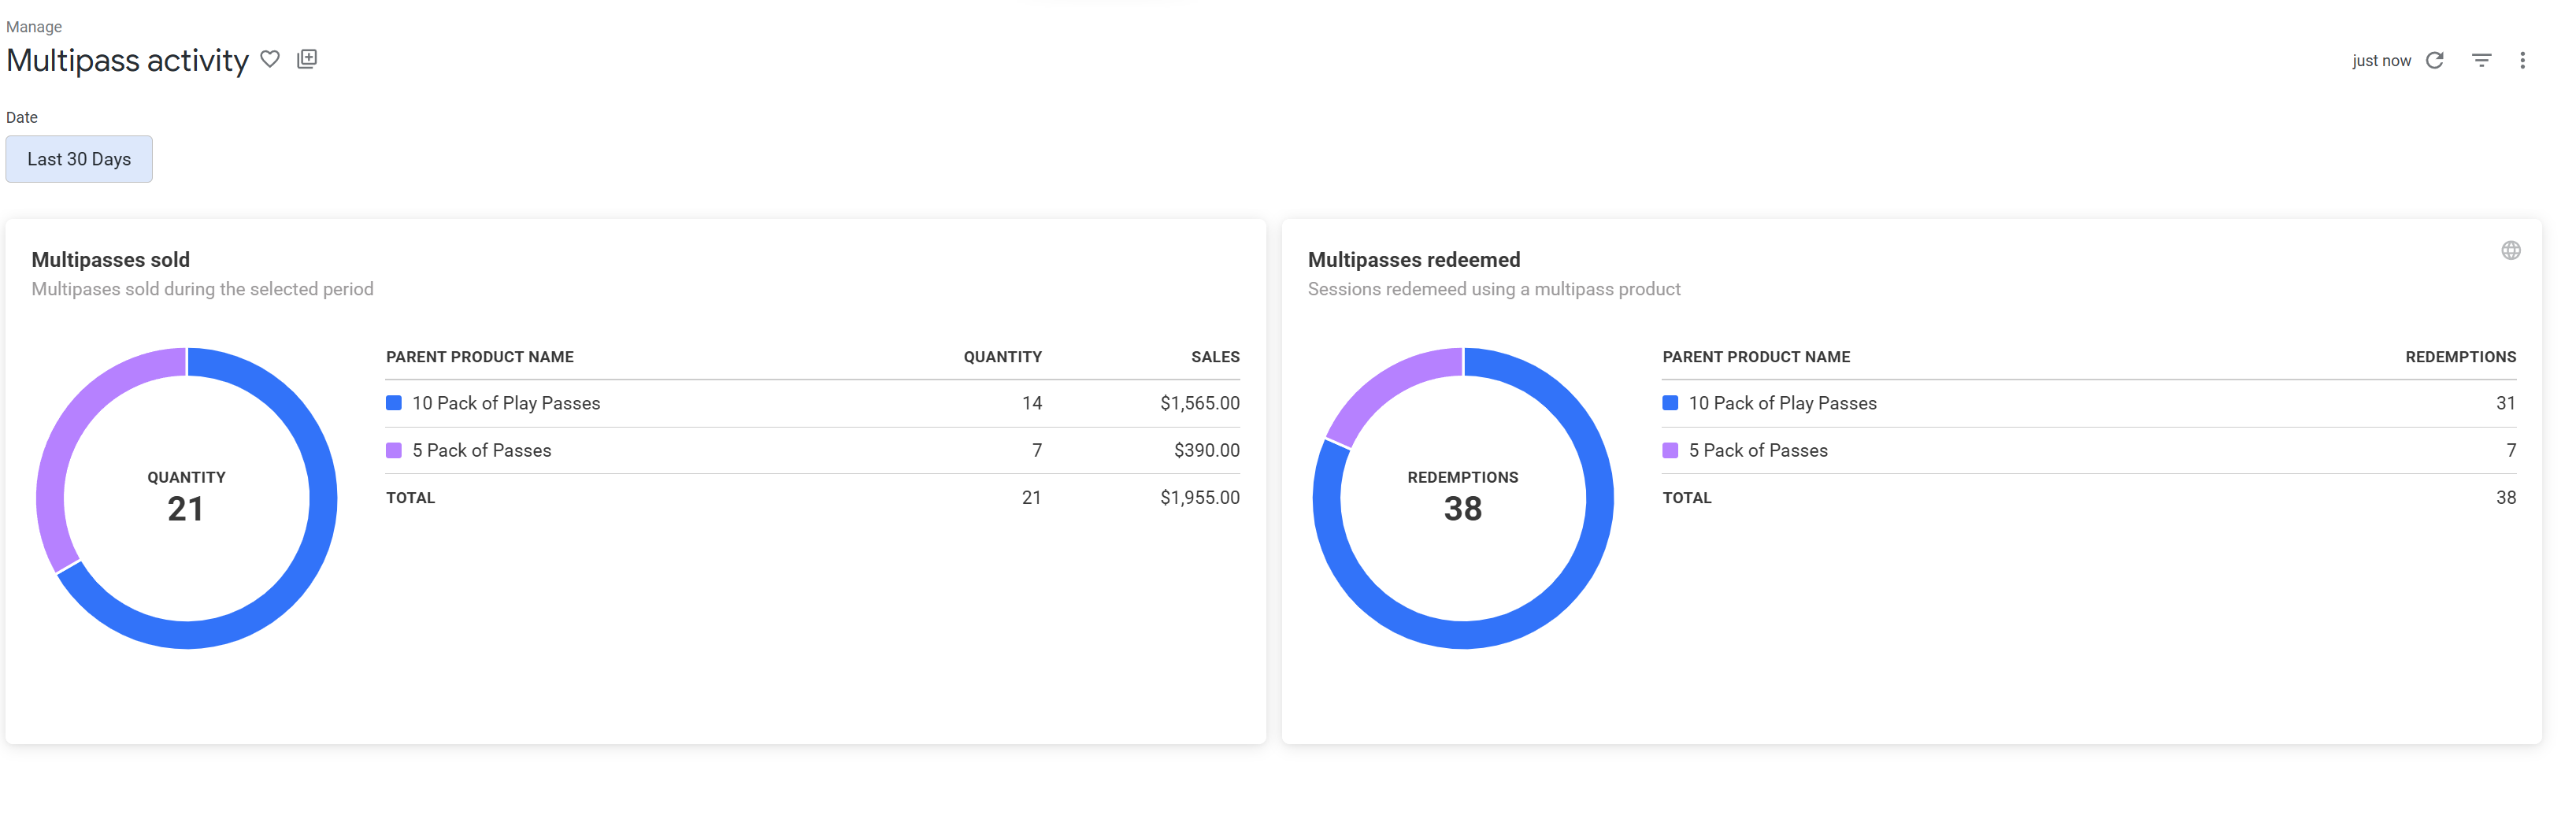
Multipasses sold shows the number of passes sold and the revenue for each product.
Multipasses redeemed shows the number of individual session redemptions against those passes — for example, selling ten 10-session passes creates up to 100 possible redemptions, tracked as they’re used over time. Both views break down by product, so you can see how a 5-pack is performing against a 10-pack.
Good to know:
Sold and redeemed use different units — a pack sold represents several redemptions, so don’t expect the two numbers to match directly.
The date range applies differently to each view. Multipasses sold counts passes sold in that window. Multipasses redeemed counts redemptions that happen in that window, even if the pass was sold earlier — so redemptions can outpace sales in a given period if guests are working through older passes.
Viewing analytics reports and dashboards requires the Can access Analytics permission. Administrator and manager system roles have it enabled by default. To learn more about filtering and downloading, see View and interact with visual dashboards and reports.
Products
Generate product images and descriptions with AI (on request)
Plan: All
Preview release (Playground): No
Target release: 25 August 2026 (AET)
You can now instantly generate session pass images and descriptions from just a product name. This cuts setup time for new passes by providing visuals and ready-to-edit copy in seconds.
AI generation of images and descriptions is currently only available for session passes.
To generate a description:
From Venue Manager, go to Products > Create a product > Session pass
Enter a name, session duration and other available information to help the AI provide a better result
Select the AI button next to the description field > choose a description option > select Use description
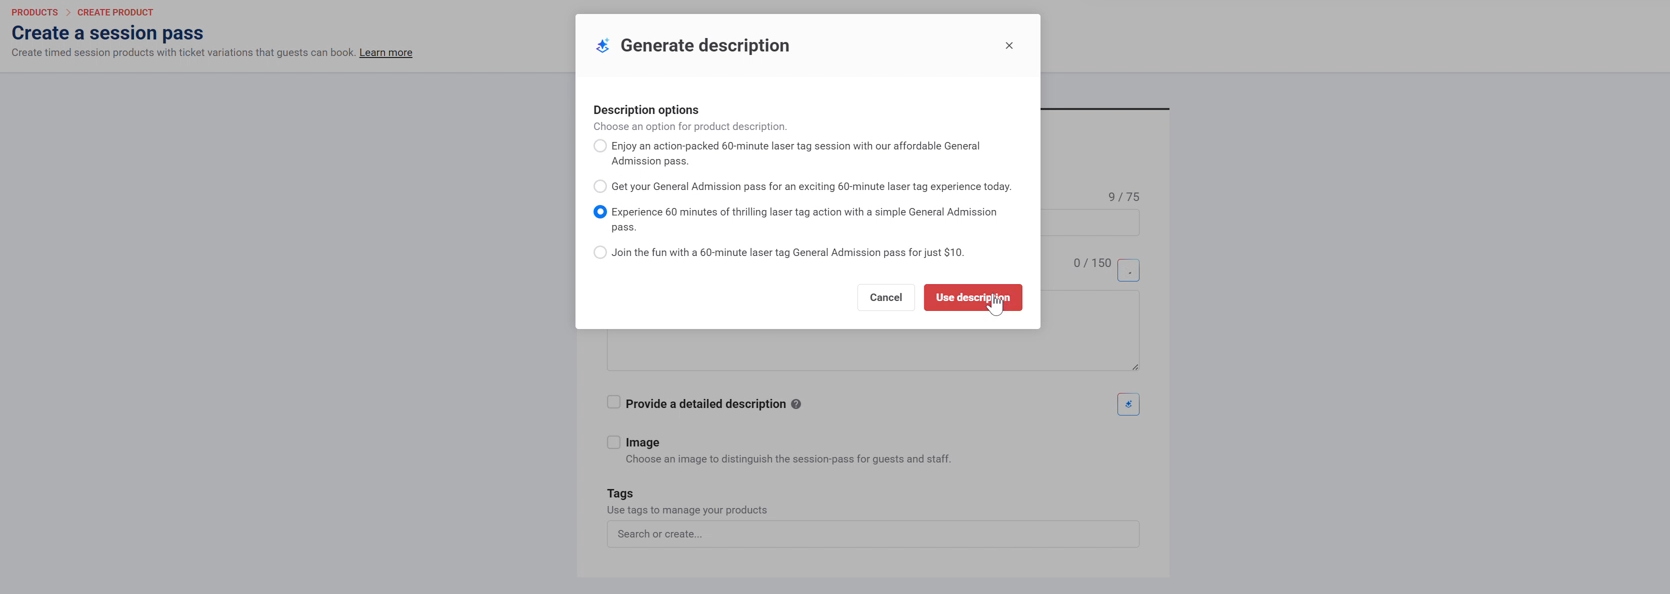
It is recommended to create a description first to ensure there is enough information to create the image. You can now:
Tick the image option > select Create one for me
Use the suggested image prompt or write your own and select an image style (graphic, realistic or illustration)
Select Generate images. You can regenerate images for more options if needed.
Once you’ve chosen an image, select Use image
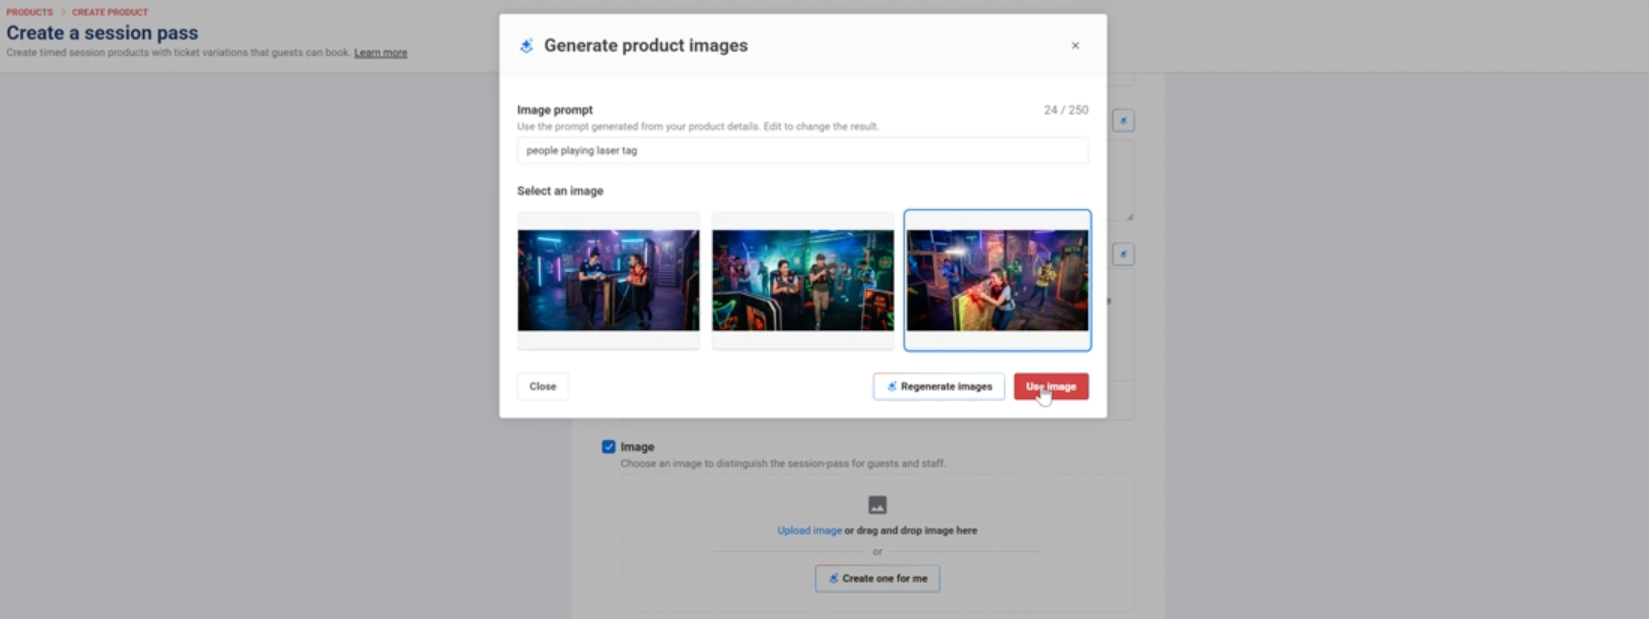
AI-generated images and descriptions is available on request. To enable it, contact your customer success manager or the support team.
Payments
Updated card surcharge rules in Australia
Plan: All, for customers in Australia
Preview release (Playground): No
Target release: N/A but all changes must be made by 1 October 2026
From 1 October 2026, card scheme rules (eg for eftpos, Mastercard, Visa, Amex, etc) ban Australian venues from adding a surcharge to card payments. Along with this change, the domestic credit card interchange cap drops from 0.80% to 0.30%. Because ROLLER uses an IC++ pricing model, these savings are passed on automatically, so your payment costs go down regardless of whether you currently surcharge.
If you currently apply additional fees to card transactions, you must remove them by 1 October 2026 to stay compliant.
To remove your card fees and surcharges, before the 1 October 2026 deadline, follow the steps below.
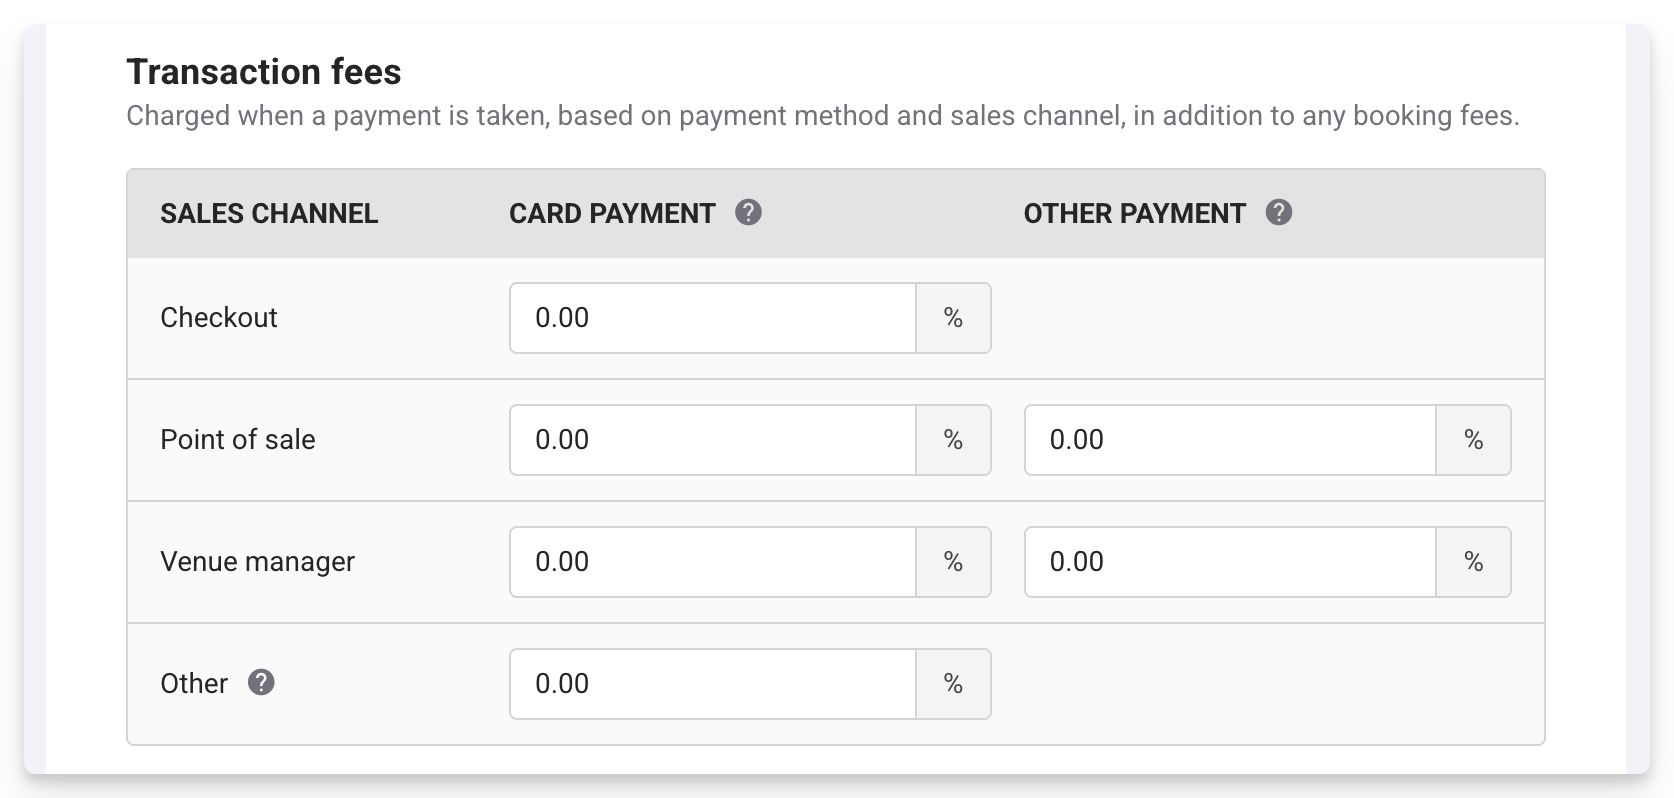
From Venue Manager, go to Settings > Account > Tax & fees.
Select the Fees tab and scroll down to Transaction fees.
Set your card transaction fees to 0% for every sales channel (ie checkout, POS, venue manager and other).
Select Save.
FAQs
Do I need to remove my card transaction fee everywhere?
Only where card surcharging is restricted by your local regulations. For Australian venues, this change applies to card payments across every sales channel from 1 October 2026.
To learn more, see the guide Adjust tax and fees.
Refund bottle deposits with the correct tax
Plan: All
Target release: Live now
If you collect deposits on bottles, which is common in some countries like Germany (Pfand), ROLLER now calculates the tax on those deposits correctly. When you refund the deposit, the tax you charged on it is reversed at the same time, so there’s nothing left to correct outside ROLLER.
This applies to any stock item set up with a negative value and tax applied, which is the usual way to handle a refundable deposit. Nothing needs setting up, so it works on the items you already have.
Loyalty
Run time-limited promotion campaigns for your loyalty program (beta)
Plan: Loyalty add-on
Preview release (Playground): No
Target release: Tuesday, 25 August 2026 (AET)
You can now run time-limited promotion campaigns that temporarily multiply rewards for a single loyalty rule or your entire program, without the need to manually change rule settings and then remember to revert them once a promotion ends. Loyalty rewards guests over time, but a well-timed promotion can turn occasional guests into regulars.
Set a multiplier, a start and end date and choose whether the promotion applies to one reward or your whole program. Guests who are signed-up to your loyalty program get an automatic email when a campaign starts, plus reminder emails while it’s running. Then, when your campaign ends, your rewards revert back to normal without having to make the change manually.
The multiplier you set as part of a promotion affects different reward types in different ways:
Points: The multiplier applies to the earn rate (eg 10 points per $ spent = 20 points per $ spent with a 2x multiplier).
Free product: The multiplier applies to the reward (eg more free products, depending on what the rule already gives).
Fixed-amount discount: The discount amount is multiplied (eg $10 = $20 with a 2x multiplier).
Redemption values always stay the same. During a campaign, only how rewards are earned or issued changes.
To get started:
From Venue Manager, go to Loyalty > Promotions.
Select Create promotion.
Give your promotion a Name.
Enter a multiplier (eg 2 for double rewards).
Set which reward type this promotion applies to: All reward types, points, free product or fixed amount discount.
Set the start date and time and the end date and time.
If the start date of the campaign is in the future, you can select Schedule and the campaign is scheduled to start on the date you’ve selected.
If the start date of the campaign is today’s date (or a past date), when you select Schedule you’ll be asked to confirm that you’d like your promotion to start immediately. Select Activate promotion to do so.
Select Save.
Your promotion will run for the duration you’ve set and all eligible loyalty guests will be included in the campaign. Once a promotion is live, it cannot be edited or changed.
To set up promotion campaigns, you need a custom role based on the administrator or manager role with the Can edit loyalty settings permission enabled. To learn more, see Create and manage staff roles and permissions.
To learn more, see the guide Set up time-limited promotion campaigns for your loyalty program.
Reduce unredeemed loyalty rewards with an expiry reminder email
Plan: Loyalty add-on
Preview release (Playground): No
Target release: Tuesday, 25 August 2026 (AET)
Guests with unredeemed loyalty rewards now get a reminder email 14 days before the reward is set to expire. This gives guests one more reason to stay engaged, return and use their rewards, so fewer rewards go unused and expire without being redeemed.
You can customize the expiry reminder email from Settings > Design > Email templates.
To learn more, see the guide How loyalty emails work.
Multi-venue
Switch venues faster and land on the same product
Plan: HQ
Preview release (Playground): No
Target release: 25 August 2026 (AET)
When you’re viewing a product in HQ and switch to a controlled venue that has the same product, you’re now taken straight to that product’s page instead of the product list. It works the same way in reverse — switching back to HQ from a product page lands you on the matching HQ product.
This saves clicks when you’re comparing how a product looks across venues, or checking its state in one venue, since you don’t have to search for it each time.
If the controlled venue doesn’t have this product yet, the redirect falls back to that venue’s product list, where you can add it.