Buy and Get offers are a great way to incentivize your guests to add more to their cart and make them feel like they've unlocked a reward. Use it to offer a “Buy 2, Get 1 Free” deal or a discounted item when a specific product is purchased.
In this guide, we’ll walk through how to create and customize a Buy and Get discount code in Venue Manager.
Percentage based, multi-use (eg 2-for-1) and flat price discounts aren’t supported for recurring membership products. To apply a discount to the first month of a recurring membership, use a fixed amount discount instead.
Create a new discount
From Venue Manager, go to Products > Discount codes > Create a discount code.
Give your discount code a name to identify it in ROLLER.
If you're creating a discount for staff, select This is a staff only discount.
Configure the details
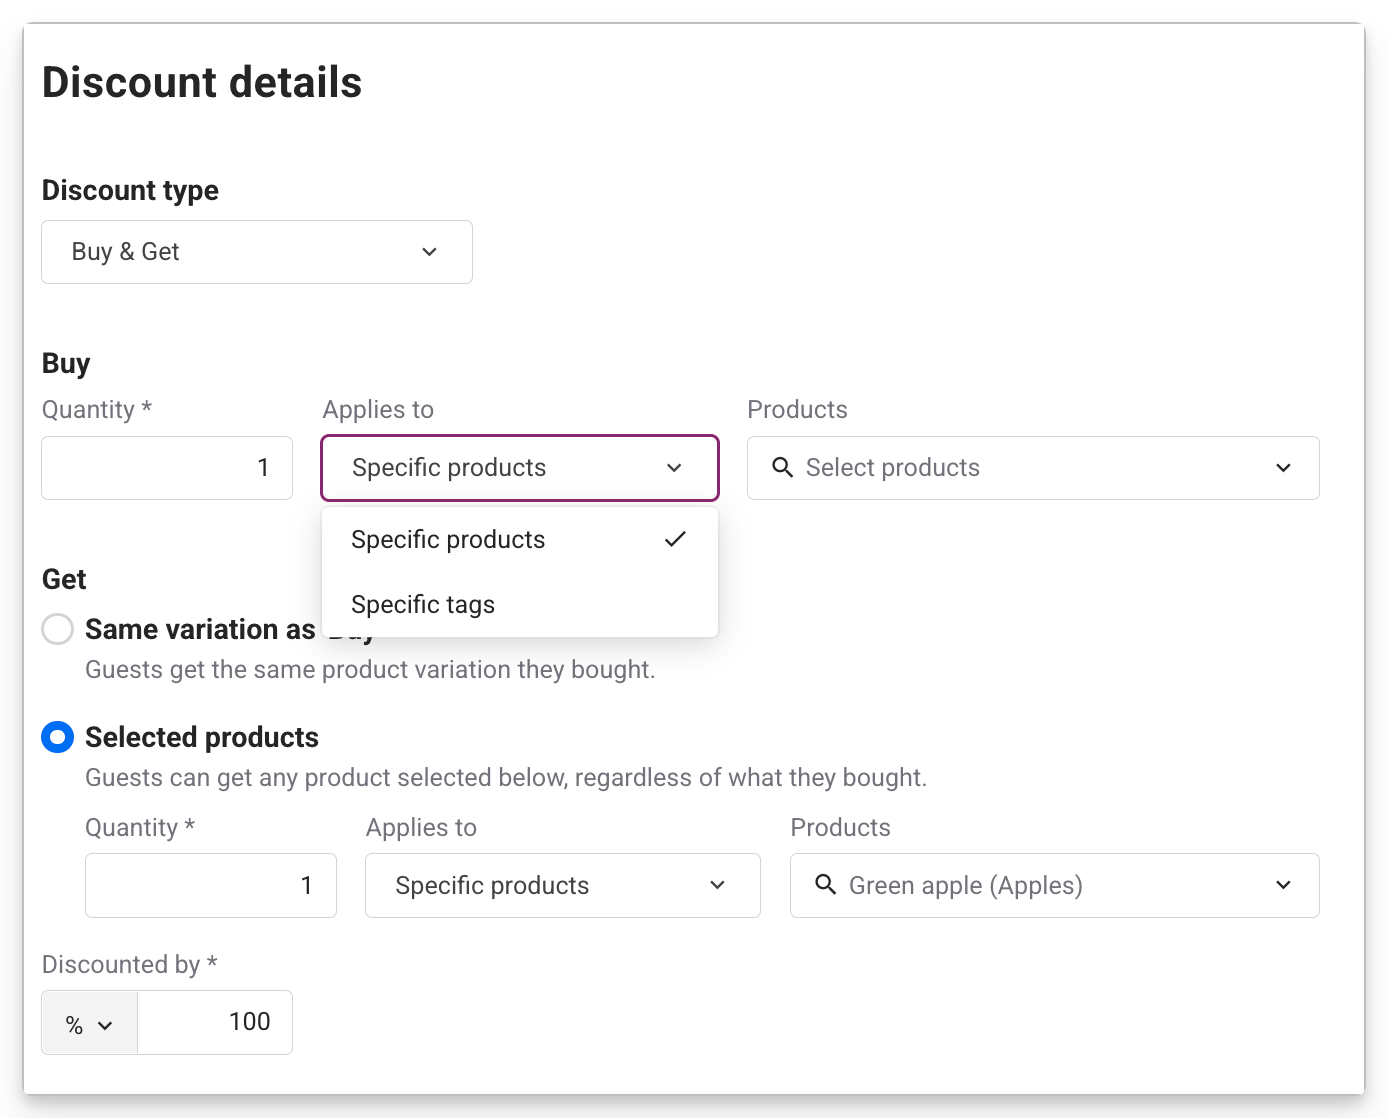
Under Discount type, select Buy & Get.
Buy and Get discounts automatically scale in the cart (eg a 2-for-1 offer scales to 4-for-2, then 8-for-4 if the guest adds the right amount of applicable products to their cart). To prevent this, set a usage limit on the discount (see the Additional options section below).
Buy: Select the product(s) and quantity a guest needs to purchase to qualify for the discount. In the drop down Applies to, select whether you want to choose Specific products (select individual products from the list) or Specific tags (apply to all products with 1 or more tags).
Get: Choose the quantity and products the guest will receive as part of the offer. If it's a like-for-like deal (eg Buy one, Get one 50% off), select Same product variation as "Buy".
Specify whether the discount is a percentage or a fixed dollar amount, then enter the discount amount that applies to the Get product. For example, if the Get product is free, you can discount by 100%.
Choose how to generate the discount code(s)
Select one method to create discount codes.
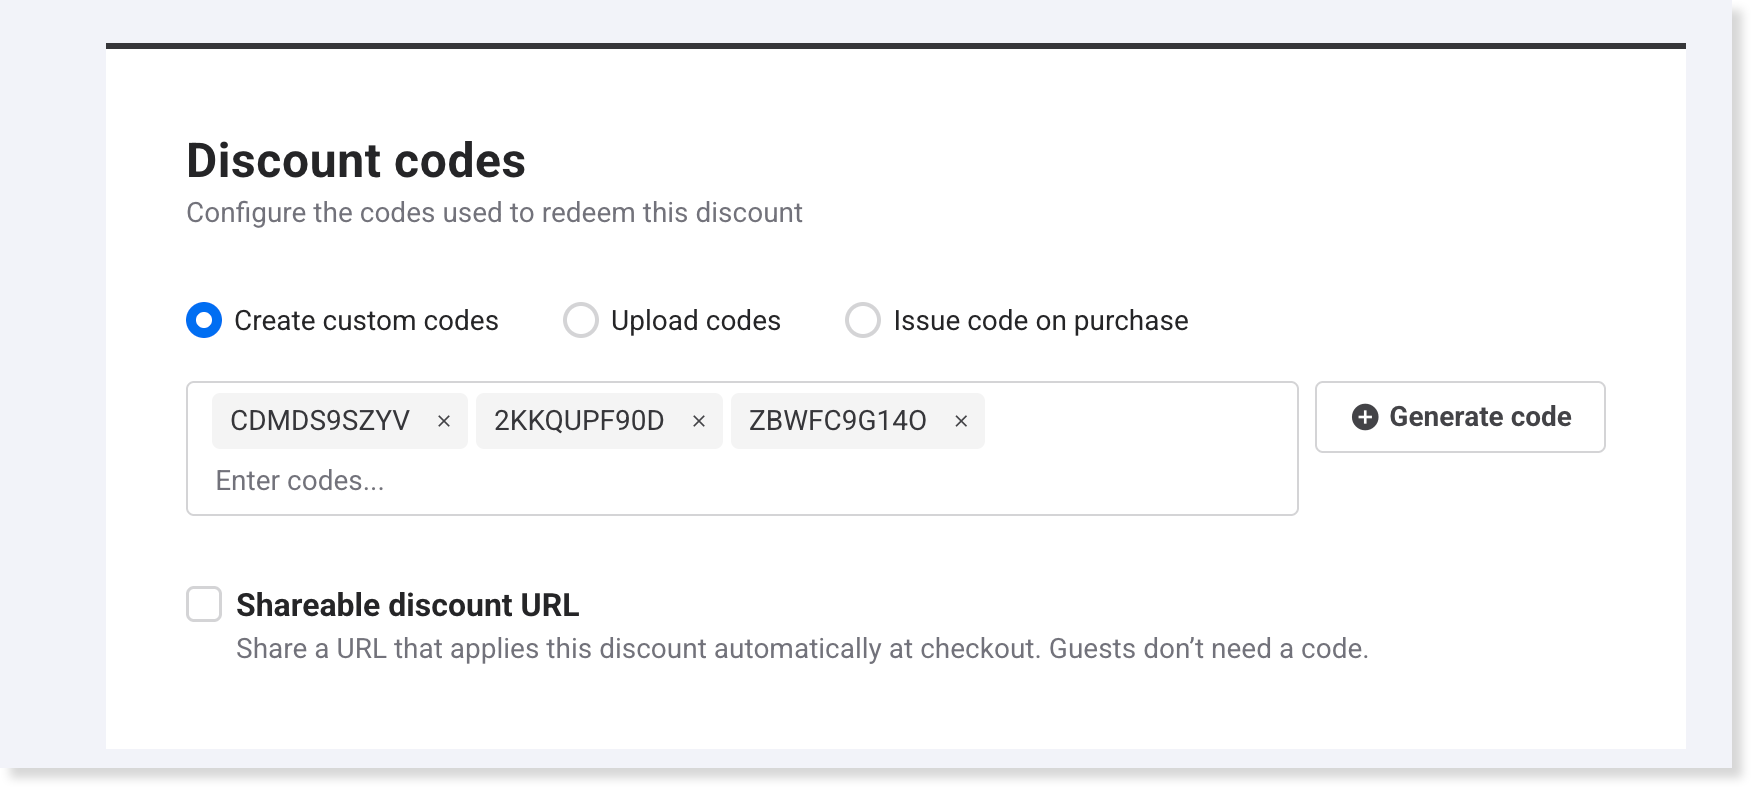
Create custom codes
Type codes manually or generate them automatically.
Manual entry: Type a code in the field and press Enter. You can add up to 1,000 codes this way. To remove a code, select the X next to it.
Auto-generate: Select Generate code to have ROLLER create unique codes automatically. Generate as many as you need.
Upload codes in bulk
Batch create up to 200,000 codes (up to 10 MB) at once using a CSV file.
Download the following file:
Open the file and replace the sample codes with your own (one column for all discount codes).
Upload the completed file.
Codes uploaded by CSV aren’t shown individually — you’ll see the total code count and a Download current codes button. To edit them, select Download current codes, change the file, then re-upload it.
Uploading a new CSV replaces all existing codes on the discount when you save — it doesn’t add to them. Always start from Download current codes and edit that file, so you don’t remove codes that are live in a promotion.
Issue code on purchase
Let ROLLER automatically create a unique discount code and issue it to guests when they purchase specific products.
When you select this option, guests receive two emails after purchase:
A discount email containing their unique discount code
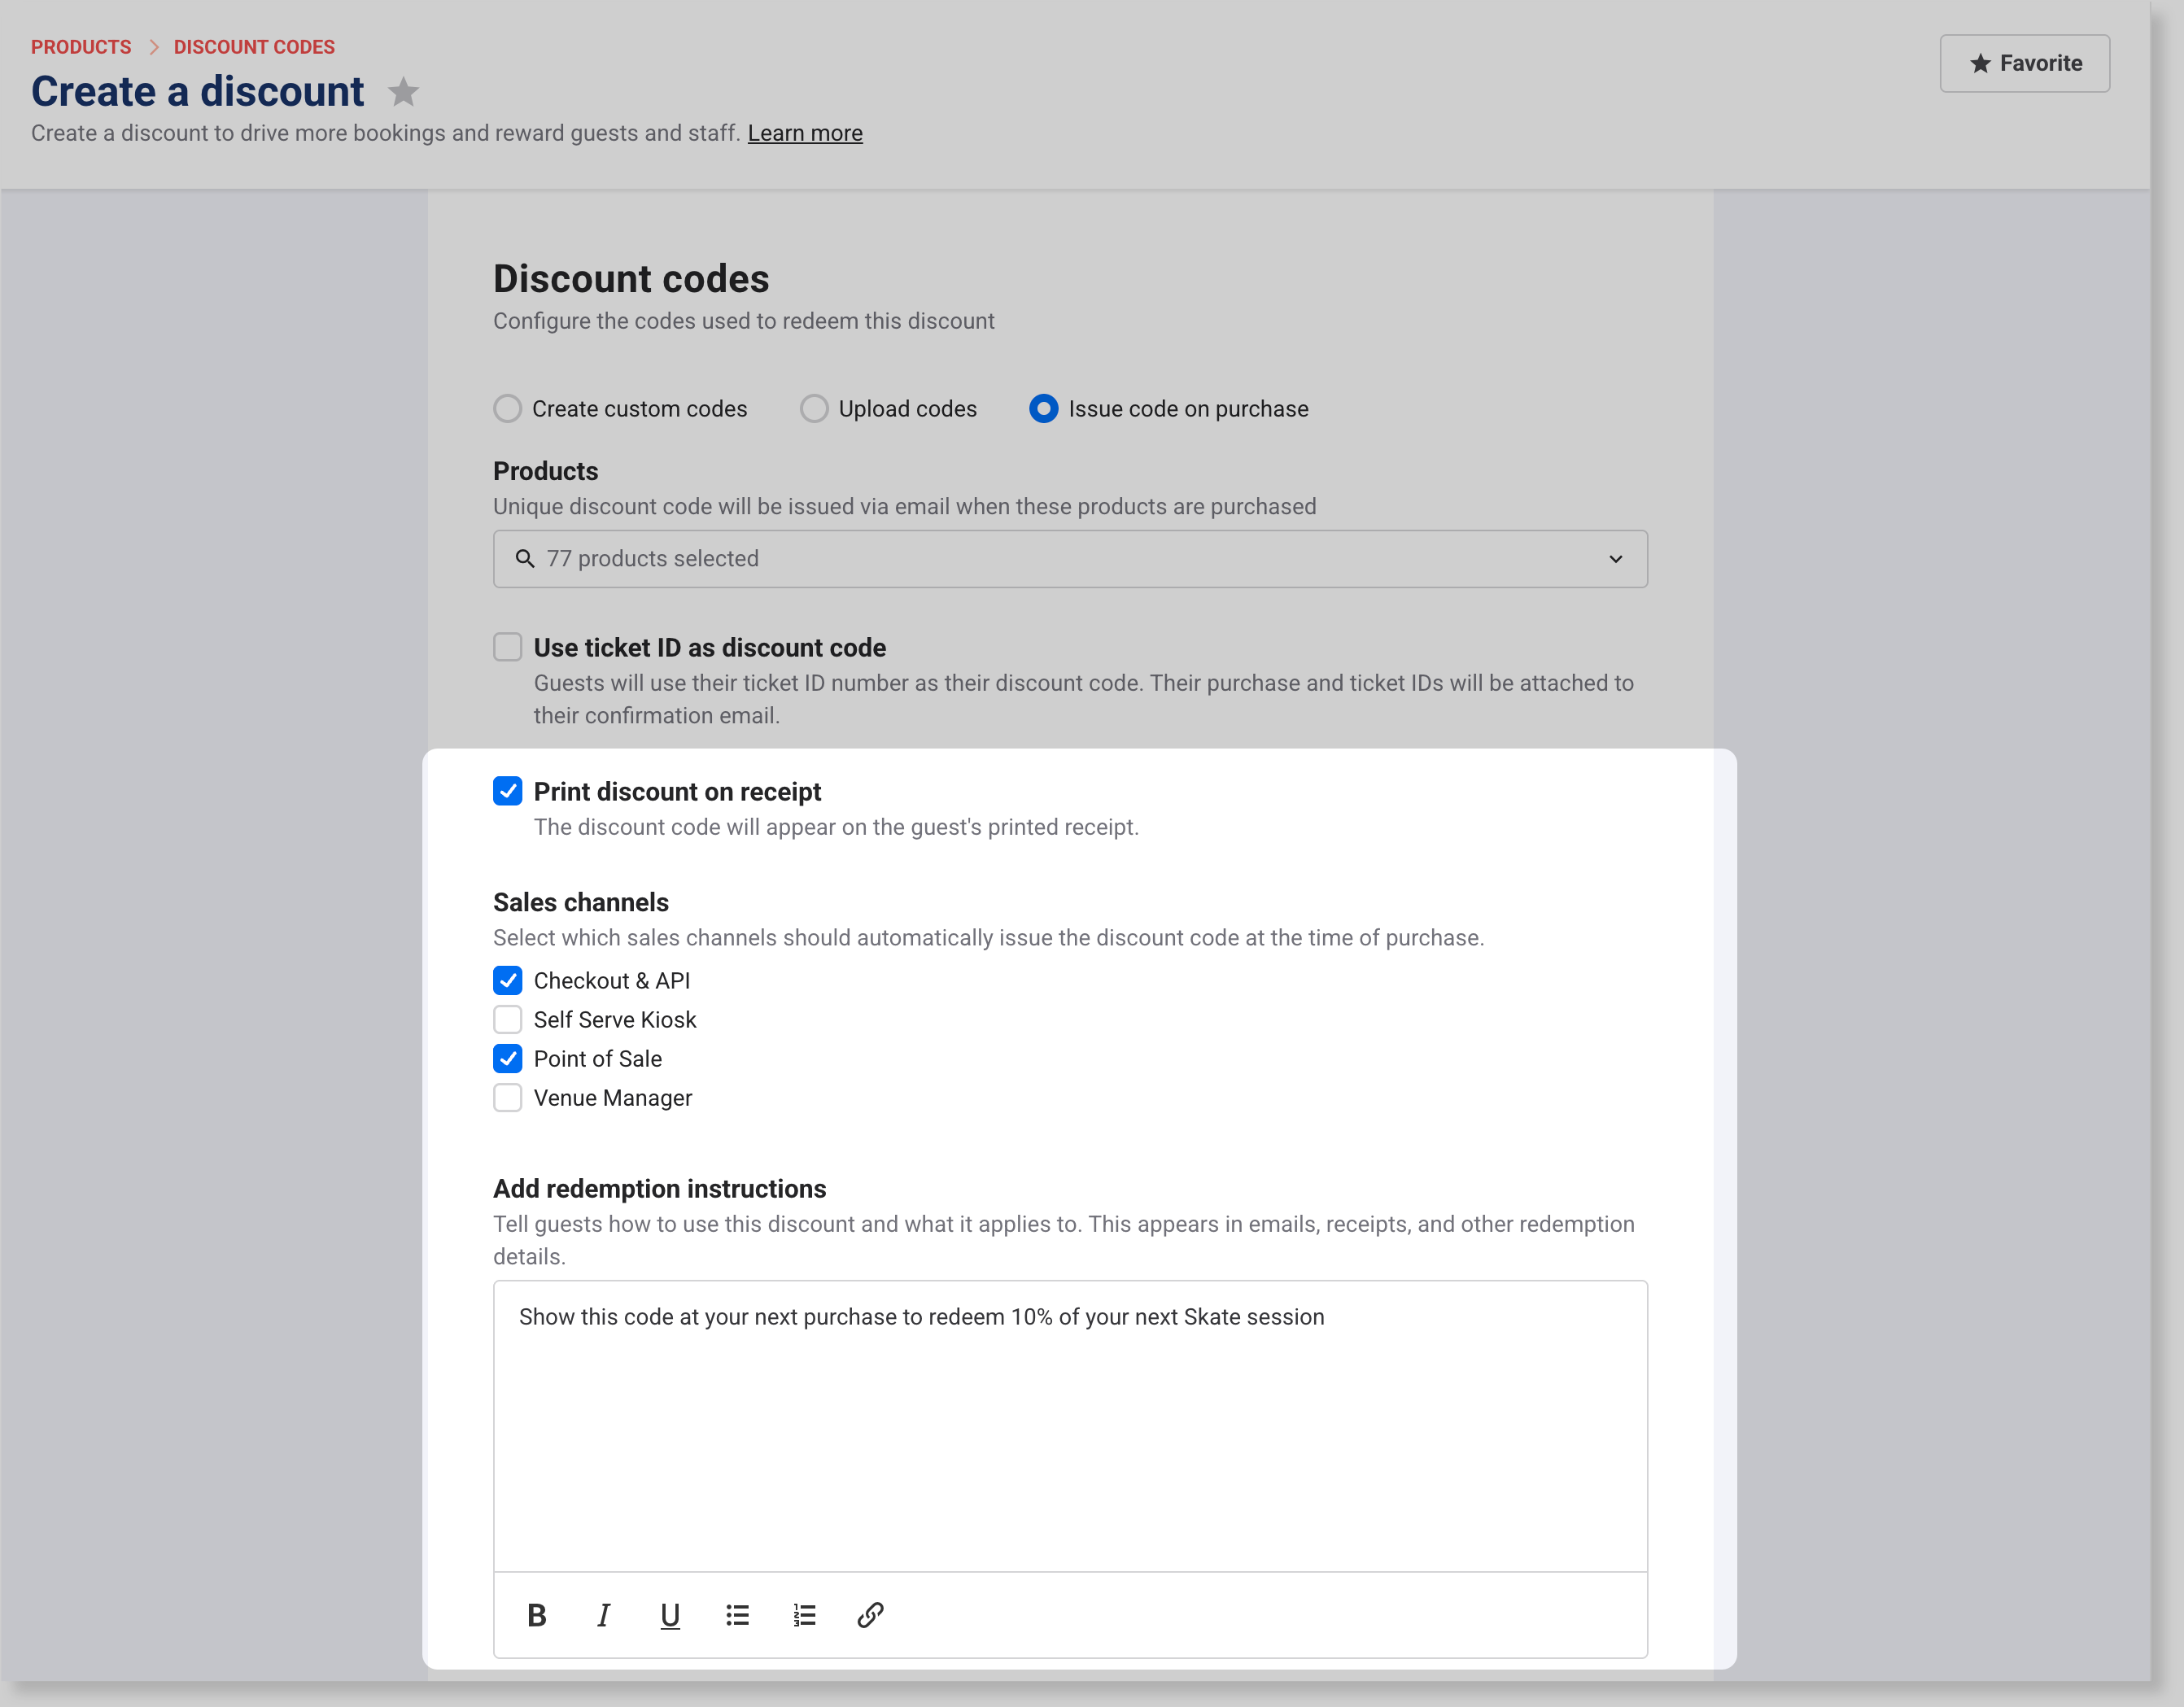
Under Products, choose which products trigger the code.
Membership products and gift cards won't appear as an option in the Products list. Also, the Shareable discount URL option below is not available for discounts set to issue codes on purchase.
Select Use ticket ID as discount code if you want guests to use their ticket ID as the code. They can only redeem on the same day they purchased the ticket. If you want guests to redeem on a different day, leave this unselected — ROLLER will generate a unique code instead.
Turn on Print discount on receipt to also print the issued code on the guest's POS receipt — including a QR code, expiry date, and the redemption instructions you add below.
Under Sales channels, choose which sales channels should automatically generate and issue the discount code at the time of purchase. This is separate from where the code can be redeemed, which you configure later under Sales channels in the availability section.
Under Add redemption instructions, describe when and how guests can use their discount. This text appears in the discount email, on the printed receipt, and in other redemption details.
Receipt printing works with cloud printing and ROLLER Connect (Windows Service and ROLLER Connect). If Receipts can be emailed from POS is enabled in your global POS settings, the issued discount code is also included in the emailed receipt PDF.
Share a discount link with guests
Shareable discount URLs are currently supported with full-page progressive checkouts. They can't be used with overlay or legacy checkouts. If your venue uses an overlay checkout, see Automatically apply discount codes in overlay checkout, which requires developer support.
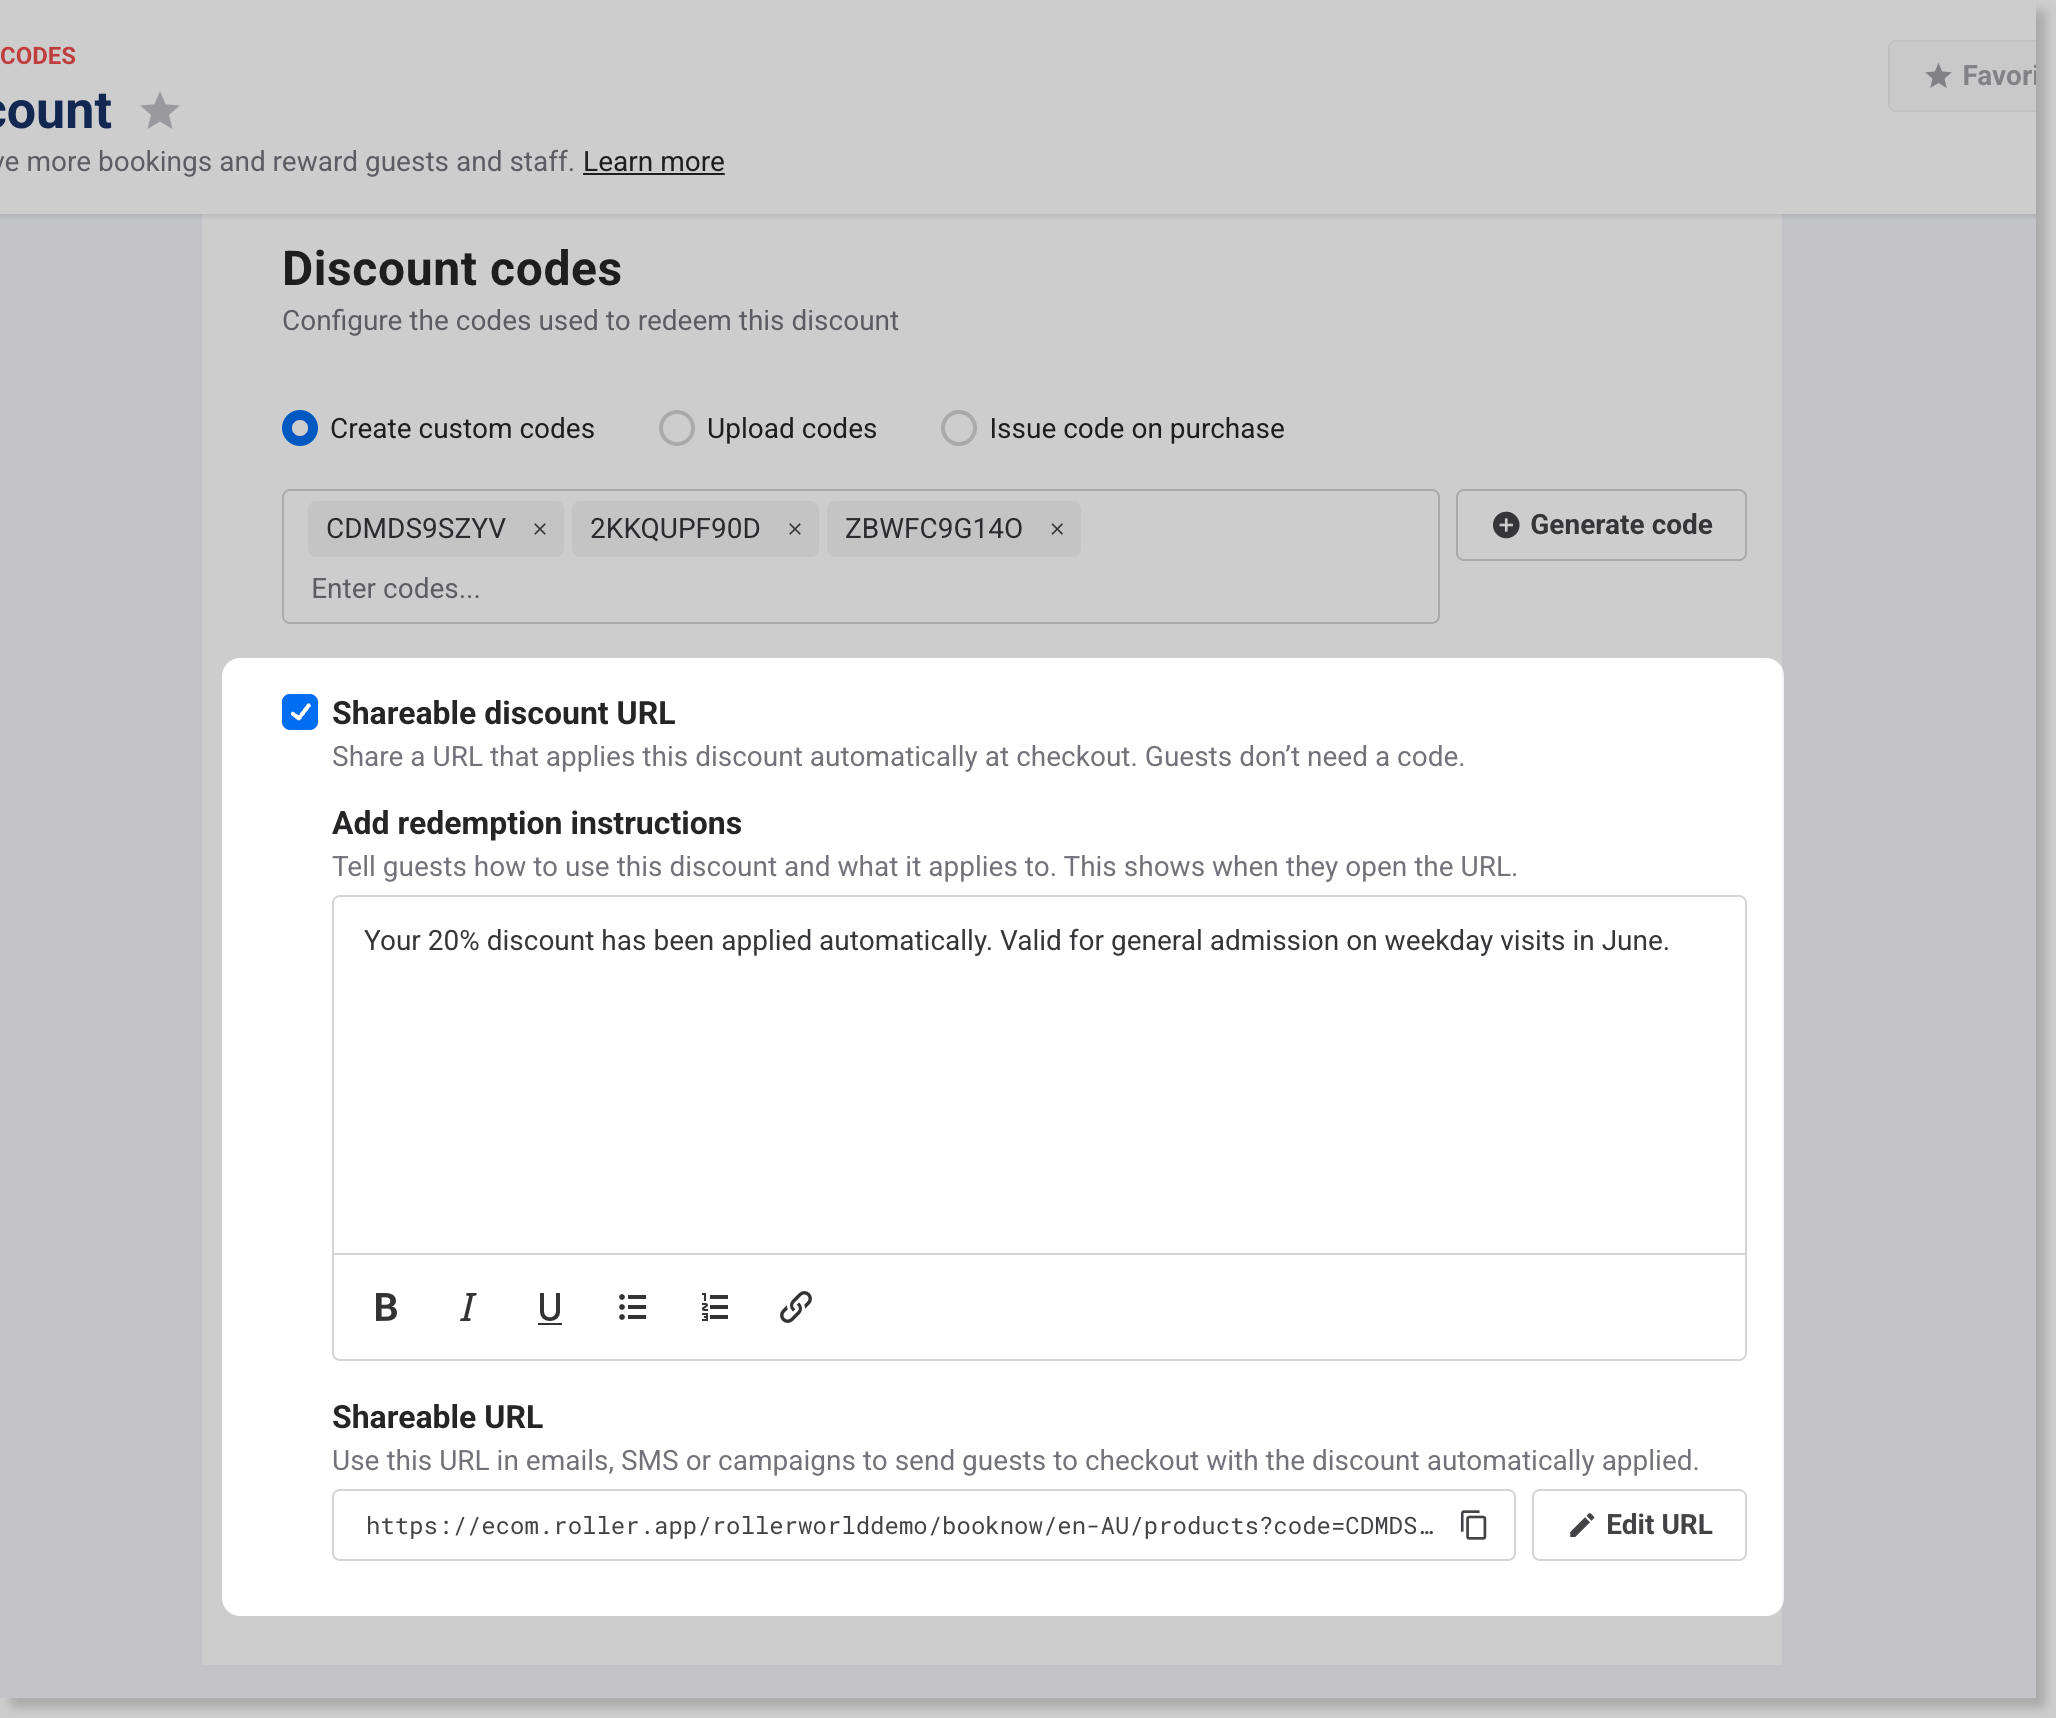
Select Shareable discount URL to generate a link that applies this discount automatically at checkout. Guests don't need to enter a code.
Under Add redemption instructions, enter the message guests will see when they open the discount link. Describe what the discount applies to and any conditions they should know. You can format your message using bold, italic, lists or links.
The URL is pre-generated using your venue's default checkout and the first discount code you created. To change either, select Edit URL:
Choose the Destination checkout — the checkout URL where the discount will apply.
Choose the Discount code to use — select from your configured codes.
Copy the Shareable discount URL.
Select Save to confirm.
You can also use the copy button next to the URL on the main page to copy it at any time. Share the URL in emails, SMS or campaigns to send guests directly to checkout with the discount pre-applied.
You can create multiple shareable URLs for different checkouts, and they'll all stay active. The checkout selector builds the link, it doesn't save a setting, so it resets to your primary checkout URL after you save. That doesn't affect any links you've already created.
Set availability
Under Availability, set when the discount can be used. For both Discount usage and Visit dates, choose Ongoing or Date range.
Discount usage
Choose when the discount can be used — for example, use before Jan 31 to get Buy 2, Get 1 Free on jump passes.
Select Ongoing to make the discount available from a start date with no end date. For example, a code that's valid from 1 February with no expiry.
Select Date range to restrict usage to specific dates, days of the week, and times of day (sessions only). For example, a code that can only be redeemed during a two-week sale period.
Visit dates
Controls the dates and times when guests must visit to redeem the discount — for example, visit on Fridays before 5 PM to get a free jump sock with every jump pass purchased.
Select Ongoing to allow visits from a start date with no end date. For example, a code that applies to any visit from 1 March onwards.
Select Date range to restrict visits to specific dates, days of the week, and times of day (sessions only). For example, a code that only applies to weekday morning sessions in March.
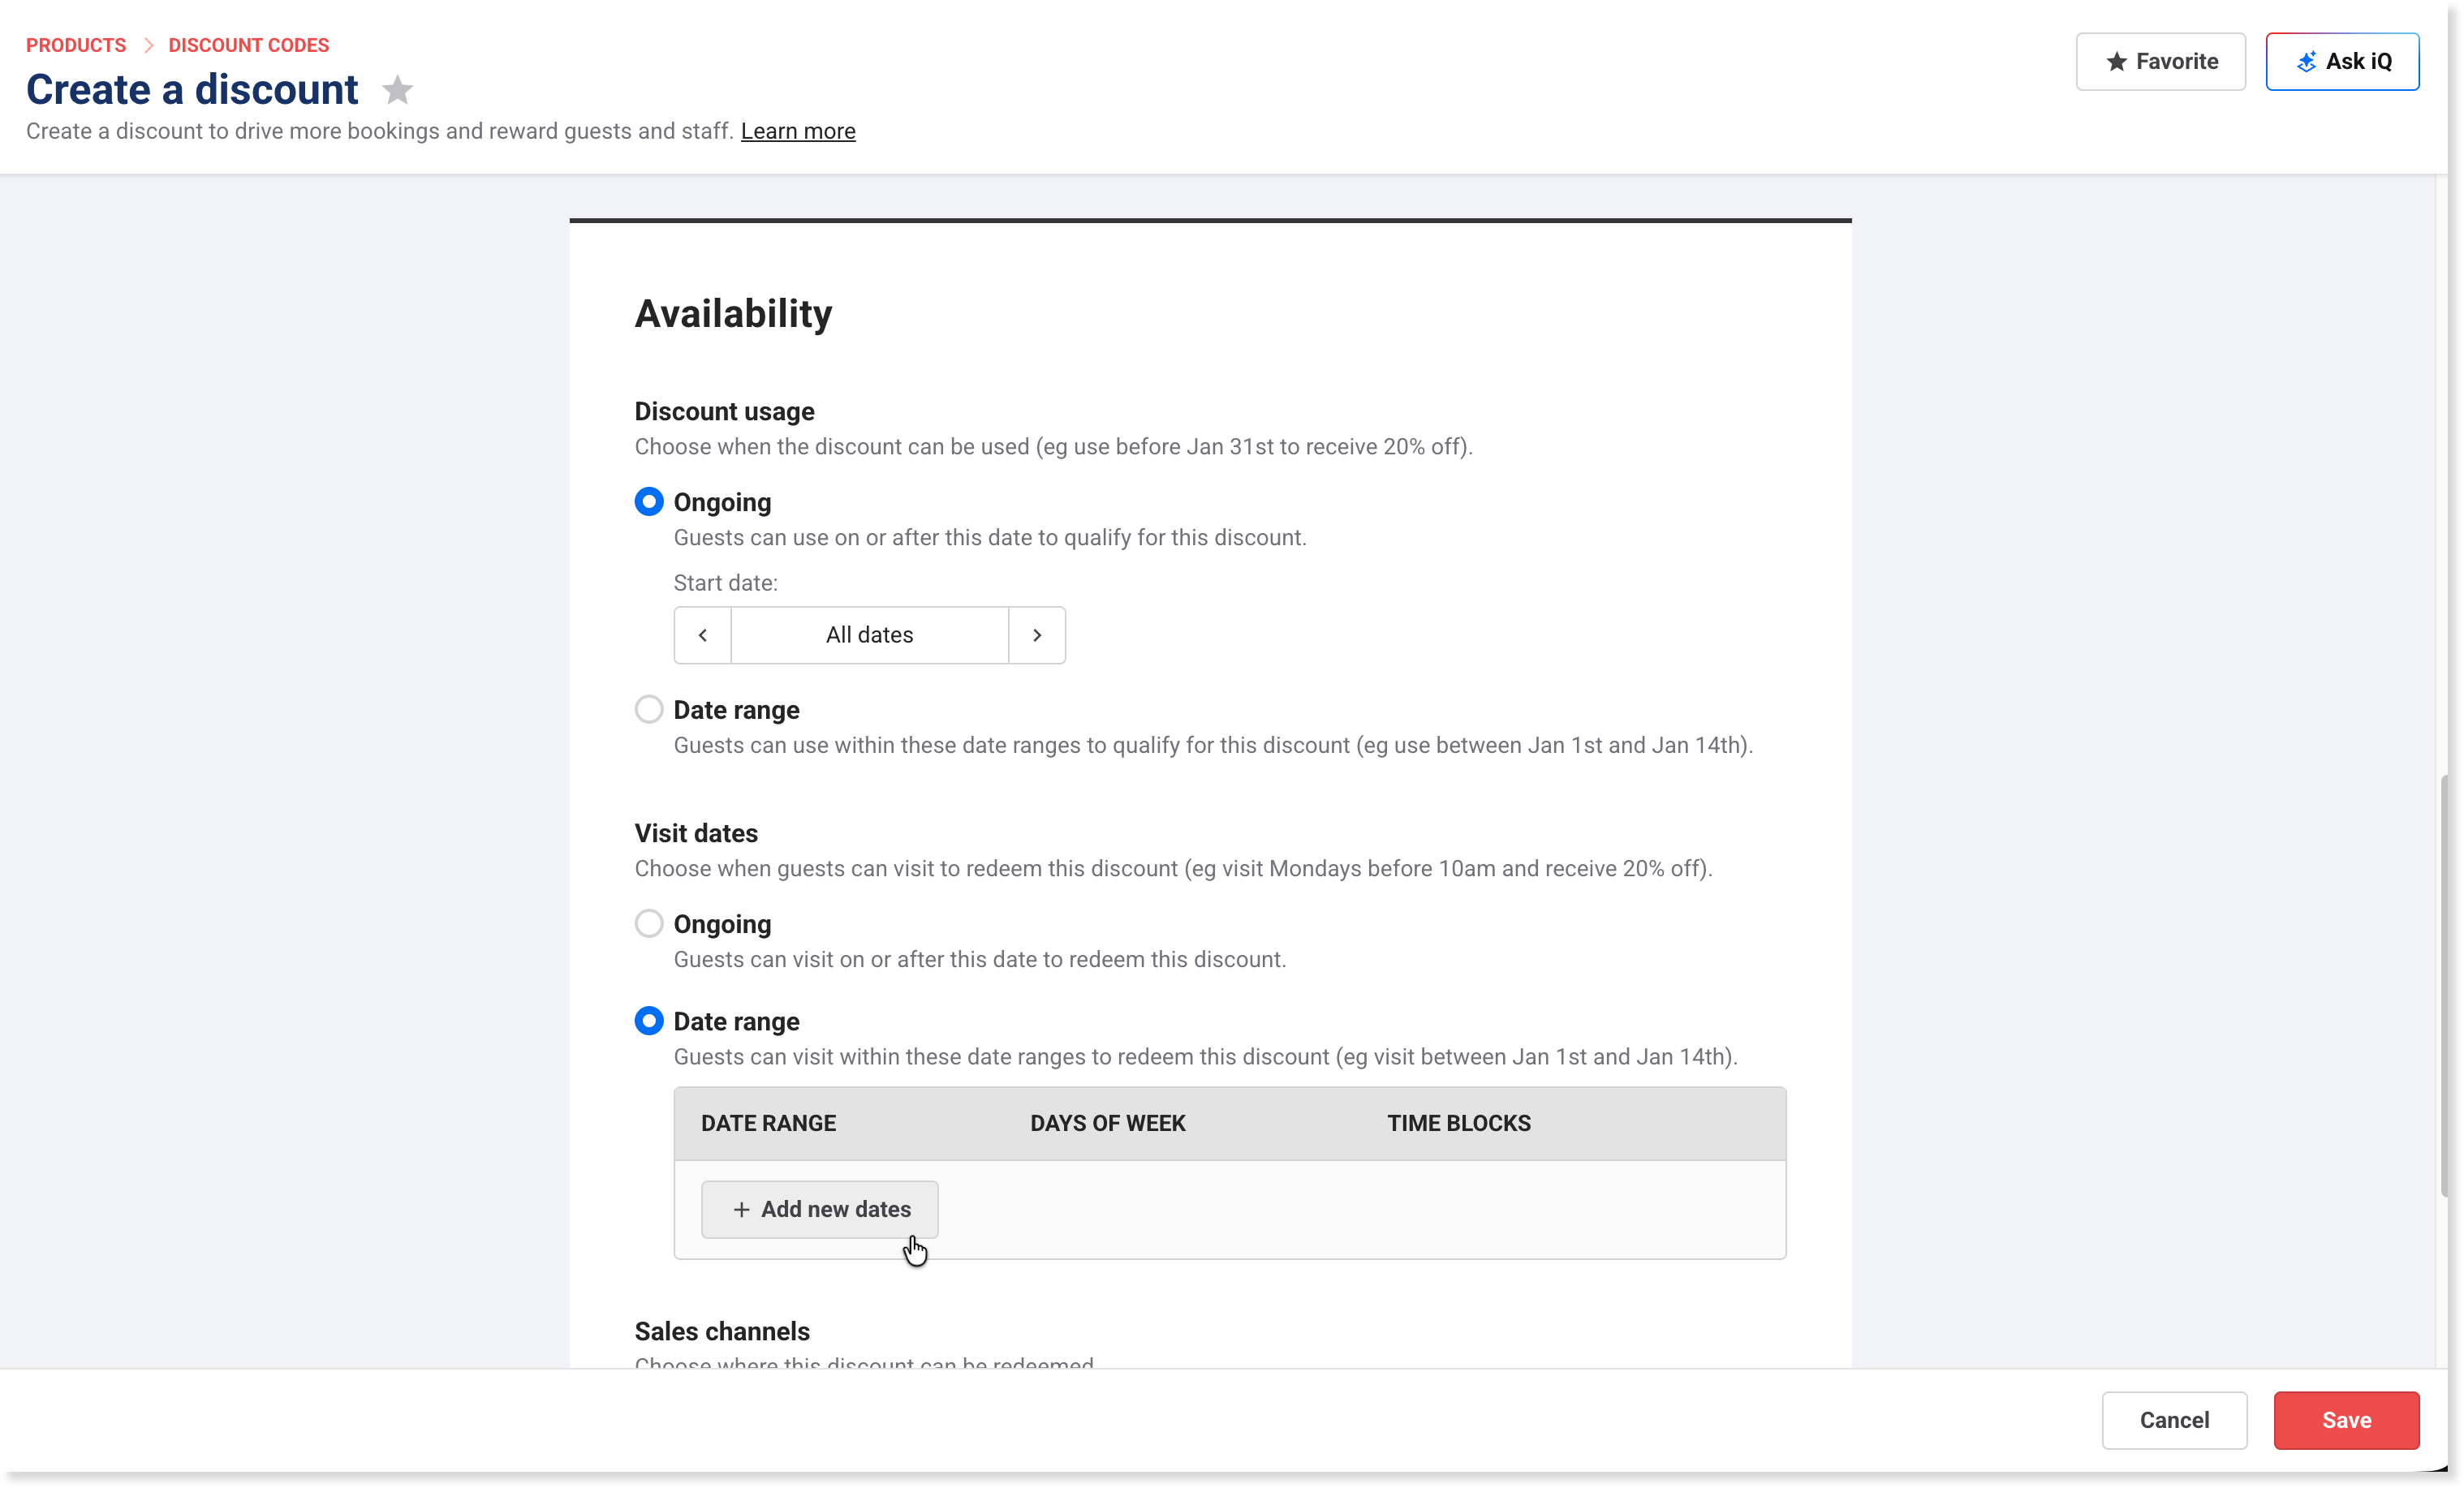
Add date ranges
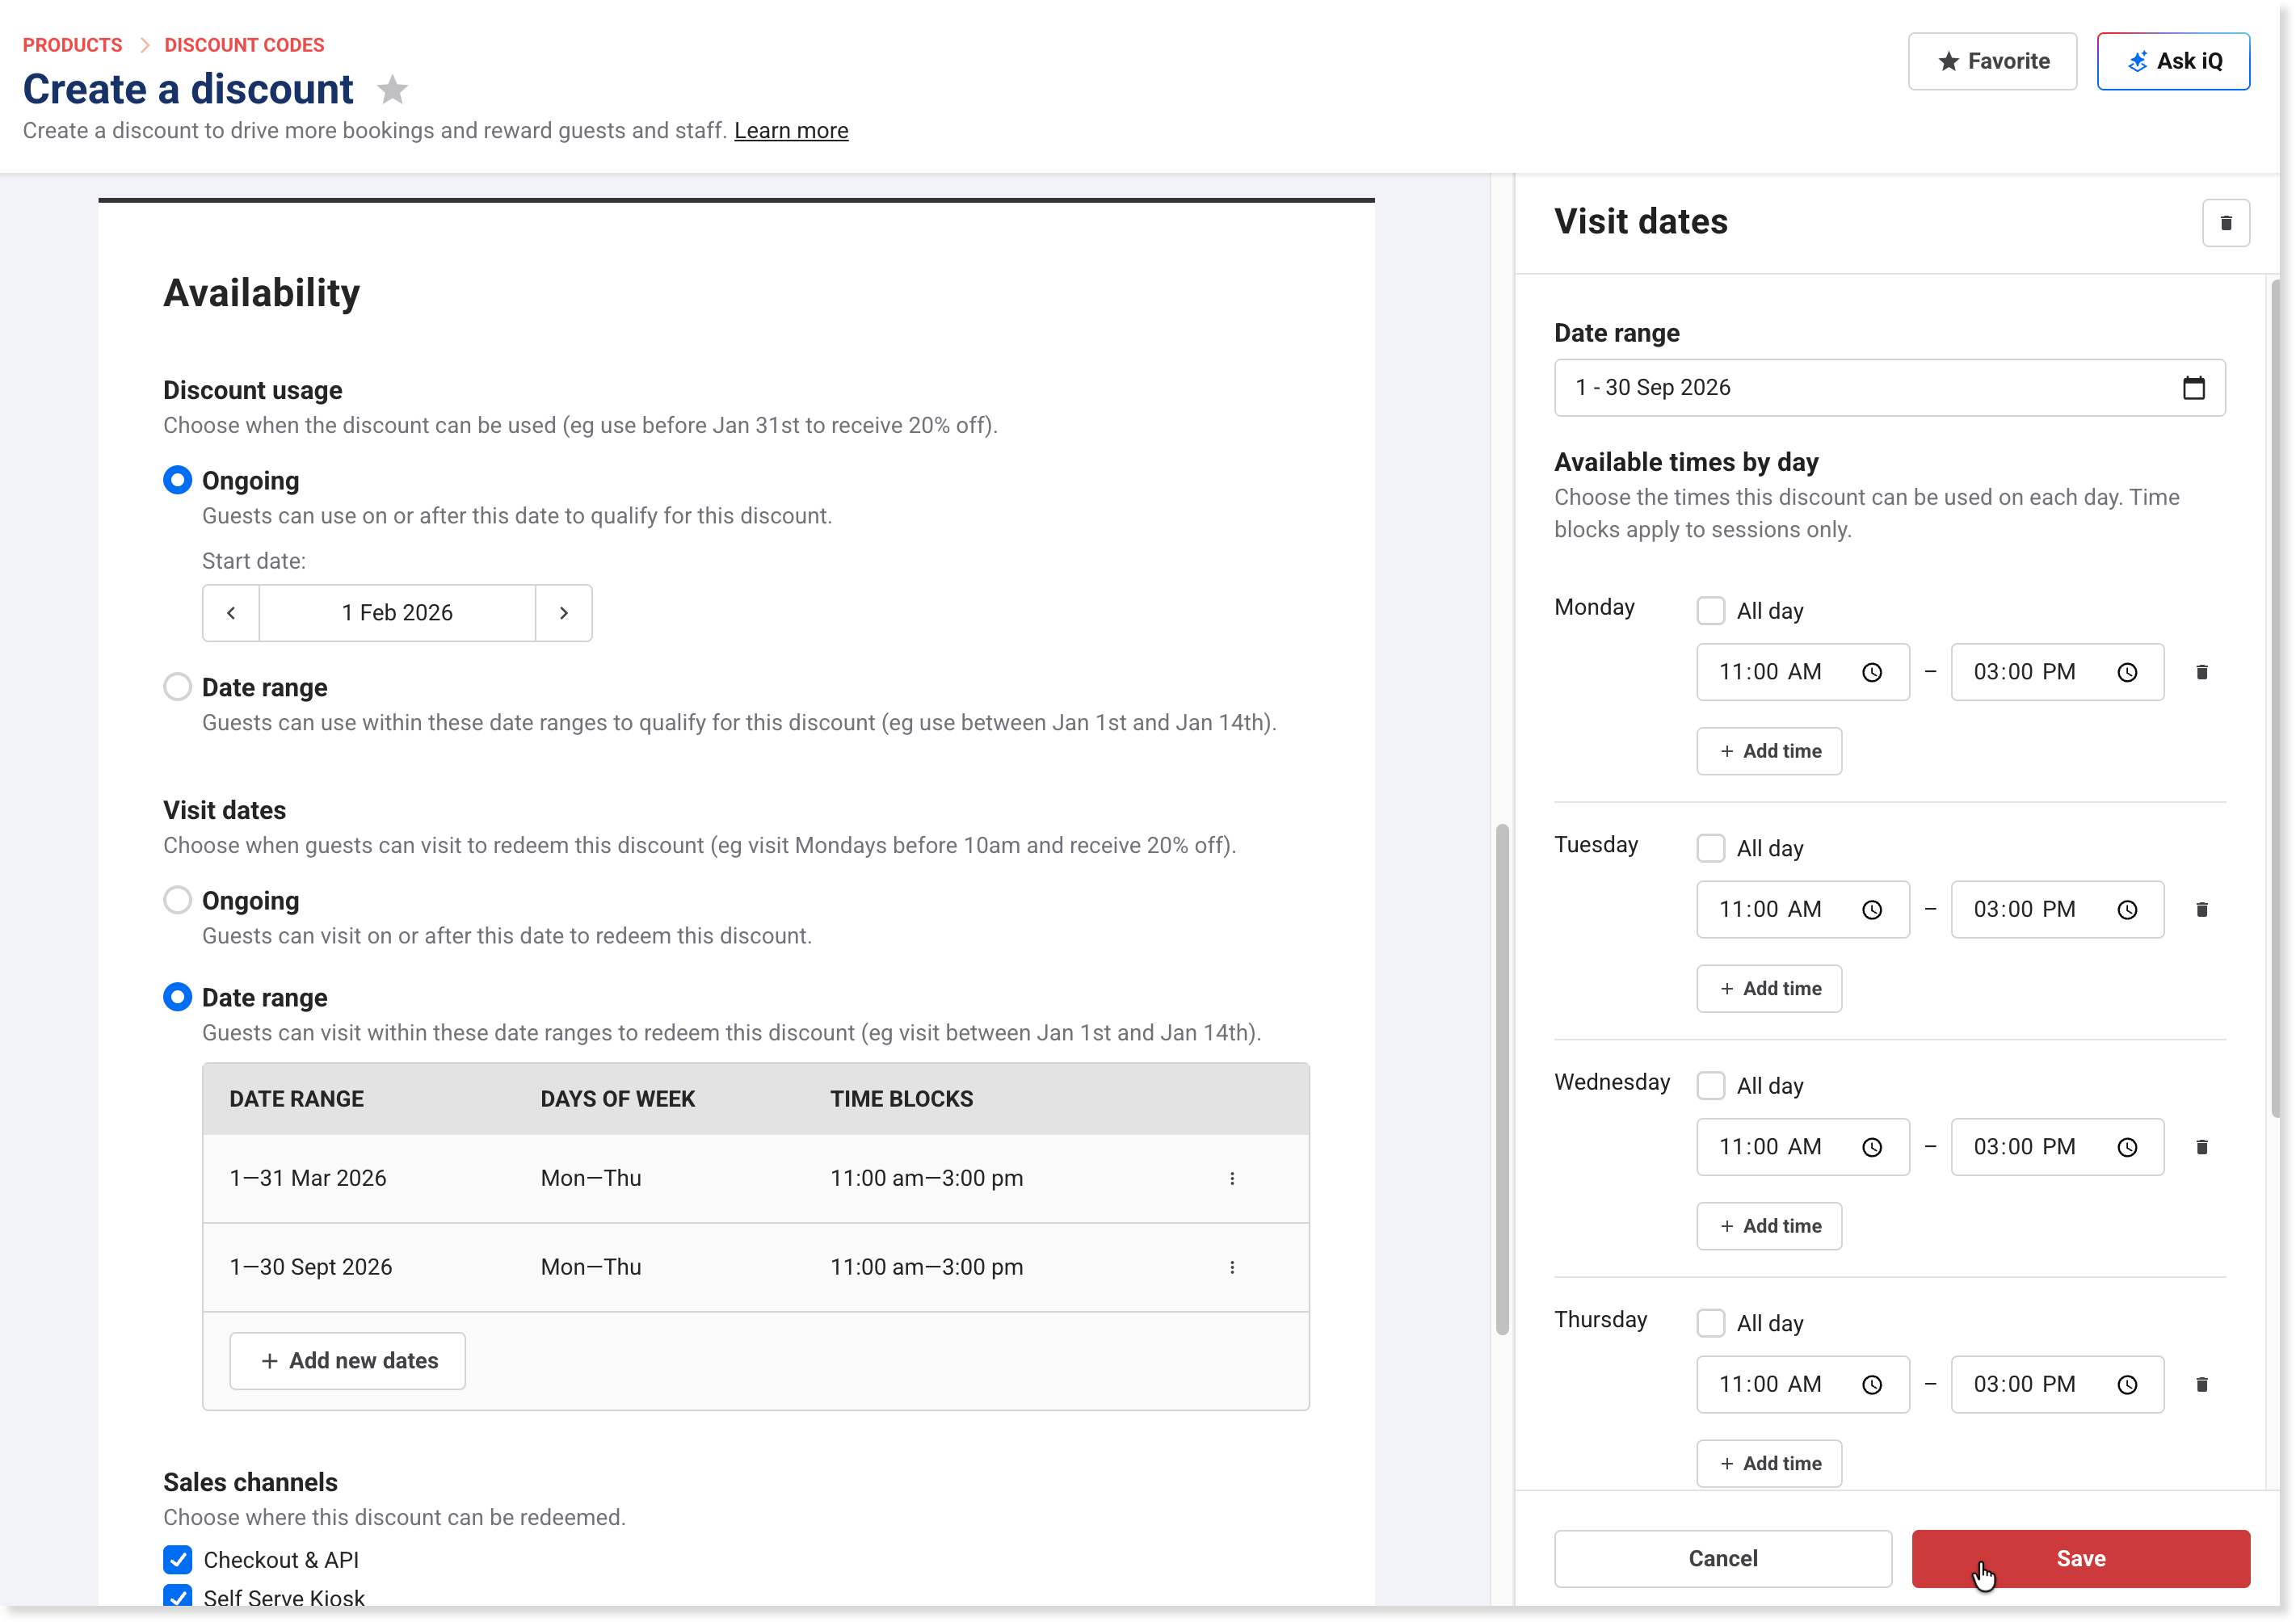
When Date range is selected, you can build up as many date ranges as you need — each with its own days and optional time windows. To add a range, select Add new dates, then:
Set the Date range — the start and end dates for this period.
Select the Days of week when the discount applies within that range.
(Optional) To restrict by time of day, uncheck All day for each relevant day and select + Add time to add one or more time windows. Time windows apply to sessions only.
Select Save to confirm the range.
Select + Add new dates again to add another range. Repeat until you've covered all the date ranges, and any times you need.
Example
To run a Buy 2, Get 1 Free offer on jump passes across two separate periods:
Setting | |
|---|---|
Discount usage | Ongoing from 1 Feb |
Visit dates — range 1 | 1 Mar–31 Mar, Mon–Thu, 11 AM–3 PM |
Visit dates — range 2 | 1 Sep–30 Sep, Mon–Thu, 11 AM–3 PM |
With this setup, guests qualify for Buy 2, Get 1 Free on jump passes when they visit Monday–Thursday between 11 AM and 3 PM in March or September.
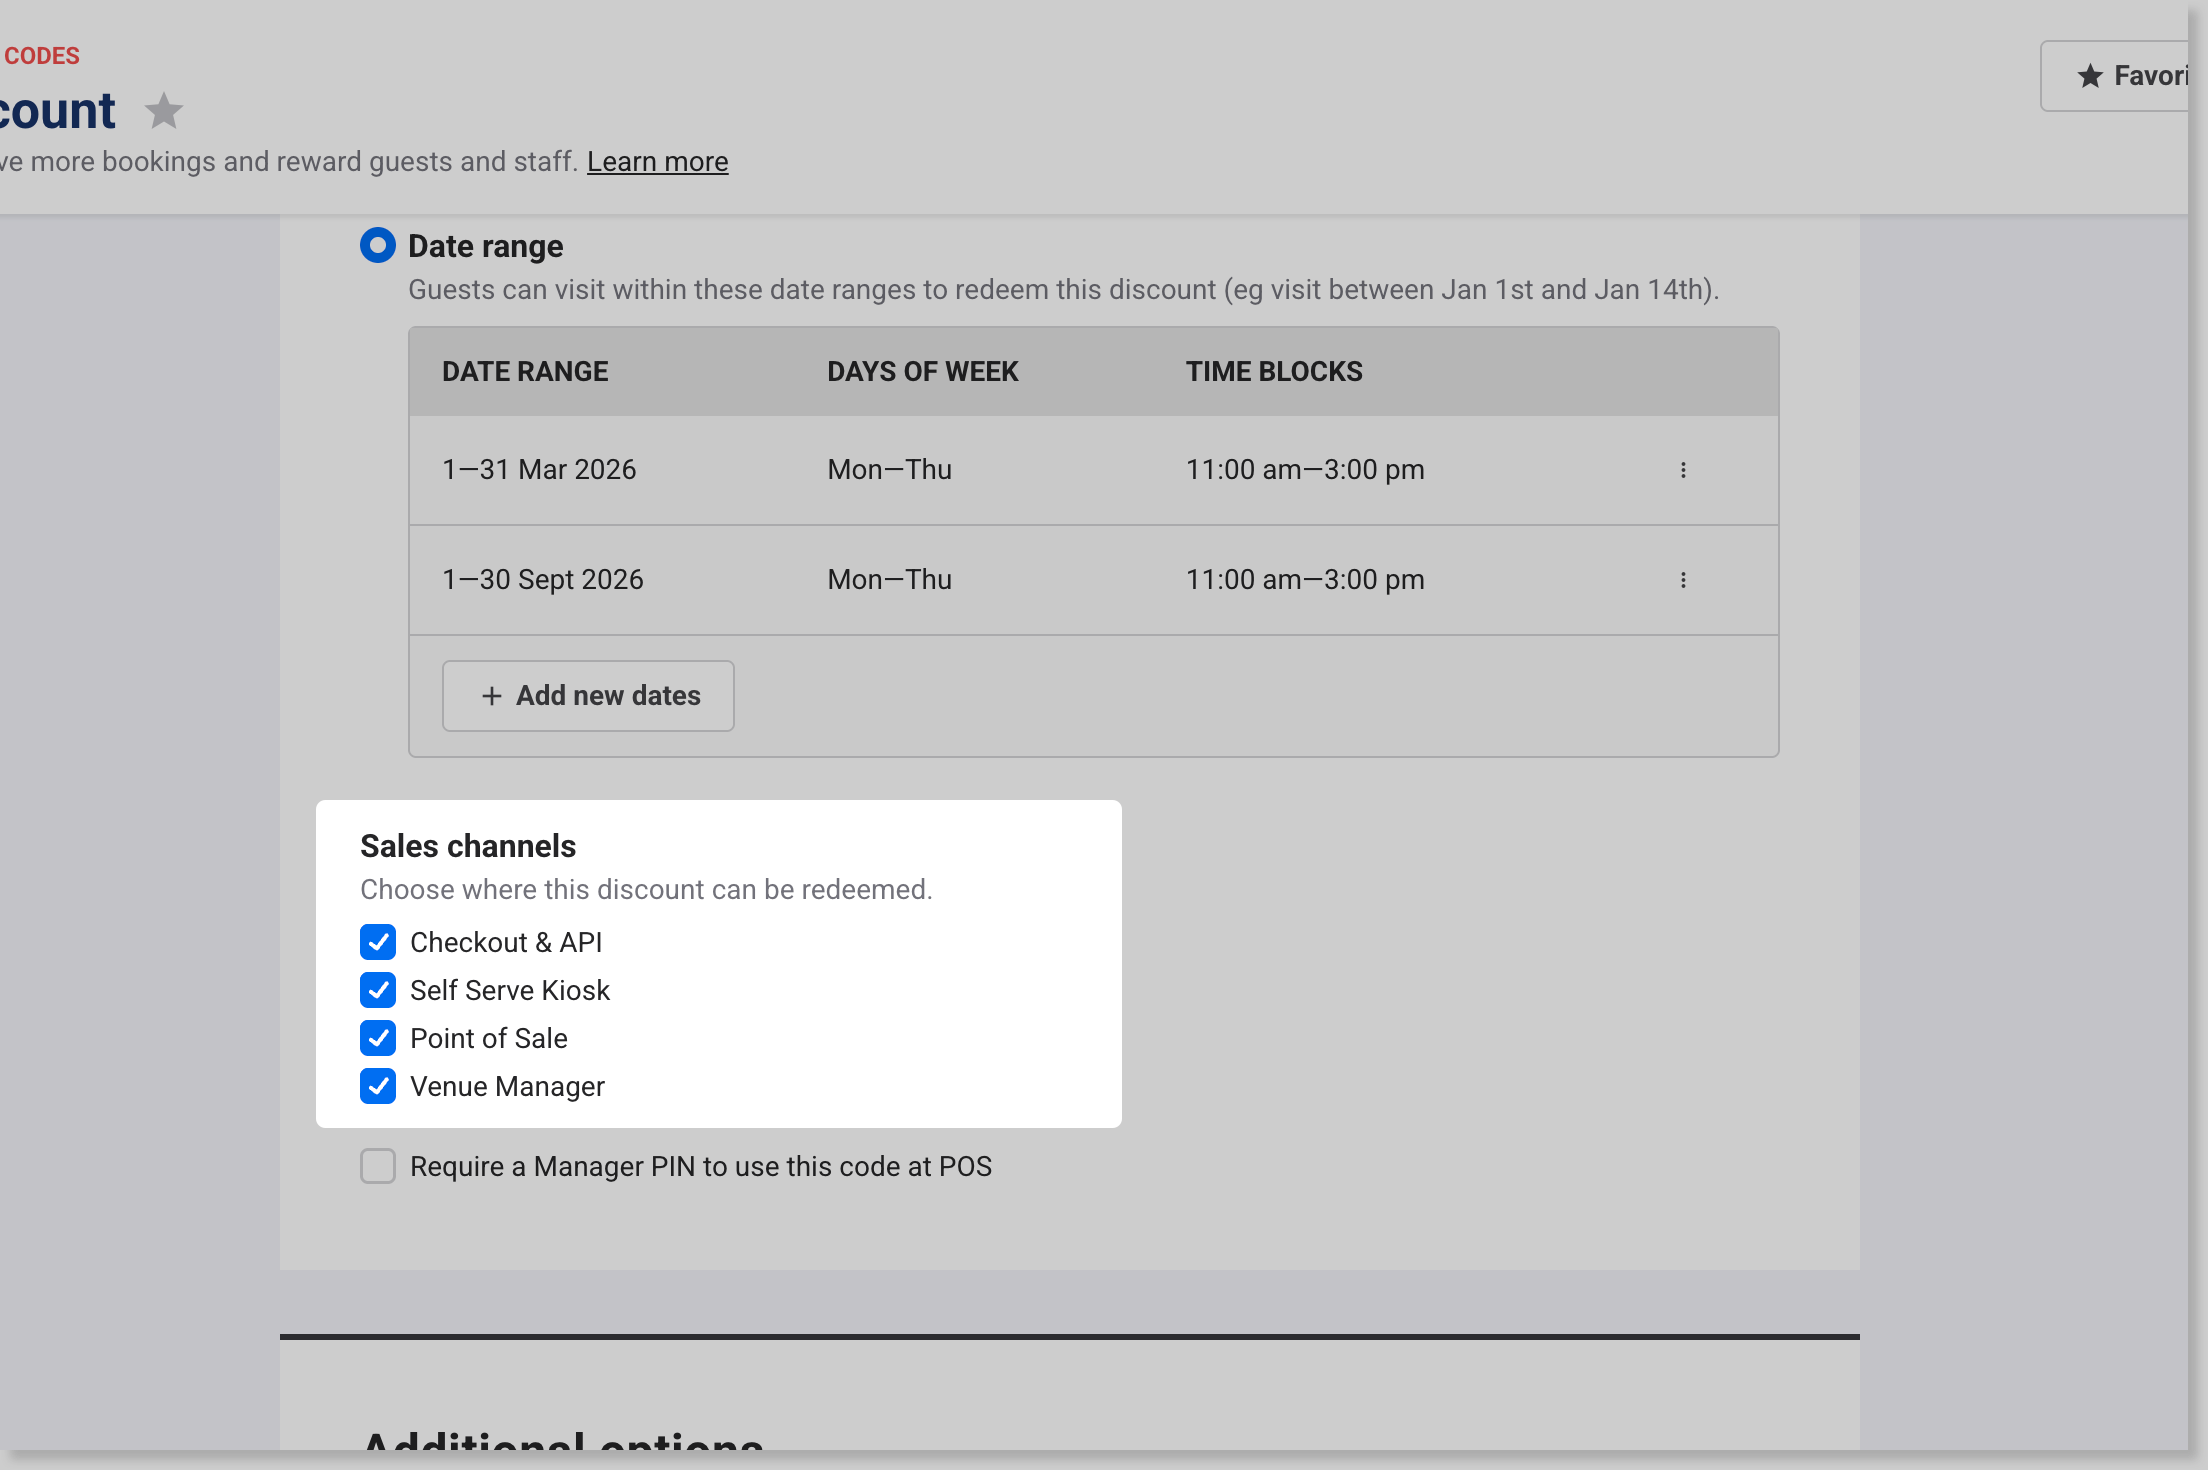
Sales channels
Use Sales channels to choose where the discount can be redeemed.
Checkout & API
Self-serve kiosk
POS
Venue Manager
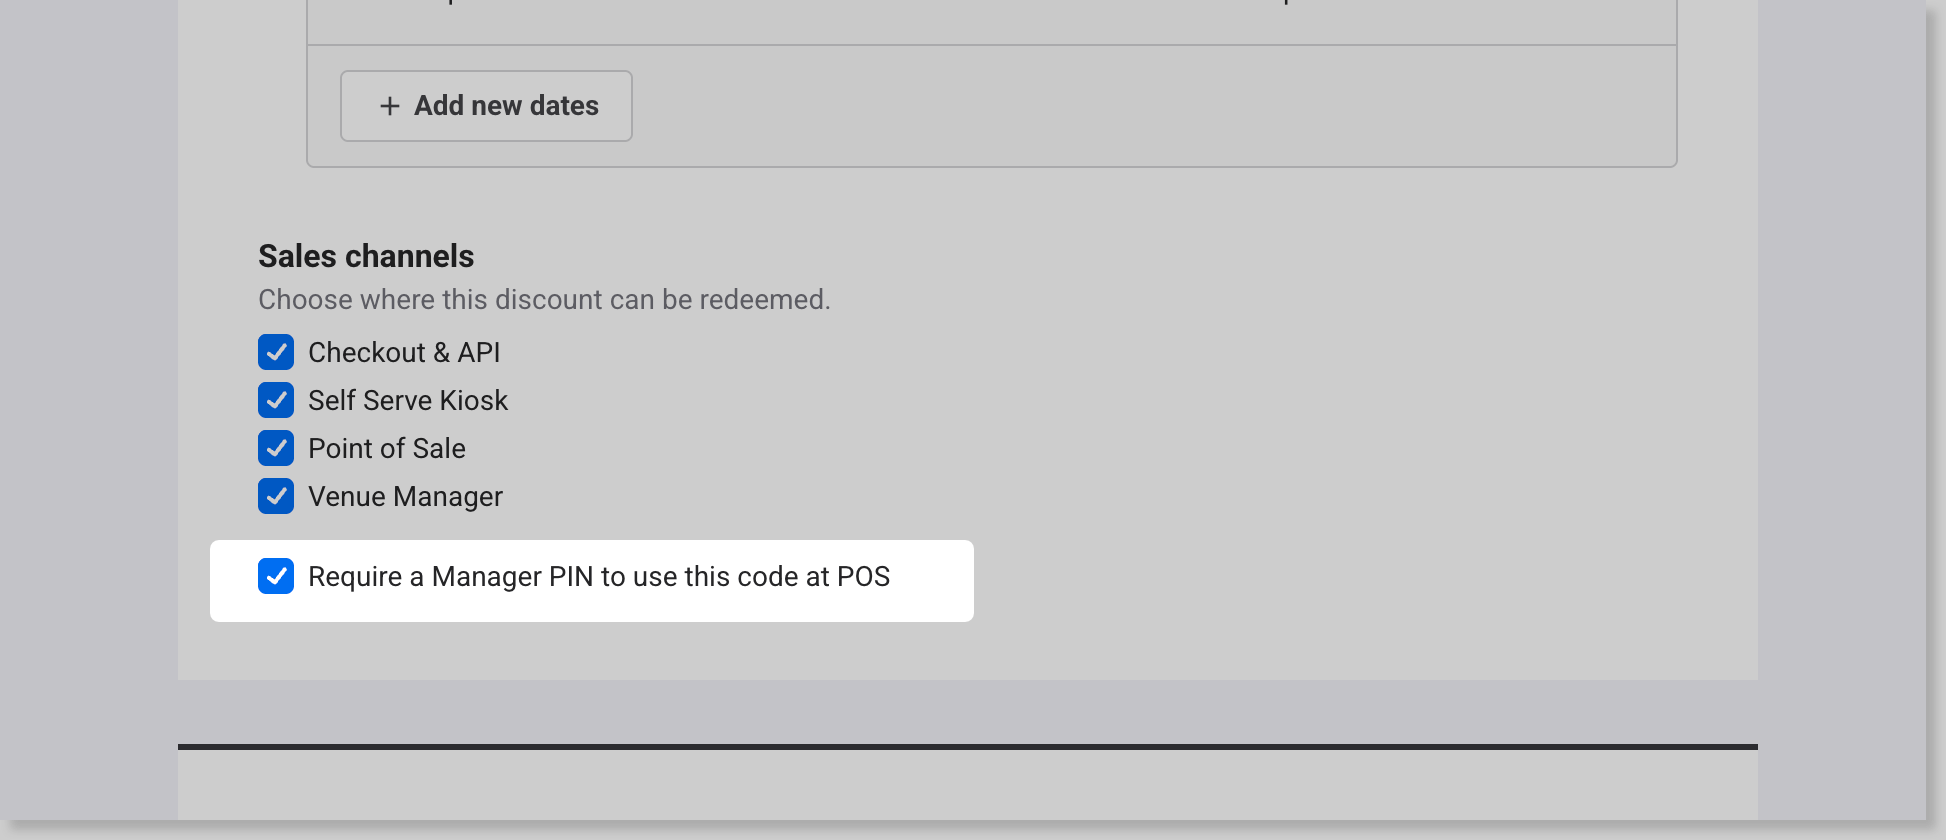
Require a manager PIN
Select Require a manager PIN to use this code at POS to require manager approval before the discount can be applied at POS.
Additional options
Apply limits to control how often discount codes can be used, to keep them aligned with your marketing goals and prevent overuse.
You can create urgency by capping redemptions, such as making the code available only to the first 10 guests who use it.
Buy & Get usage limits work differently
Instead of counting each discounted item individually, the entire "Get" portion of the offer is treated as a single usage.
For example, with a "Buy 4, Get 2 at 50% off" offer and a 1x usage limit:
Guest #1 buys 4 items and gets 2 at 50% off — that's 1 use.
Guest #2 buys 8 items — they could qualify for 4 at 50% off, but the 1x limit caps the discount to just 2 items at 50% off
Limit discount uses
Select Limit discount uses to set a cap on how many times the code can be used. Usage limits must be configured if you want the discount to apply to more than one eligible product in a single checkout. Without a usage limit, the discount applies to only one product in the cart by default.
To limit how many times the discount can be used, select Limit discount uses, then set the number of uses and select a limit type.
Per code
Sets how many times the code can be used across your entire guest base. A “Buy 4, get 1 free” jump pass code with a limit of 200 means the offer can be redeemed 200 times in total.
The discount applies once per booking.
Select Include booking rule to set the maximum number of booking items the discount can apply to within a single booking. Enter the number of uses — each qualifying item in the booking counts as one use toward this limit.
Select Allow multiple uses in same booking to let guests use the same code more than once within a single booking.
Per code per day
Works like per code, but limits the number of times the code can be used each day, within any booking date restrictions you’ve set.
Per guest
Limits each guest to using the code once, preventing the same guest from using it more than once.
Select Include booking rule to set the maximum number of times a guest can use the code for selected products in a single booking.
For each selected product (regardless of quantity purchased)
Every booking transaction counts as one use of the code when applied, regardless of how many items are bought.
A “Buy 2, get 1 free” offer on jump passes — a group buying 4 eligible tickets at once counts as 1 of the 10 uses.
Select Codes can only be used once to restrict the code to a single use per guest across all time.
Across selected products (quantity purchased counts towards uses)
Each qualifying booking item in a booking is counted as one use.
A “Buy 3, get 1 free” offer with a 5-use limit — buying 3 eligible tickets in one transaction counts as 3 of the 5 uses.
Limit to specific guest segments
Restrict who can redeem this discount by selecting one or more guest segments. The discount only applies for guests who match the selected segments and whose identity has been captured at the time of purchase. See Create and manage guest segments.
Set a maximum discount per booking
Select Set a maximum discount per booking to cap the total value of the Get discount applied per booking. This limits the total saving across all qualifying items in a single transaction.
Check and save the discount
Confirm that the discount type, availability, and additional options are set up correctly before saving. Once everything is in order, Save the discount to activate it for your guests.
Learn more
Learn how to apply a discount code to a booking in Venue Manager, or redeem the discount code at POS.
Guests can also redeem the discount for qualifying items when purchasing them via online checkouts.