Party packages offer a flexible, guest-friendly way to sell bundled experiences like food, drinks, attractions and merchandise in one product that's easy to manage. You can tailor pricing per guest or per party, include fixed items, or let guests choose from various options, such as different pizza types or drinks.
Party packages with customizable inclusions save time, boost guest experience, increase spend per booking and simplify operations.
The permission required to create or duplicate a party package is Can create products. To edit one later, staff also need Can edit products. The administrator and manager roles have both enabled by default.
What you can do
Feature | What it means for you |
|---|---|
Pricing that fits the party | Set prices per guest or per party. Pricing displays clearly online to reduce confusion. |
Automatic pricing with price rules | Reward early bookers, charge a premium for peak slots like Saturday afternoons or price each party slot by how full it is. Apply an early bird, time-based or capacity-based price rule to your party tickets and pricing follows the rule automatically. |
Guest customization | Let guests choose between inclusion options like meal types or party favors, or offer different variations like Classic and Premium. |
Party room choice | Let guests choose their party room when they book, from an included party table to a premium room for an extra cost. Guest-selected resources are in beta. To learn more, see the guide Let guests choose their party room and charge extra for premium choices. |
Streamlined operations | Automate the bundling of food, drinks, and more for consistent service and fewer manual steps. |
Revenue clarity | Party ticket revenue and bundled items report separately using GL codes for better financial insights. |
Built-in buffer time | Add transition time after parties on single-booking resources (eg party rooms) and on multi-booking resources when booked out by a party package to ensure smooth party turnover and prep. Buffers appear on the daily capacity view to prevent back-to-backs and early arrivals. |
Where you can sell party packages
Party packages can be sold and managed through:
Progressive online checkouts (with guest customization)
Venue Manager (eg phone or in-person bookings)
Online accounts (guests can update their booking and guest choices)
From POS, staff can update party bookings at check-in or during the event (eg add food and drinks or change selections). They can't sell a new party package at POS.
How guests choose their inclusions
When you add more than one stock product variation to an inclusion, guests choose their preference at checkout. This lets you offer more personalized experiences without creating extra variations.
Example: Add both Cheese Pizza and Pepperoni Pizza to a party package, or Soda and Juice. Guests choose their preference during checkout, with no extra product setup required.
Options in the same inclusion do not have to cost the same. You can set a base price for the inclusion and charge extra for the options that cost you more. To learn more, see the guide Let guests upgrade their package inclusions for an extra charge.

What happens if guests skip selections?
By default, ROLLER applies the first option listed in the product setup. When you disable this, skipped choices stay blank and trigger activity center alerts, so staff can follow up with the guest to confirm details, upsell extras or personalize the order.
You can turn off auto-fill when guests skip inclusions during online booking.
To update this setting: From Venue Manager, go to Progressive checkouts > Settings > Advanced and turn off Auto-select skipped inclusions.

Step 1: Create a new party package
From Venue Manager, go to Products > Create product.
Select Party package.
The party package product settings open, ready to customize.
You don’t always need to start from scratch. You can duplicate an existing package or party package and change what you need. To learn more, see the guide Create and manage products.
Step 2: Add the content
Enter the basic product details:
Name: What guests and staff will see
Short description: Max 150 characters for checkout preview
Detailed description: Appears under a "Learn more" link in checkout
Image: JPG, PNG or WebP in a 5:3 ratio, up to 5 MB
Tags: Add tags to help you organize products in checkouts and POS
Party name: Guests enter a name for the party (eg “Ava’s 7th Birthday”)
Guest list (optional): Allow guests to manage their invite list from their online account

Generate a description and image with AI (optional)
You can generate a description and a product image from the party package details, then edit whatever you generate before saving. This is useful when you’re setting up a new party package and don’t have copy or artwork ready.
AI-generated descriptions and images are available on request. To enable this, contact your customer success manager or the support team.
The AI writes the description from the package name and each inclusion’s name, quantity and description. For the best result, add your variations and inclusions in Step 4 first, then generate. The more the AI has to work with, the better the result.
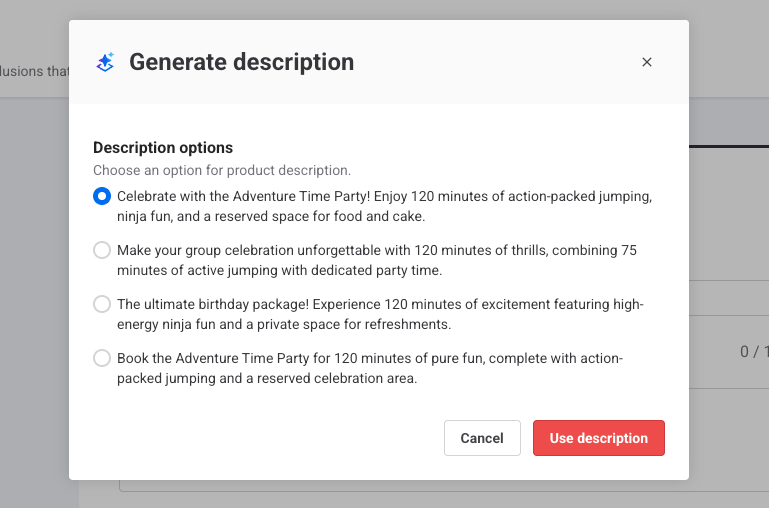
To generate a description:
Enter a Name for the package, then select Write it for me next to the Description or Detailed description field. If the field already has text, the button is Improve it for me.
Choose one of the description options.
Select Use description.
To generate an image:
Select the Image checkbox, then select Create one for me.
Write a prompt to guide the AI (optional), then choose an image style: Graphic with text, Realistic or Illustration.
Select Generate images. If none of them work, select Regenerate images for more options.
Once you’ve chosen an image, select Use image.
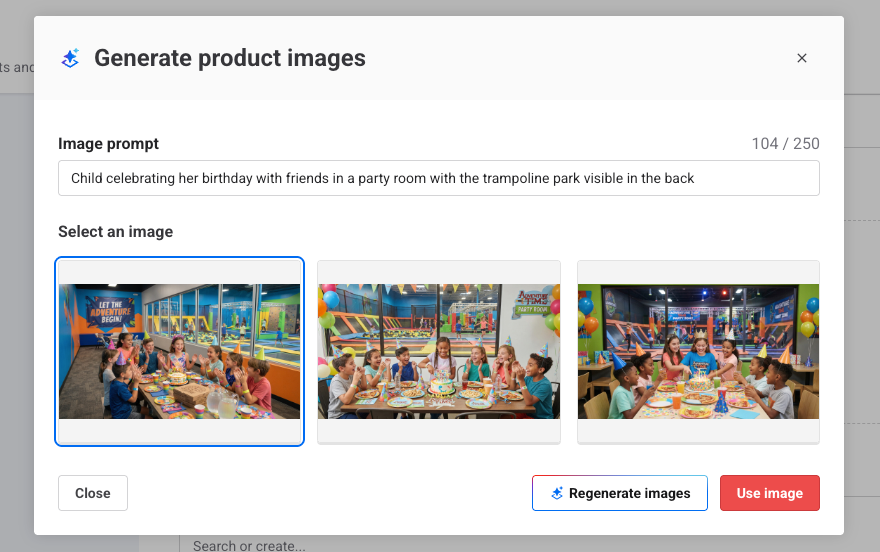
Create the description first. The image generation uses the product details you’ve entered, so it produces a better result when there’s a description to work from.
Step 3: Create the party program
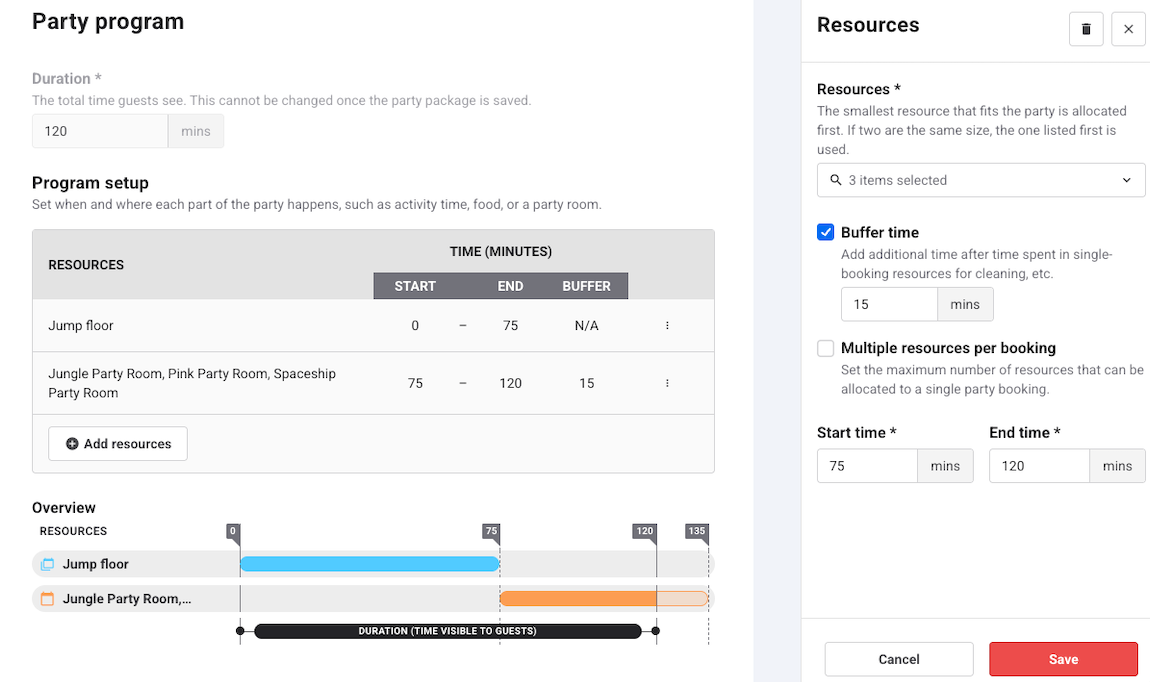
The party program is your party itinerary. It sets when and where each part of the party happens, such as time on the main floor followed by cake in a party room.
If your venue is in the guest-selected resources beta, you’ll see Resource type when you select Add resources. To learn more, see the guide Let guests choose their party room and charge extra for premium choices.
In the Party program section, enter the Duration (eg 120 minutes). You can’t change it once the party package is saved.
Select Add resources to choose the Resources (eg Jump floor).
(Optional) Set a Buffer time, Multiple resources per booking, or Book out resources. The settings you see depend on the booking rule of the resources you picked. See Other party program options, later in this guide.
Enter a Start time and End time.
Select Save.
To add other areas of the venue, repeat steps 2 to 5. Each one appears as its own row in the Program setup table.
Each resource should be listed in its own row, in the order guests will use them.
If multiple resources are listed in one row, ROLLER will automatically select the smallest-capacity resource that can accommodate the guest numbers booked. If capacities are equal, the resources will be used in the order listed.
Other party program options
These settings control how long a room stays blocked after a party and how much of the venue one party can use. Which ones you see in the Resources flyout depends on the booking rule of the resources you pick.
Setting | What it does |
|---|---|
Buffer time | Adds time after the party for cleanup (eg 15 minutes for a party room). Guests don’t see it, and the resource stays unavailable for other bookings until the buffer ends. It shows on the daily capacity view. Available for single bookings resources, and for multiple bookings resources once Book out resources is selected. |
Book out resources | Books out a whole multiple bookings resource (eg a trampoline court) for the party, so no other bookings can use it at the same time. Booked-out resources show in dark blue on the daily capacity view. |
Multiple resources per booking | Sets how many single bookings resources (eg party rooms) one party can use. Choose Auto to let the system allocate as many as the party needs, or a number up to the number of resources you selected (eg 1, 2 or 3 when you’ve selected three party rooms). |
The Overview timeline under Program setup shows when each resource is in use, including buffer time.
To change or remove a row, select the options menu (3 dots) for the row, then select Edit or Delete.
Step 4: Create party package variations
Variations let you offer different types of parties (eg Classic, Premium, Additional Guest) within the same party package product.
Select the interactive hotspots below to learn how to create a party package variation.
Scroll to the Party package details
Your first variation is already open, with the placeholder name General admission. In Name, enter the variation name. This name is shown in the online checkout. To add more variations, select Add variation.
Choose pricing:
Per guest (default): minimum and maximum guest count
Per party: one price for the whole group
If you switch between per-guest and per-party package pricing, remember to manually update all prices and quantities included, as these do not automatically adjust.
Once you save your party package, per-guest or per-party package pricing can't be changed.
Select Add item to include products (food, drinks, merch, etc). You can bundle together as many stock items, add-ons, fixed-price wallets and cashless cards as you want for your party package. The inclusions can't cost more than the party ticket price, or you won't be able to save the variation.
If you add one item the inclusion is fixed
If you want to let guests choose items, select Option set and add multiple products to the inclusion (eg “Cheese Pizza” + “Pepperoni Pizza”). At check-in, staff can see each guest's selections and update them if needed.
In the side panel, set the Price per item and quantity if needed. The price per item applies to every option in the inclusion.
For per-guest pricing, specify the number of items per guest (eg 1 pizza for every 5 guests) and set rounding rules, or set a fixed number per package.
For per package pricing, specify the total number of items included.
To charge more for a premium inclusion option, such as a larger pizza, you can add an extra price to individual options in an option set. This is available on request. To learn more, see Let guests upgrade their package inclusions for an extra charge.
Select Save. The inclusions table updates with the selected options.
Tips
Select Add variation to add another.
Use Duplicate to quickly copy and edit variations.
Mark a variation as Required if it must always be included (eg Base Party is required if adding an additional guest variation).
When you require a variation, and the option to show minimum pricing on the checkout homepage is also selected in the specific checkout settings Options tab, it will display as the minimum pricing on checkout homepages.
When editing an existing party package to add a new variation, make sure you add the new ticket variation to its existing schedule. If you don't do this, the party package variation won't show up in online checkouts or Venue Manager.
Step 5: Add a price rule (optional)
A price rule prices this product by tier and applies the right tier automatically. What decides the tier depends on the rule type. Build the rule first in Products > Price rules, then apply it here.
Scroll to Price rule and select your rule from the drop-down. The Variations table gains a column for each of the rule's tiers.
Set a price for every ticket variation in every tier.
Select the checkout display checkbox below the Variations table if you want guests to see why the price changes. It does not change what they pay.
Save the product.
One rule per product. The same rule can be applied to as many products as you like. For the rule types available and how to build one, see Get started with price rules.
Keep in mind:
Price tiers apply to party tickets only. Inclusion prices (food, drinks, merch) stay the same across all tiers.
Tier prices need to cover the inclusions. If a tier price is too low, Venue Manager shows the lowest price you can set, and you can't save the product until every tier price meets it.
Quantity-based price rules aren't supported on party packages.
Capacity-based rules price each party slot off the fullest resource in the party program, which is often a party room rather than the main activity area. See Create a capacity-based price rule.
Step 6: Set the sales availability (optional)
Decide when the party package can start to be sold and when online sales stop.
Default: The party package is available immediately and can be purchased up to 1 hour before the session starts.
Sales start: If you want to begin sales on a different date or hour, set it here.
Sales cutoff: Set how many minutes, hours or days before each booking starts to stop selling online. This won’t affect sales through POS or Venue Manager.
You still need to create a schedule for dates and times a party or event is available to book. Sales availability controls when the product is available to sell, while schedules control the dates and times the sessions are available for guests to purchase within the sales availability window.
Step 7: Additional options
Customize your party packages with these optional features.
Setting | Description |
|---|---|
Add-ons | Offer additional products, add-ons or stock as upsells for after guests add the party package to their cart online. Add standard add-ons (always available) or restricted ones (available only during specific times using stock periods). Search for and select the add-on or stock products from the drop-down menus, then select Apply. If the add-on is a session, use Pre-select session time to set which session guests see first. Next available session suggests the next session after the party finishes, so guests don't book both at the same time. Same as initial session suggests the same time. You can also enter a minute buffer between sessions. |
Alternative printer | Print wristbands or stickers for guests when they check in to a party at POS. Two checkboxes are available:
|
Booking reminder | Set up automated booking reminder emails to send to the booking holder. The email includes booking details, product instructions, and a reminder to sign the waiver (when waivers are required), complete with a link to the booking's unique waiver. |
Confirmation required | Decide if bookings with this product are labeled with an unconfirmed booking status in ROLLER until manually confirmed by staff. |
Deposit | Allow guests to make a partial payment when booking this product by setting a deposit as either a percentage of the total cost or a fixed amount. |
Display availability as remaining resources | Show availability in online checkout as remaining resources (eg party rooms) instead of remaining tickets. This option appears when your party program uses a single-booking resource. |
Forms | Add custom forms for additional details like dietary restrictions or preferences for party bookings. Guests will be prompted to complete the form post purchase in online checkouts. Select and apply the form from the drop-down menu. |
Instructions | Provide specific instructions for bookings including this product which display post-purchase in online checkouts, order confirmation emails and booking reminder emails. |
Itemized tickets | You may want to enable this so that party guests can redeem each ticket individually. |
Override tax | Set a specific tax rate for the party package, different from the default rate set up in venue settings. This option appears when your venue has more than one tax rate. |
Purchase limits | Set minimum and maximum purchase limits across all ticket variations combined. |
Receipts show inclusions | Display itemized party contents and inclusions on receipts. |
Reporting category | Assign products to appropriate reporting categories based on general ledger (GL) codes. This setting is visible if you've created reporting categories in Venue Manager. |
Terms and conditions | Add specific terms and conditions for this product. These will appear after your venue's terms and conditions for guests to agree to in online checkouts. |
Ticket holder captured | Ask for the names of each ticket holder during checkout. |
Waiver | If party guests must sign a waiver before participating, enable this option. Waivers are prompted post-checkout and once completed by guests, linked automatically to the booking. Guests are also encouraged to sign in booking confirmation, waiver reminder and booking reminder emails. |
Waiver reminder | Send a waiver reminder email to remind party booking holders to get their party guests to sign waivers (for party packages requiring waivers) at the ideal time before the booking. |
Save and go to schedules
When you've finished setting up the party package, select Save and go to schedules. Here, you'll schedule the days and times the sessions are available for guests to book.
If this is your first time creating schedules, you'll be asked to set up your operating hours.
Make sure you include all party ticket variations in the schedule. When variations aren't included in the schedule, they won't show up as options for guests to choose in online checkouts, nor will they show up in Venue Manager when creating a booking.
You can also access schedules from Venue Manager. Go to Products > Schedules.
Learn more about creating schedules
FAQs
Do I need to add a session pass or standard pass product to a party package?
No. A session-based party ticket is automatically added when creating party packages.
Can I add an additional guest ticket to a party package?
Yes. You can add an additional guest as a per-guest ticket variation (minimum 1 guest) to the base party package.
What items can I bundle together as single item inclusions or option sets in party packages?
You can bundle together as many stock items, add-ons, fixed-price wallets and cashless cards as you want for your party package.
Can I update party packages if a guest calls to change them after purchasing or last minute when they turn up at the venue?
Yes, you can modify booked party packages in Venue Manager. Open the booking and go to the Order tab to change inclusion options (eg t-shirt size or pizza type), edit party package variations booked or add extra items through the Availabilities tab.
From POS, staff can adjust guest numbers on per-guest pricing variations and change the options guests chose for their inclusions, within the limits set in the party package product configuration. Where an option carries an extra price, that amount is added to the booking balance when staff change the selection.